Hi guys, I slowly in the process of trying to upgrade my van, so my apologies for asking many questions.
I have read covkids upgrade instructions on wiki , but as I don't understand electrics that well, I have hit a brick wall with my knowledge. I am okay with the wiring to the new terminal block under the dash from the new terminal block by the battery, but how do you connect the lights, rad fan etc to the new terminal block. I want to upgrade the headlights and put the rad fan on an override switch and also take some load off the existing fuse box
Or am I missing something really obvious, thanks for any response
Wiki Dash wire upgrade,
Moderators: User administrators, Moderators
-
Budgie7
- Registered user
- Posts: 312
- Joined: 23 Aug 2012, 22:19
- 80-90 Mem No: 13816
- Location: Parbold lancs
Wiki Dash wire upgrade,
2.1 Caravelle Auto
-
CovKid

- Trader
- Posts: 8413
- Joined: 30 Apr 2006, 13:19
- 80-90 Mem No: 3529
- Location: Ralph - Coventry (Retired)
- Contact:
Re: Wiki Dash wire upgrade,
What year is your vehicle? Essentially those items get their power from the fusebox so its a case of identifying them and transferring them to new supply - with a new fuse for each. we can probably help you pinpoint which ones once we know what fusebox you have. Its actually a lot simpler than you might think.
Roller paint your camper at home: http://roller.epizy.com/55554/" onclick="window.open(this.href);return false; for MP4 download.
-
Budgie7
- Registered user
- Posts: 312
- Joined: 23 Aug 2012, 22:19
- 80-90 Mem No: 13816
- Location: Parbold lancs
Re: Wiki Dash wire upgrade,
Hi CovKid, my van is E reg, a 2.1 Caravelle. I would like to move the headlamps to the new supply (and upgrade)and put a separate switch to operate the cooling fan motor, many thanks Barry
2.1 Caravelle Auto
-
CovKid
- Trader
- Posts: 8413
- Joined: 30 Apr 2006, 13:19
- 80-90 Mem No: 3529
- Location: Ralph - Coventry (Retired)
- Contact:
Re: Wiki Dash wire upgrade,
Also using relays for headlights yes?
I also have a seperate fan switch so I can overide the thermostat switch if need be but perhaps best to concentrate on headlights first. I have the earlier fusebox but I'm sure I can work it out for you as principles are the same for both. If you use relays the load is removed from lighting switch and transferred to new cable, even though operation of lights remains the same. You also get significantly brighter lights obviously.
I also have a seperate fan switch so I can overide the thermostat switch if need be but perhaps best to concentrate on headlights first. I have the earlier fusebox but I'm sure I can work it out for you as principles are the same for both. If you use relays the load is removed from lighting switch and transferred to new cable, even though operation of lights remains the same. You also get significantly brighter lights obviously.
Roller paint your camper at home: http://roller.epizy.com/55554/" onclick="window.open(this.href);return false; for MP4 download.
-
CovKid
- Trader
- Posts: 8413
- Joined: 30 Apr 2006, 13:19
- 80-90 Mem No: 3529
- Location: Ralph - Coventry (Retired)
- Contact:
Re: Wiki Dash wire upgrade,
Ok, needs a couple of hours this evening to suss out the later fusebox but should be simple enough.
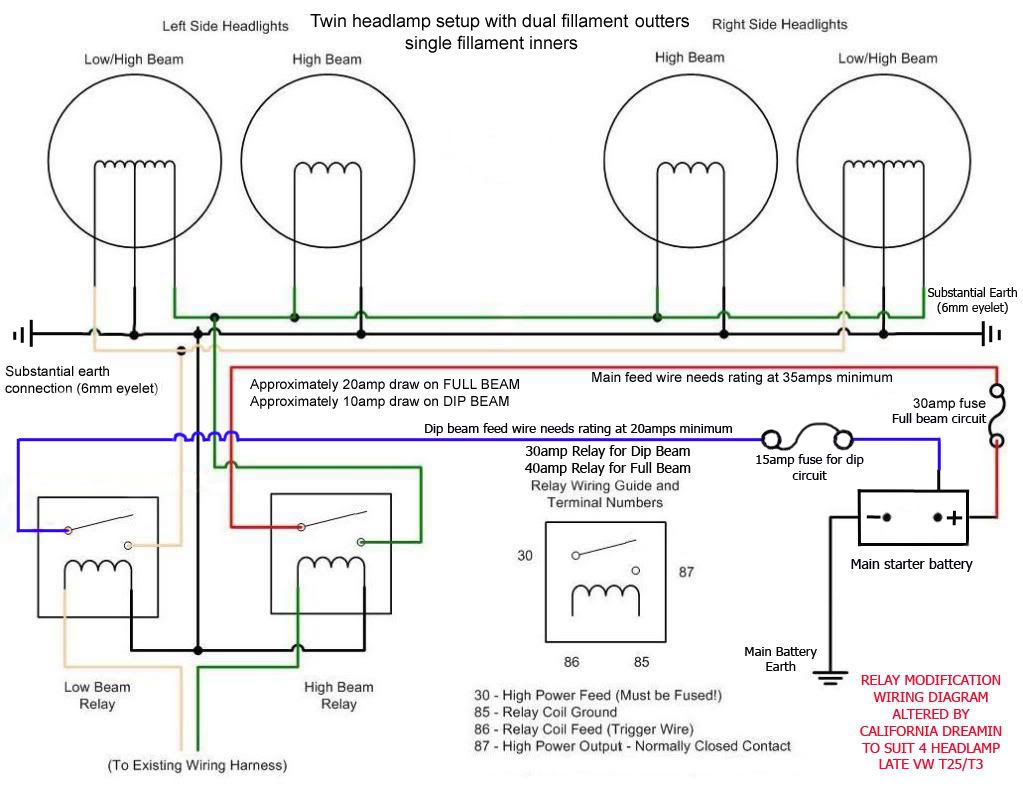
Diagram below suggests if you wanted to say, put the fan on the new cable (we can add in a switch later), all you'd have to do is remove cable from fuse 1 in present fuse box that goes to fan circuit and connect to new power cable via a 30amp fuse. A mini fusebox might be your best bet - say a 4-way one. I used in-line fuses on mine.
This is pretty much what Martin (California Dreaming) didn't particularly want to get into but a photo of connectors at back of fuses would be good I suppose. However, this diagram will tell you which fuses relate to headlights.
Last edited by CovKid on 23 Mar 2015, 10:31, edited 2 times in total.
Roller paint your camper at home: http://roller.epizy.com/55554/" onclick="window.open(this.href);return false; for MP4 download.
-
CovKid
- Trader
- Posts: 8413
- Joined: 30 Apr 2006, 13:19
- 80-90 Mem No: 3529
- Location: Ralph - Coventry (Retired)
- Contact:
Re: Wiki Dash wire upgrade,
You can get the four-pin relays most places. Fortunately relays are marked with numbers to make things easier so all we have to do is work out what goes where:
Firstly, disconnect battery.
1) Basically if you remove front grill, the yellow and white wires from headlamps are the dip/full wires. Follow them - these normally go through some rubber conduit, inside behind dash, and then to fusebox. These two wires need to be relocated to the relays. You should be able to follow where they go. These can be unplugged at fusebox and moved to terminal 87a on each relay.
There may actually be four (ie one set for each headlight) but you can join say L and R dip together - either behind grill (ideally) or at relays.
2) Terminal 85 on both relays goes to earth - make sure the earth is as chunky as headlight cable. There should be space at headlight crowns or you could make a new earth terminal on body.
3) Relay terminal 30 goes to your brand new power line (with fuses) - blue and red wires in diagram below do same thing.
4) Then all you need to do (to make them work) is make up two lengths of wire (spades each end). One end will go to the (now free) terminal/s at fusebox that you unplugged in (1). The other end will go to terminal/s 86.
If it makes it easier, just do one relay at a time. Thats basically all there is to it. Principle applies to early or late fuseboxes. Others may wish to add additional notes but I'm not sure I can make it much simpler bar coming round and doing it for you.
If when its finished, you get dip on main and main on dipped, simply swap the wires that got to terminals 86. You may be able to mount relays alongside other relays in fusebox but for now, wire it all up and test. If it all works you can move relays accordingly.
This is a headache to write and far easier to do. If anyone else wants to contribute (in simple terms), feel free!
Last edited by CovKid on 23 Mar 2015, 20:28, edited 1 time in total.
Roller paint your camper at home: http://roller.epizy.com/55554/" onclick="window.open(this.href);return false; for MP4 download.
-
marlinowner

- Registered user
- Posts: 1530
- Joined: 28 Jan 2014, 12:02
- 80-90 Mem No: 13646
- Location: Scottish Borders
Re: Wiki Dash wire upgrade,
Quick point, diagram is really good but relay pin 87 is labeled as normally closed, should be normally open. Normally closed would be 87a (if fitted) as I am sure you know.
1993 SA VW T25/T3 2.5i Microbus/homebrew camper
1981/1968 Marlin Kitcar TR6 Engine
1981/1968 Marlin Kitcar TR6 Engine
-
Budgie7
- Registered user
- Posts: 312
- Joined: 23 Aug 2012, 22:19
- 80-90 Mem No: 13816
- Location: Parbold lancs
Re: Wiki Dash wire upgrade,
wow thanks covkid, sounds complicated to a simpleton like me, but as you say it is probably easier to do than read about.
a warm sunday afternoons job, with kids and grandkids out of the way.
there will probably be many more questions along the way, but thanks very much for your help, very much appreciated,
without the help of yourself and many other people on this forum, many of us new ( old ) men, into T25s, would be stuck,
BTW, I run ( manage ) a small independent garage near Preston in Lancashire, we do MOTs, tyres , tracking etc, and have 4 ramps that are always available.
so if anyone fancies a run out for a brew and to put their van up on ramps, or swap tyre over, please feel free to contact me .01772336503 or PM
MOTs £30.00 to club members NO RETEST FEE.
BARRY
Last edited by Budgie7 on 23 Mar 2015, 22:34, edited 3 times in total.
2.1 Caravelle Auto
-
CovKid
- Trader
- Posts: 8413
- Joined: 30 Apr 2006, 13:19
- 80-90 Mem No: 3529
- Location: Ralph - Coventry (Retired)
- Contact:
Re: Wiki Dash wire upgrade,
If you plod at it, you should be fine. If memory serves me right the existing headlights will indeed have four wires, one for each dip, and one for each full. You just alter the wires to headlights so that the two dips are joined as one and the two mains joined as one - which will leave you one for each relay. I think I soldered and crimped behind gril to do that. Just report back if you get stuck. Can always PM you my mobile. Definately worth doing. It made more difference than just putting in brighter bulbs. I run with stock bulbs now as its plenty bright enough without.
Stock bulbs, modern light pods, relays and uprated power cable: https://www.youtube.com/watch?v=cEIkGpC72GY" onclick="window.open(this.href);return false;
Must do that video again with my spotlights wired in (which only come on when on full beam)
Same setup with NO relays and NO new power cable: https://www.youtube.com/watch?v=m2X5GgKDOos" onclick="window.open(this.href);return false;
To really get the best out of T25 lights you need to do the following:
https://club8090.co.uk/wiki/VW ... ain_cables" onclick="window.open(this.href);return false;
https://club8090.co.uk/wiki/VW ... ry_to_dash" onclick="window.open(this.href);return false;
plus relays (30amp or 40amp) and good modern light units (not hella old-school) - easy with round, not so easy with square ones. Hoorah for round headlights!
Roller paint your camper at home: http://roller.epizy.com/55554/" onclick="window.open(this.href);return false; for MP4 download.
-
Budgie7
- Registered user
- Posts: 312
- Joined: 23 Aug 2012, 22:19
- 80-90 Mem No: 13816
- Location: Parbold lancs
Re: Wiki Dash wire upgrade,
thanks I will have a go step by step and hopefully there will be light at the end of the tunnel  sorry about that
2.1 Caravelle Auto