VW Electrics main cables
Introduction - Good Connections
Penned by Covkid:
Good connections and good cable are essential for effective charging and starting. However, after 30 years work, the main heavy-gauge cables that go from alternator to starter, and battery to starter, can be subject to deterioration.
The thickest cable by far is the one between the battery and starter and if you drive a T25 with your main battery behind the drivers seat, you'll realise that its quite a distance between the two (actually 2-3 metres!). It not only needs sound connections at each end, it needs to be in good condition generally as it can draw as much as 160amps on a very cold morning. Any replacement cable should ideally be close to or rated for 200amps to meet that demand - which isn't cheap. The alternator cable isn't quite as chunky but will also, over time, corrode and a thicker cable won't hurt.
For this upgrade I replaced both of these cables with 4 metres of 25mm 'fine strand' cable as that's what I had. It was probably way thicker than I needed but more has to be better than less. Avoid cable which has thicker strands - it has less surface area and won't stand up to bending - it is not suitable.
Copper cable definately isn't cheap so prepare for that if you have to buy new. You may be able to get an off-cut from a project or recycle some suitable cable. The cable used on MIG welders is ideal. Work tidily and you'll get excellent connections as well as a reduced chance of problems in the future.
Cable corrosion
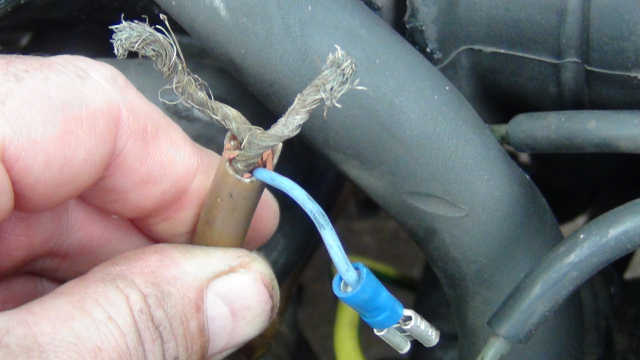
The photo below shows the terrible (although not untypical) state of a cable at the rear of an alternator. This grey-green colour is acid corrosion which can also cause the insulation to blister, crack and break away. Unfortunately this corrosion tends to work its way along the entire length. Most alternator connections actually terminate in a plug rather than like this and therefore the state of them can easily be missed. You'll also find that no matter how far you cut back, the problem persists and it potentially creates resistance - reducing the alternator's ability to charge and the starter's ability to turn the engine over. Moreover, the stands can weaken and break too, further reducing the capacity of the cable to deliver, causing heat build-up and more damage.
When things have become this bad, solder won't take and the only thing you can do is replace the cables entirely and solder new connectors as and where required. You can crimp (if you have access to oversized crimps) but in my view. soldering makes for a more reliable 'sealed' connection and with shrink tubing, should shrug off the weather. You could do both I suppose.
Photo 1: Acid corrosion can take its toll on charging/starting circuit.
This particular engine a 1.9DG and wiring layouts do vary. It also uses a golf alternator rather than a stock one so only has a single nut which holds the main cable. You will need to decide how best to replace corroded cables in your setup.
Replacing cables
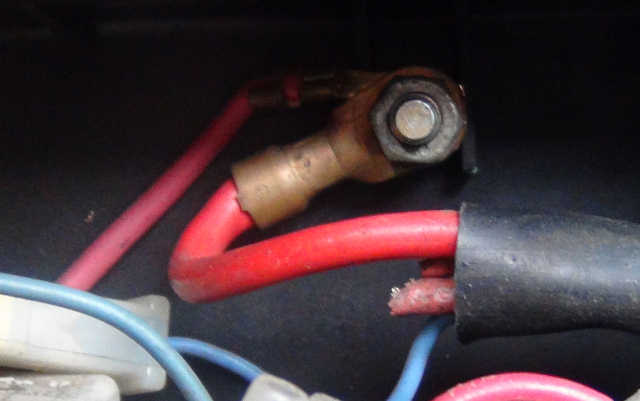
Disconnect battery. I started by removing the old corroded cable on the alternator (above photo) which was not one, but two red cables, twisted around the post and clamped between two washers (not by me!!). This cable didn't, as you might expect, go directly to the starter terminal as it does on so many v-dubs but went to a post connection inside the black junction box in the engine bay on the left (see photo below). Another separate red wire goes from this post back to the starter terminal. It seems that not ALL T25s (mine is a Caravelle 84/85) have this connection, some instead (like earlier Bays & Beetles) go directly to starter connection but thought it worth mentioning in case you encounter the same.
Photo 2: Terminal post in junction box in engine bay
I puzzled over why mine was like this for a while, checking either end to figure it out, and to be honest it still makes no sense unless it was something to do with the assembly process at the factory, a changeover year thing, or that some vehicles had their battery in the back? Towing? Either way, another separate fatter red wire on that post in the junction box does go to the starter motor main connector so effectively all went to the starter motor connection anyway - just in a roundabout kind of way!
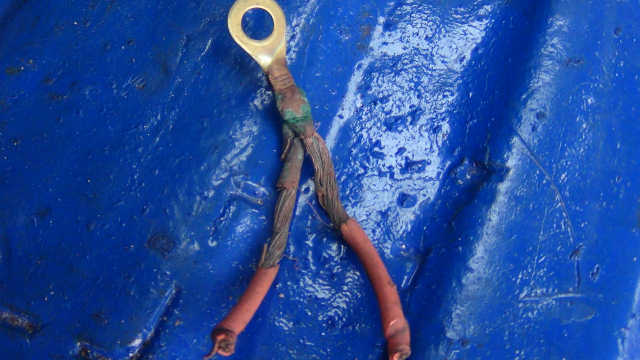
I gave up musing this one, decided it was plain daft, and snipped those two alternator cables in that box completely (you can see ends in above photo and what was snipped below) and just ran the new alternator cable straight to the starter terminal to meet the starter-battery cable, with a new soldered ring connector on the end. This seemed wholly logical, a more direct route and a lot simpler to do. I could I suppose also have replaced that single red cable from the junction with a heavier one but to be honest it seemed absolutely fine. I couldn't find fault with its condition or suitability. Perhaps if I towed a caravan with leisure batteries, or had some great power consuming device attached at the rear, things might be different but direct to starter was the most obvious route.
Photo 3: The snipped cable to junction box from alternator. It illustrates how the outer covering can break up as the cable corrodes.
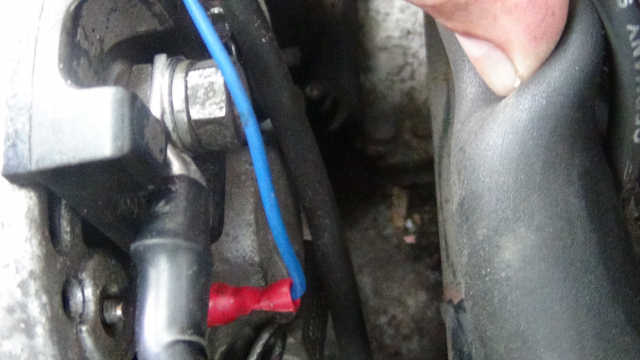
Below, the back of the alternator. As mentioned, mine is a golf alternator (90 amps) and has a single post plus blue trigger wire. I could therefore get away with a really fat cable (handy as that's what I had) but you may need to scale back such ambitions if the cable goes to a plug or spade connector. Its easy to spot which wire needs to be replaced as it'll be the thickest one. It doesn't need to be anywhere near as thick as the one I used but does need to be equal to what came off and a good connection. Cable used to wire in a leisure battery would be perfect actually. If yours has a plug, it may be impossible to fit thicker cable to it and you may have to use suitably sized spade connectors instead.
Photo 4: On this alternator, I was able to connect using a ring connector and chunky cable
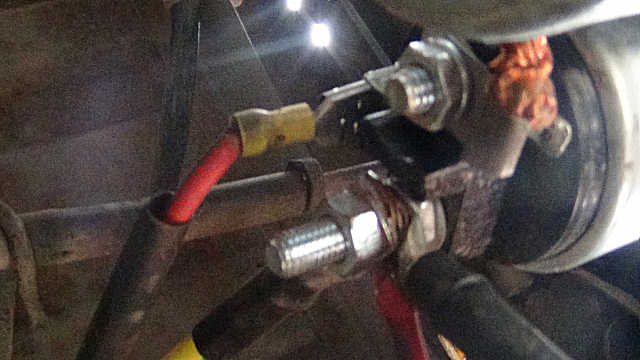
Looking underneath, at the bottom of the pic (below) you can see the two thick cables entering the picture from the bottom - to the starter under the nut - one goes to the alternator and the other to battery. Its important to leave enough room for these cables without stretching them but also routed so they don't foul anything underneath.
Running the cable to the battery ended up being a cat & mouse affair. I couldn't be bothered to pull out the old one until such time as I have the vehicle on a proper lift so snipped ends off and ran the new cable as near to exiting run as I could with cable ties until I reached the battery terminal. Believe me, you'll easily run four metres if you go via existing route - less if you ran through rear bulkhead (with grommets) and direct to battery inside. Up to you on that - see what works best. A short run is preferred but your interior may make this impossible.
Photo 5: At starter motor from underneath. Alternator cable now goes direct to this terminal along with battery cable - instead of junction box as before. You can see the two new HD cables at the bottom of this pic
In above photo you'll notice I dispensed with the original copper tube (or ferule) connector that used to be on the end of battery cable. I felt the connection I had was a good one and it didn't need one but others may want to reinstate it. Stacking copper washers may achieve the same to be honest.
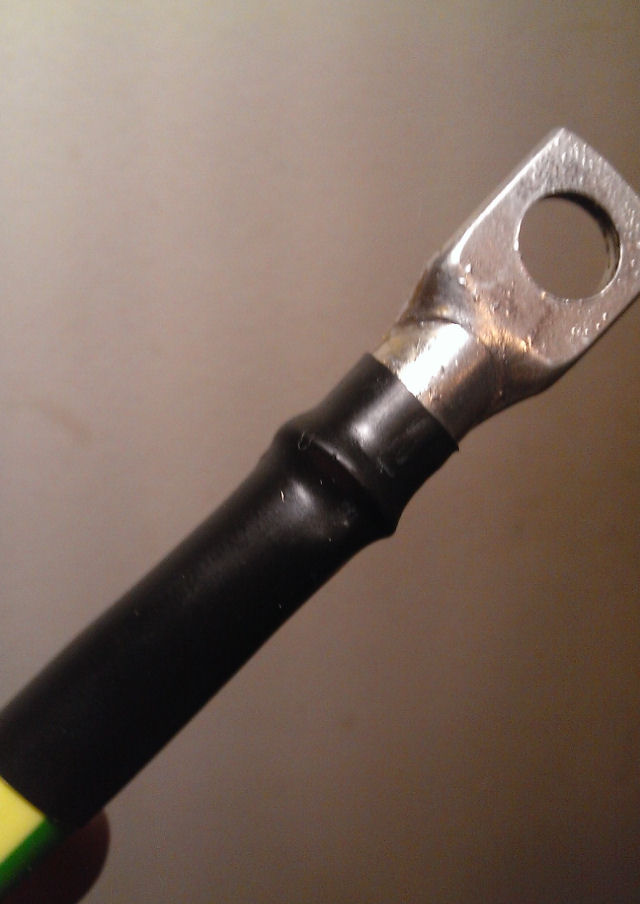
Photo below gives you some idea of how chunky the new cables are. Its about 1cm across.
Photo 6: Properly soldered and sealed connectors make for a professional job.
I used 25mm fine strand earth bonding (yes green cable). Colour made no odds to me but you can get it in any colour. Something around the 200amps range is about right otherwise.
I found the beat way to solder the ring connectors on (and mine were sealed at the top with only a small hole, presumably to run the solder in) was to cut back the cable slightly less than you might think, as the sheath melts slightly with heat.
Then rub some flux over the exposed copper cable, slide the ring connector on, warm up with a small blowtorch that jewellers use these days, and run the solder in. Its important not to do this vertically though or you run the risk of running too much solder in which can work its way too far down the cable. Try to monitor the amount of solder you're using as it will keep taking it by capillary action if you don't. You don't want the cable to soak up too much, cool, and become inflexible.
Once cool, just use some shrink tubing to keep out air and water - remembering to slide the shrink tubing on BEFORE putting the ring connector on. Ring connectors are not cheap in some places so you can make your own fairly easily if you follow this video: https://www.youtube.com/watch?v=RpFb_Yxl_hA
The difference to starting afterwards was astonishing. Before it was a bit sluggish at times. I'm getting half a volt or so more from the alternator too now as the cable for that was in a hell of a state. They can deteriorate quite badly.
See also "upgrading power to dash": http://wiki.club8090.co.uk/index.php/VW_Electrics_battery_to_dash
