CovKid wrote:Sorry Baron, I added some more observations as you posted but yes you're right.
For those driving pre-85, I added the mod needed to the WIKI (bottom of page) although the principle would apply to post-85 too: https://club8090.co.uk/wiki/Co ... eplacement" onclick="window.open(this.href);return false;
Fitting a slow-blow fuse would also obviate the chances of fuse blowing if you start motor up on full.
Halfords (and other places) do extra fuse boxes for this purpose (around a tenner depending on size). May be a prudent time to look at whats being run from the fusebox now and whether it would be better to screw up a new fuse box to spread the load.
My fan does not work on 1 and 2, and blows the fuse on 3. I am using 20amp fuses (that is what I found in there). Would increasing fuse to 25, 30 or 40 free it up at all? (Before having to gio through the dash out, sterring wheel exercise and all the gremlins like seized bolts and boxes that will no doubt arise)
It started with my wife running in to tell me her camper of only 6 weeks was on fire. After a quick look I noticed smoke coming out of the fuse box. The fuse in question having being replaced with some copper wire (guess somebody had had problems with fuses blowing before) was for the heater blower.
So in the cold light of day and with some googling I discovered it was a common t25 issue. The blower motor starts to seize and when it does it pops the fuse. I can now add that if some plank replaces the fuse with copper wire, it progresses to smoke and a melted rotary blower switch.
So blower motor and switch ordered from Just Kampers for a reasonable 40 odd pounds and now to fit it.
It isn’t impossible, nor is it quite as easy as some make out on the net. I took almost a full day. I could do it a few hours faster now I know what the procedure entails.
You should disconnect the battery first. Then pull the instrument cowling up and off from the rear to reveal the instrument cluster and brake master cylinder. Four screws should then see the instrument cluster free. Unplug the multi plug on the left and the three on the right. Oddly on mine at least there are also several individual wires. Tape, mark or photograph the connections for future reference. With the instruments removed the next thing I did was remove the steering column cowling. This was just two screws. I couldn’t get the top part out or when it came to rebuilding back in with the steering column in position. The steering column however has to be undone anyway in-order to remove the dash board.
So this is the first and to be honest only big sticking point of the job. The steering column will have sheer bolts holding it in place just under the lip of the dash. You can see the threads sticking up as you look down through where the instruments were. They pass through two reinforcing mounts with captive nuts. Sheer bolts have no head, so are a swine to get off when access is tight. This is where my mig welder saved the day again for the millionth time since I bought it fifteen years ago. If you have ever thought of getting one, do. Must have paid for its self, ten times over at least. I welded two bolts onto what I could see of the sheer bolts and then simply undid them with a spanner. I then replaced them with proper bolt when reassembling.
With the upper bolts removed, now the mush easier job of slackening off the lower ones. I left the lower ones in until the last moment before the dash came out.
Next I removed the radio, cig lighter and a couple of aftermarket LEDs and switches. I also removed the heater control levers. These just pull off, but they take some effort and when they come off be careful not to damage the heater control panel. Then the heater switch knob and the control panel front just pull off. Now you should be able to remove the two screws holding the control mechanism in.
Now I removed the glove box, this is just a matter of undoing the four screws holding the hinge plate to the bulkhead. It looks like it should come off without removing that and just opening the glove box past the retaining straps and move left. But there wasn’t space.
Next I undid the two screws down each side of the dash hidden when the doors are closed and the five screws across the top of the dash under the windscreen. With that the dash is almost free. Time to remove the two remaining bolts we left loose holding the lower steering column bracket in place. Now the dash should come away. Takes a bit of coaxing past the two upper steering column brackets and needs to come out of the left hand door (passenger in the uk)
With the dash out, it is time to free the motor/fan which is contained in the huge plastic housing that is now exposed. First we need some room to access all the clips that hold it together. So the housing needs to come forward a few inches.
To do this there are three bigish screws down each side. Two into the upper part of the bulk head and one holding a bracket into the lower part of the bulkhead. The lower ones are easy. The upper four were all rusty and two sheared of during the removal process. Still, how many do you need! The two upper ones on the right hand side are hard to get to and you will need to undo the pipe work that take air to the vents in the dash.
With the housing now freeish, it can be moved forward enough to undo the clips that hold it together. There are also two screws, one either side of the curved part the fan sits under. Now you should be able to gain access to the motor/fan to remove it. Be careful not to pull too hard on the housing because the heater matrix and pipes to it, are still attached. My motor from Just Kampers had different connectors, so I had to crimp some new ones on. Then with it replaced, put the housing back together and fit the new switch. Best to reconnect the battery, put the ignition on and test it works before reversing every step you have just done.
I had a problem that the switch I ordered didn’t come with a knob and the old one isn’t the best fit. You can get a switch/knob combo from another supplier on ebay and I wish I had done that now.
Hope that helps for any future googlers of this issue.
andyf wrote:If I can add to that.
Hope that helps for any future googlers of this issue.
Andy, thank you my friend,for walking me through the myriad steps I am about to take on m next epic journey.
I now know what to expect!
As it stands my heater blows a 20a fuse as soon as the fan switch hits 3, so odds-on I have a similar issue and will be following your guide as and when I tackle it.
Cheers for being so clear & thorough in the steps of the job, I just might be able to pull it off
"...of course it can go faster - if you fill it up I'd be happy to show ya..."
It's a good idea to replace the fans resistor when replacing the motor.brickwerks sell them.my blower was blowing fuses on no 3.The resistor was burned out.
2.1 LPG/Petrol Auto Caravelle
"The difference between genius and stupidity is that genius has its limits"
R0B wrote:It's a good idea to replace the fans resistor when replacing the motor.brickwerks sell them.my blower was blowing fuses on no 3.The resistor was burned out.
Cheers Rob, I might be able to test this today if I get stuck in.
From memory I thought only settings 1 & 2 used resistance, with setting 3 being straight through 'un-throttled'. Thankfully all the info I need will be in here so I'll take a refresher course before I break out the tools
Any excuse to use my new multimeter really!
Sunray, I hope you get your problem resolved with the new motor, and thanks for bringing this topic up at just the right time for my benefit - nice one.
"...of course it can go faster - if you fill it up I'd be happy to show ya..."
Thinking back it was blowing fuses on position 3.It was only when it siezed altogether and i had to have a new motor that it became apparent the resistor had burned out.Might be an idea to change it whilst your doing the blower.
2.1 LPG/Petrol Auto Caravelle
"The difference between genius and stupidity is that genius has its limits"
Placing myself under unreasonable pressure, I'm planning on doing this in only one day. Are there any parts that I will kick myself for not ordering? Clips? Glue? Stuff?
T25 California 1.6 TD 1989,
From West Sussex - but living in USA for a couple of years
Start early and its dooable but really helps if someone can keep you in mugs of tea - lifts your spirits. Ignore Haynes, don't need to remove steering column - just the wheel, and lay column down. Seats out.
Best as a Summer job, far more light for longer.
Plusgas on captive nuts just behind/below radiator that heater box is bolted to. There are four of those. Bottom ones prob accessible from underneath (I forget now). Remove front grill to see them. Otherwise bolts/screws can be really stubborn and slow you down. I liked the idea of using cable ties to re-secure heater box (as seen on youtube).
Roller paint your camper at home: http://roller.epizy.com/55554/" onclick="window.open(this.href);return false; for MP4 download.
It can be daunting if the blower is the only thing you're going in for. I sorted out untidy wiring, replaced the washer pipes, greased the wiper mechanism, and finally fitted two sub-dash speakers which still sound excellent. A days work easily but easier to do than describe. Also worth replacing foam around flaps and vents.
Roller paint your camper at home: http://roller.epizy.com/55554/" onclick="window.open(this.href);return false; for MP4 download.
Thanks for the advice. I think I'm trying to make it as complicated as possible so that I end up putting it off!
Must get it done this season. The van still warms up once on the move, its just demisting it having been in it overnight. Plus, I can't stand the idea of things not working as they should (in the house, yes, but in the van definitely NO!).
T25 California 1.6 TD 1989,
From West Sussex - but living in USA for a couple of years
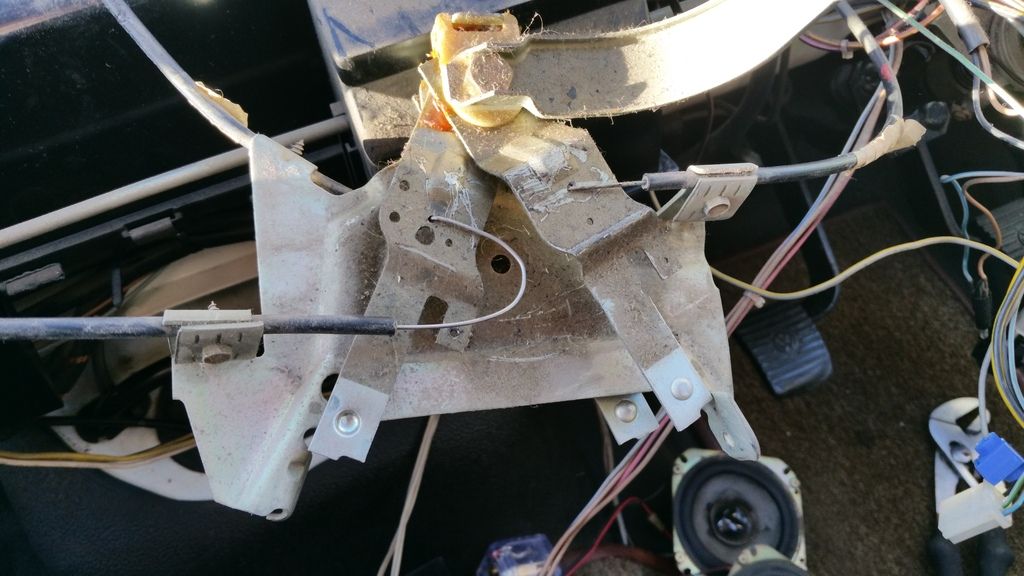
I'm mid stripping my dash to replace the blower motor & noticed a small issue...
The wire coming from the left side of the picture that locates into the control arm & then goes thru the centre of the transmission tunnel below it (in the pic), doesn't make anything work (it was lying loose & I've just inserted as per the others !!!). When I operated the arm, all it does is fold over on itself.
Can anyone advise (preferably with a picture or two) how to get it back together ?
Additionally, the pipework for the heater matrix rad that's embedded in the midst of the blower, do you have to disconnect them, and do you have to drain the system / will it leak fluid all over the place??
I didn't disconnect the heater matrix when I changed my blower motor, you should be able to get the heater box out far enough to swap the motor. Should you want to entirely remove the heater box then you'll need to disconnect the matrix. You can clamp the feed pipes but you will need to bleed the system once it's all back together, good luck!