I wonder if that could cause a problem, if the paint tears while torquing the sealant may not work properly
1.9 DG - Attempting a full rebuild...
Moderators: User administrators, Moderators
-
itchyfeet

- Registered user
- Posts: 12428
- Joined: 23 Jul 2007, 17:24
- 80-90 Mem No: 12733
- Location: South Hampshire
Re: 1.9 DG - Attempting a full rebuild...
It looks like you have painted the surface where the head stud nuts seal
I wonder if that could cause a problem, if the paint tears while torquing the sealant may not work properly
I wonder if that could cause a problem, if the paint tears while torquing the sealant may not work properly
1988 DG WBX LPG Tin Top
itchylinks
itchylinks
-
T25Convert

- Registered user
- Posts: 401
- Joined: 20 Jun 2009, 09:27
- 80-90 Mem No: 7819
- Location: Chester
Re: 1.9 DG - Attempting a full rebuild...
Oldiebut Goodie - Sounds great to me - these small legged pullers are pretty feeble. Assume you can effectively reverse it as well and press bits back together again which would be handy.
Itchyfeet - You're right (and somewhat eagle eyed!) the nut mating surface is painted. I'd though similar thoughts myself that torquing up the nuts will cause the paint to crack. Will clean the surfaces before I put the head nuts on I think, to avoid any issues.
Cheers,
Alex
Itchyfeet - You're right (and somewhat eagle eyed!) the nut mating surface is painted. I'd though similar thoughts myself that torquing up the nuts will cause the paint to crack. Will clean the surfaces before I put the head nuts on I think, to avoid any issues.
Cheers,
Alex
RIP - George - 1.9DG '85 AutoSleeper Trident - rusted away
George Second - 1.9DG '89 Caravelle
George Second - 1.9DG '89 Caravelle
-
sarran1955

- Registered user
- Posts: 1500
- Joined: 11 Mar 2009, 18:51
- 80-90 Mem No: 6754
- Location: 6, les Hauts de Sarran 19800, Sarran ,Limousin ,FRANCE
Re: 1.9 DG - Attempting a full rebuild...
Hello,
at work...
I have millions of of 'paint tight',..slightly dished..compression washers..
We use them on our machines (big agricultural factory).. to provide a watertight joint without damaging the paint..
Give me the dia and quantity needed..
Postal address and so on..
I'll give you them and you owe me me a pint for the postage..
oh and the make of puller you need is Sykes pickavant.. 2 and 3 leg puller.. 8 inch..
order 2 spare sets of legs.. which you modify to be able to pull the crankshaft.. apart
and brake drums and so on..
Cordialement,

-
T25Convert
- Registered user
- Posts: 401
- Joined: 20 Jun 2009, 09:27
- 80-90 Mem No: 7819
- Location: Chester
Re: 1.9 DG - Attempting a full rebuild...
Sarran - thanks for the kind offer, but I have read this too late and already spent a happy evening with a very small scraper removing the required areas of paint  Bother.
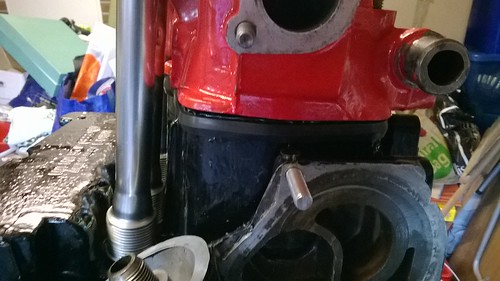
Now, look away now if you are of a squeamish disposition - yes I really am using a T25 throttle body as a drift:
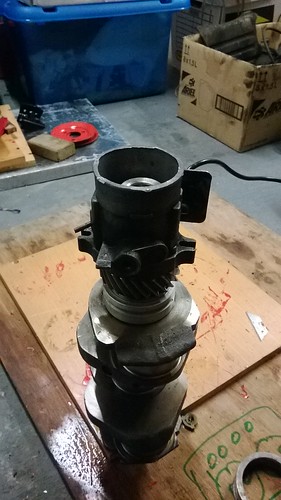
In my defence it was a very tired one which was probably beyond repair, and it was the perfect size for the job in hand! Good fun trying to heat the main cog to 80 degrees and drift it on - aligning a hot bit of metal with a woodruff key proved an exciting adventure! Readings the Opps thread again (like the Haynes, but with pictures that actually make sense!) I abandoned the heat and it went on fine.
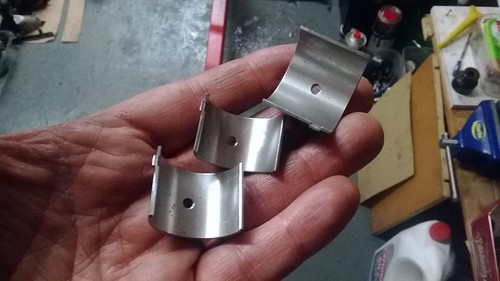
Here we go, the first bearing is on, an exciting day. Note, check orientation, the blind hole goes on the crank web side (it would be very frustrating to get this bit wrong!)
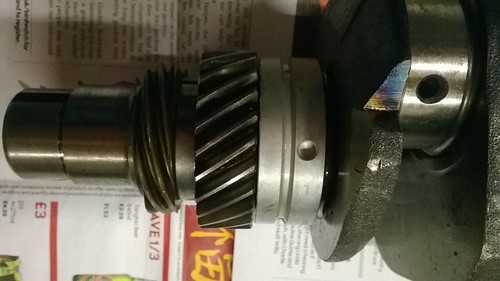
Feels like its finally getting somewhere!
My mother in law has also come up trumps and put a heater in the garage for me - so much nicer now!!
Cheers,
Alex
Now, look away now if you are of a squeamish disposition - yes I really am using a T25 throttle body as a drift:
In my defence it was a very tired one which was probably beyond repair, and it was the perfect size for the job in hand! Good fun trying to heat the main cog to 80 degrees and drift it on - aligning a hot bit of metal with a woodruff key proved an exciting adventure! Readings the Opps thread again (like the Haynes, but with pictures that actually make sense!) I abandoned the heat and it went on fine.
Here we go, the first bearing is on, an exciting day. Note, check orientation, the blind hole goes on the crank web side (it would be very frustrating to get this bit wrong!)
Feels like its finally getting somewhere!
My mother in law has also come up trumps and put a heater in the garage for me - so much nicer now!!
Cheers,
Alex
RIP - George - 1.9DG '85 AutoSleeper Trident - rusted away
George Second - 1.9DG '89 Caravelle
George Second - 1.9DG '89 Caravelle
-
T25Convert
- Registered user
- Posts: 401
- Joined: 20 Jun 2009, 09:27
- 80-90 Mem No: 7819
- Location: Chester
Re: 1.9 DG - Attempting a full rebuild...
Its starting to get more interesting now – after all the cleaning and preparation it’s nice to start building it all back up again.
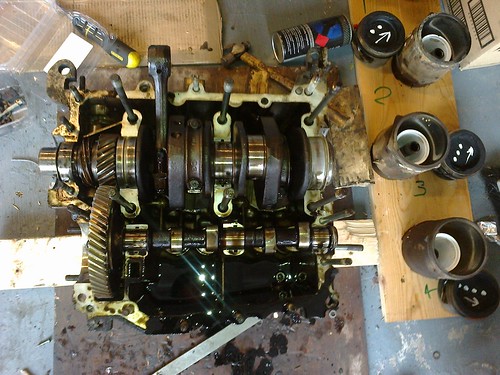
Con rods back on crank, crank back in case and cam back in case all with shiny new bearings, which were all a pleasingly snug and smooth fit. Oiled everything well. Note marks as recommended in Sarran’s Opps post diametrically opposite the dowel holes. I tried first without, and its almost impossible to get them all to line up, then put them on and it’s much easier!
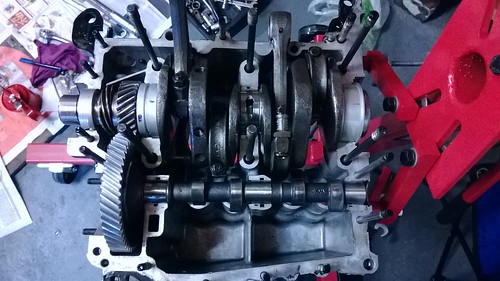
With regards to oiling, Mr Haynes suggests filling all the oil tappings with oil. Some may laugh, but I had missed that fact that the oil tappings went all the way through in some places, so spent a merry few minutes gently squirting oil into a hole, oblivious to the fact that much of it was going straight through onto my feet. Hopefully others can learn from this – check where the tapping goes!!

Align can and crank spots. Bentley suggests assembling like this, then rotating the crank backwards – if everything is okay then the cam shouldn’t lift out of its bearing shells. It didn’t so all happy there. Couldn’t fit the case back together as I had not yet got new nuts.
Trial fitted the oil pump just to check it all lined up, and that the lug engaged in the cam okay – again all fine:
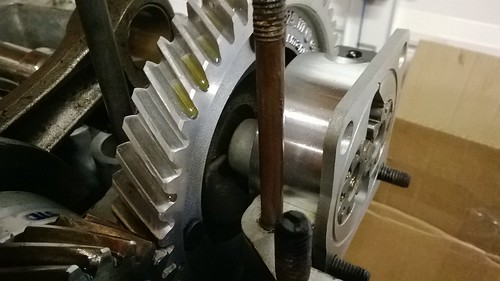
Oil pump cover is a genuine VW one –
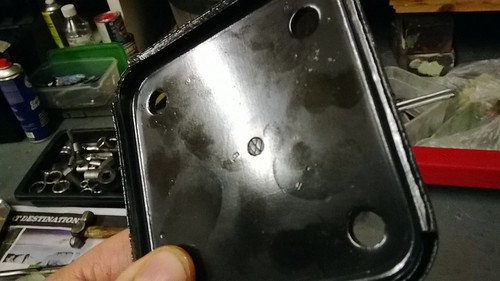
But why would you stick one of those ‘won’t come off even if you soak it in petrol for a week’ type sticker on the business side of it:
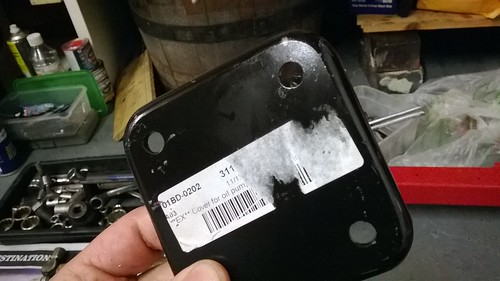
Bother.
Finally got all the ancillaries off the engine in the van, so more cleaning required (don’t want to fit grubby old parts to the nice clean case!)
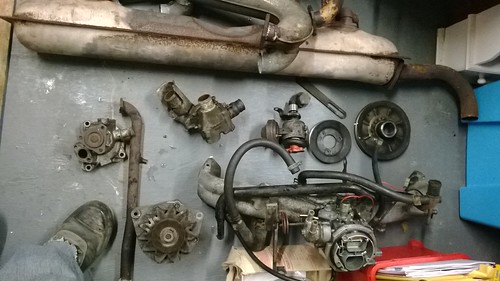
So back out with the degreaser and toothbrush!
Cheers,
Alex
Con rods back on crank, crank back in case and cam back in case all with shiny new bearings, which were all a pleasingly snug and smooth fit. Oiled everything well. Note marks as recommended in Sarran’s Opps post diametrically opposite the dowel holes. I tried first without, and its almost impossible to get them all to line up, then put them on and it’s much easier!
With regards to oiling, Mr Haynes suggests filling all the oil tappings with oil. Some may laugh, but I had missed that fact that the oil tappings went all the way through in some places, so spent a merry few minutes gently squirting oil into a hole, oblivious to the fact that much of it was going straight through onto my feet. Hopefully others can learn from this – check where the tapping goes!!
Align can and crank spots. Bentley suggests assembling like this, then rotating the crank backwards – if everything is okay then the cam shouldn’t lift out of its bearing shells. It didn’t so all happy there. Couldn’t fit the case back together as I had not yet got new nuts.
Trial fitted the oil pump just to check it all lined up, and that the lug engaged in the cam okay – again all fine:
Oil pump cover is a genuine VW one –
But why would you stick one of those ‘won’t come off even if you soak it in petrol for a week’ type sticker on the business side of it:
Bother.
Finally got all the ancillaries off the engine in the van, so more cleaning required (don’t want to fit grubby old parts to the nice clean case!)
So back out with the degreaser and toothbrush!
Cheers,
Alex
RIP - George - 1.9DG '85 AutoSleeper Trident - rusted away
George Second - 1.9DG '89 Caravelle
George Second - 1.9DG '89 Caravelle
-
New Kentish Campers

- Registered user
- Posts: 1739
- Joined: 12 Oct 2010, 06:16
- 80-90 Mem No: 8994
- Location: Near Linton, Kent.
- Contact:
Re: 1.9 DG - Attempting a full rebuild...
Great thread this
I'm looking forward to seeing this back in the van and running
I'm looking forward to seeing this back in the van and running
-
Robsey

- Registered user
- Posts: 1496
- Joined: 19 May 2012, 20:45
- 80-90 Mem No: 11137
- Location: East Manchester
Re: 1.9 DG - Attempting a full rebuild...
Excellent progress...
Hmm - oil on the feet. - I have done this when servicing my Cavalier.
Drain the old old, fill up with fresh...
Oh bother forgot to refit the sump nut. - grrrr!!
I am making notes, before starting on my DF this summer.
Not quite sure if I have the same level of patience as you though...
Hmm - oil on the feet. - I have done this when servicing my Cavalier.
Drain the old old, fill up with fresh...
Oh bother forgot to refit the sump nut. - grrrr!!
I am making notes, before starting on my DF this summer.
Not quite sure if I have the same level of patience as you though...
1983 Tin Top with a poorly DF and 4 speed DT box.
1987 Electrics and a DJ engine.
Maybe one day I might get it finished
1987 Electrics and a DJ engine.
Maybe one day I might get it finished
-
sarran1955
- Registered user
- Posts: 1500
- Joined: 11 Mar 2009, 18:51
- 80-90 Mem No: 6754
- Location: 6, les Hauts de Sarran 19800, Sarran ,Limousin ,FRANCE
Re: 1.9 DG - Attempting a full rebuild...
Hello,
Good work..
Cut yourself 4 times 8 inch sections of 100 mm grey PVC waste pipe..
This just fits in the bore holes and saves the conrods banging against the case ..
Makes case assembly easier.. use them to hold up the conrods
then when it is together and you want to test it for free spin..
With the weight of the flywheel on the thing will spin well..
The oil in passageways thing is to speed up oil pressure priming on start up.. the most important things are to prime the pump ..
and fill the oil filter..
Cordialement,
-
T25Convert
- Registered user
- Posts: 401
- Joined: 20 Jun 2009, 09:27
- 80-90 Mem No: 7819
- Location: Chester
Re: 1.9 DG - Attempting a full rebuild...
Evening,
Thanks for the tips Sarran and general encouragement from all.
Another question for you all. My dizzy isn't in great shape, needs a new vacuum can, has a couple of splits in the wiring and has a slight wobble on the shaft (but only a very small one!) Costing up can, cap, rotor arm gets me to about £30 +p&p. I see the svda that Sarran is using on the air cooled oops engine is about £60, which seems good value once you factor in cleaning and tidying the one I have.
Any down sides to buying one and sticking it on - would it be a straight swap for the existing on a wbx?
Cheers,
Alex
RIP - George - 1.9DG '85 AutoSleeper Trident - rusted away
George Second - 1.9DG '89 Caravelle
George Second - 1.9DG '89 Caravelle
-
T25Convert
- Registered user
- Posts: 401
- Joined: 20 Jun 2009, 09:27
- 80-90 Mem No: 7819
- Location: Chester
Re: 1.9 DG - Attempting a full rebuild...
Hello,
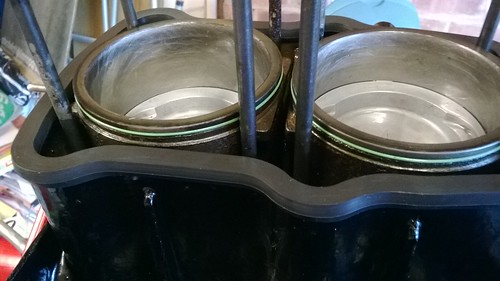
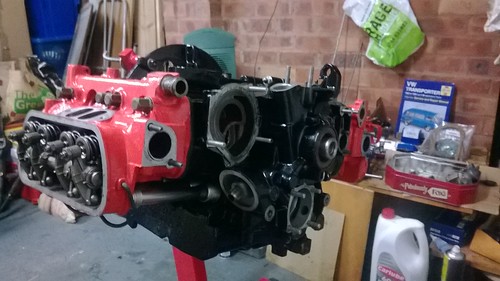
Further progress - the case is closed!
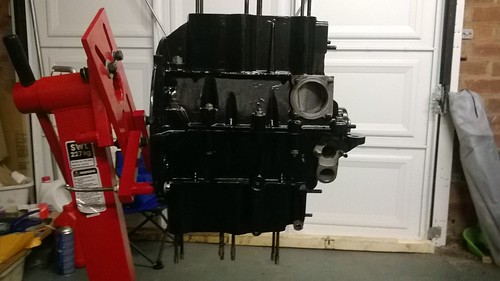
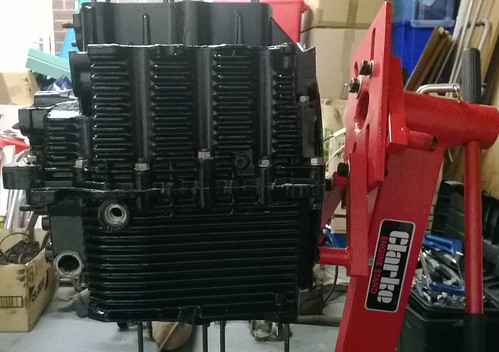
Thin skim of sealant over the mating surfaces, final squirt of oil in all the oilways and lower the top half on. So far so good. Sealant notes that time to skin is 5 minutes, and assembly has to take place within 15 minutes.
Realise that whilst having purchased large quantities of M8 stainless nuts and washers, I only have 2 of the three required M10 nut that go at the back of the case (I have the ones that go inside the water jacket). Had to resort to stealing one off the engine in the van, so must replace this with a new one! Lesson learnt, check you have everything you need before you apply some quick setting sealant!!
Cheers,
Alex
Further progress - the case is closed!
Thin skim of sealant over the mating surfaces, final squirt of oil in all the oilways and lower the top half on. So far so good. Sealant notes that time to skin is 5 minutes, and assembly has to take place within 15 minutes.
Realise that whilst having purchased large quantities of M8 stainless nuts and washers, I only have 2 of the three required M10 nut that go at the back of the case (I have the ones that go inside the water jacket). Had to resort to stealing one off the engine in the van, so must replace this with a new one! Lesson learnt, check you have everything you need before you apply some quick setting sealant!!
Cheers,
Alex
RIP - George - 1.9DG '85 AutoSleeper Trident - rusted away
George Second - 1.9DG '89 Caravelle
George Second - 1.9DG '89 Caravelle
-
itchyfeet
- Registered user
- Posts: 12428
- Joined: 23 Jul 2007, 17:24
- 80-90 Mem No: 12733
- Location: South Hampshire
Re: 1.9 DG - Attempting a full rebuild...
T25Convert wrote:Evening,
Thanks for the tips Sarran and general encouragement from all.
Another question for you all. My dizzy isn't in great shape, needs a new vacuum can, has a couple of splits in the wiring and has a slight wobble on the shaft (but only a very small one!) Costing up can, cap, rotor arm gets me to about £30 +p&p. I see the svda that Sarran is using on the air cooled oops engine is about £60, which seems good value once you factor in cleaning and tidying the one I have.
Any down sides to buying one and sticking it on - would it be a straight swap for the existing on a wbx?
Cheers,
Alex
according to this from Sarran need to change the coil also.
https://club8090.co.uk/forum/viewtopic.p ... 4#p7958175" onclick="window.open(this.href);return false;
where are you pricing that vac can from? sounds a good price to me, I'd stick with the origional.
1988 DG WBX LPG Tin Top
itchylinks
itchylinks
-
T25Convert
- Registered user
- Posts: 401
- Joined: 20 Jun 2009, 09:27
- 80-90 Mem No: 7819
- Location: Chester
Re: 1.9 DG - Attempting a full rebuild...
Vacuum advance can from here:
http://www.simonbbc.com/ignition-spares ... vance-unit - Somehow there is a post on here confirming it fits.
And the fully electronic version of the SVDA from same place:
http://www.simonbbc.com/distributors/4- ... 20a&page=3
Requires primary windings of less than 1.5 ohms, so the existing coil would work I believe, its only the points / condenser version that needs a 4 ohm plus coil.
My thinking is that it would remove the various 150k mile parts and replace with new, but am concerned that it may be made in the far east from dairy-lee and not last more than 100 miles!
Cheers,
Alex
RIP - George - 1.9DG '85 AutoSleeper Trident - rusted away
George Second - 1.9DG '89 Caravelle
George Second - 1.9DG '89 Caravelle
-
T25Convert
- Registered user
- Posts: 401
- Joined: 20 Jun 2009, 09:27
- 80-90 Mem No: 7819
- Location: Chester
Re: 1.9 DG - Attempting a full rebuild...
A long one this, a busy weekend:
Ring compressor and ring pliers purchased, started cracking on with the re-ringing using these:
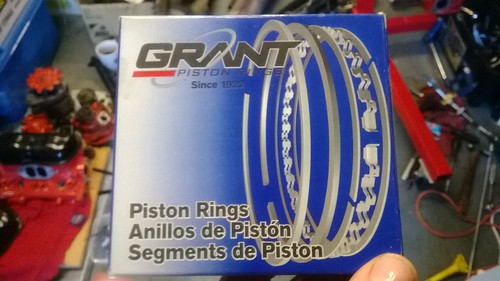
Seemed pretty good, they have comprehensive instructions of what needs to go where.
Oil ring(s) first – comprises a wavy spring and two rings (top left):

With handy two colour quick check alignment blocks:
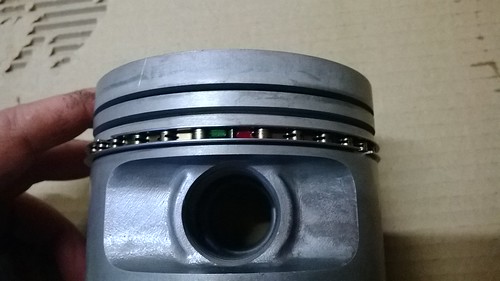
Tope two rings have handy markings:

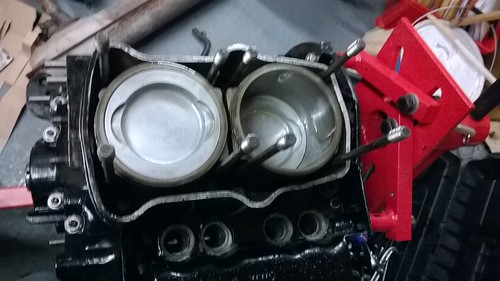
Ringed, one circlip in, gudgeon pin mostly in and all back in the liner (facing the right way!)

Lowered back over the con-rod, ready for long and fiddly fun of getting the second circlip back in – what a pain!
Two back in:
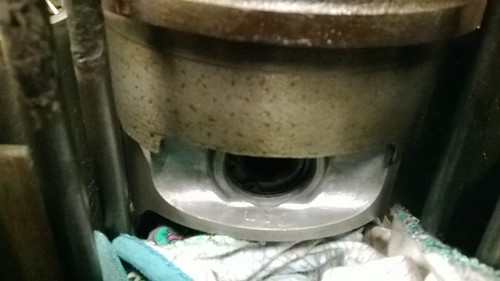
And here we have the ‘head gasket’! No wonder they leak after a while!
And head on – note the gap, as the pushrod tubes hold the whole lot up until you tighten it up:
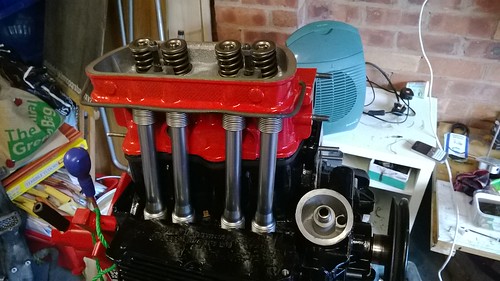
Repeat, and you get this:
So at this point I thought I would have a tidy up and a cup of tea, when I found these:
AAARRRGGHHH! Why the hell are these not in the engine helping the cam go round!
EPIC FAIL!
So, tonight will start stripping it back down again At least I know what I’m doing this time round!
Cheers,
Alex
Ring compressor and ring pliers purchased, started cracking on with the re-ringing using these:
Seemed pretty good, they have comprehensive instructions of what needs to go where.
Oil ring(s) first – comprises a wavy spring and two rings (top left):
With handy two colour quick check alignment blocks:
Tope two rings have handy markings:
Ringed, one circlip in, gudgeon pin mostly in and all back in the liner (facing the right way!)
Lowered back over the con-rod, ready for long and fiddly fun of getting the second circlip back in – what a pain!
Two back in:
And here we have the ‘head gasket’! No wonder they leak after a while!
And head on – note the gap, as the pushrod tubes hold the whole lot up until you tighten it up:
Repeat, and you get this:
So at this point I thought I would have a tidy up and a cup of tea, when I found these:
AAARRRGGHHH! Why the hell are these not in the engine helping the cam go round!
EPIC FAIL!
So, tonight will start stripping it back down again At least I know what I’m doing this time round!
Cheers,
Alex
RIP - George - 1.9DG '85 AutoSleeper Trident - rusted away
George Second - 1.9DG '89 Caravelle
George Second - 1.9DG '89 Caravelle
-
kevtherev

- Registered user
- Posts: 18831
- Joined: 23 Oct 2005, 20:13
- 80-90 Mem No: 2264
- Location: Country estate Wolverhampton Actually
Re: 1.9 DG - Attempting a full rebuild...
You won't be the first or last to do that..
Bummer
Bummer
AGG 2.0L 8V. (Golf GTi MkIII)