Hi all,
A few weeks ago I decided to try and fix the Heater Blower on our camper. After much reading of Haynes and browsing the forums I did the following.
1. Replaced Fuse ....Bang
2. Took fuse out and put multimeter in there and got a reading .. According to Haynes this is a short circuit.
3. Referred to lots of forums and reckoned it was probably a seized motor as its never worked since we've had her.
4. Decided to be brave and start the scary process of dismantling the pride and joy.
5. I've managed to get the instrument panel off, steering column off and dash out.
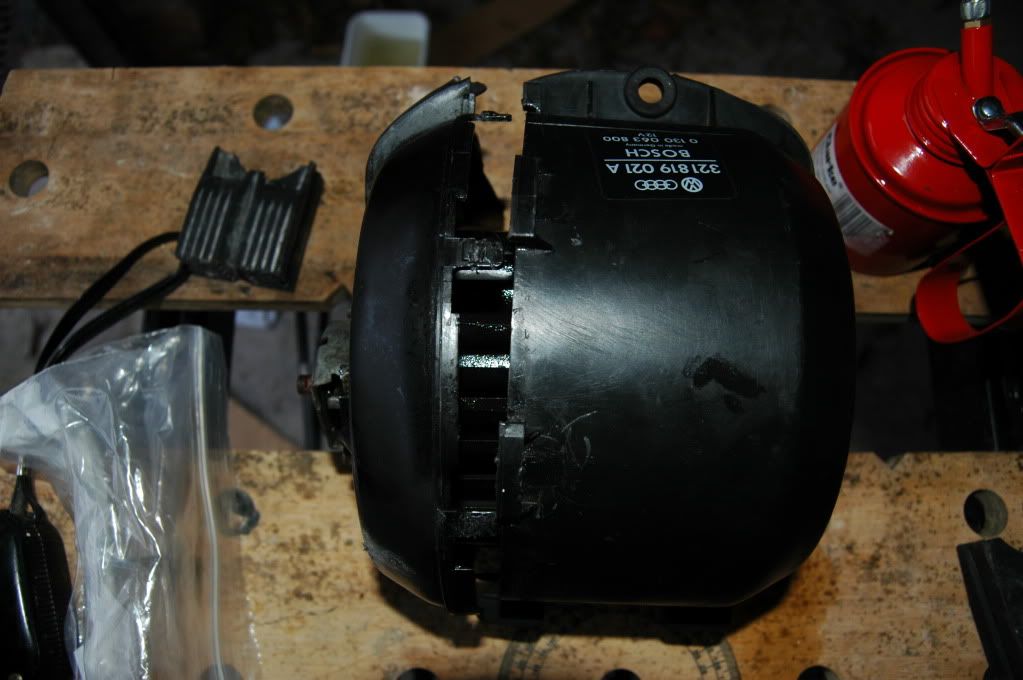
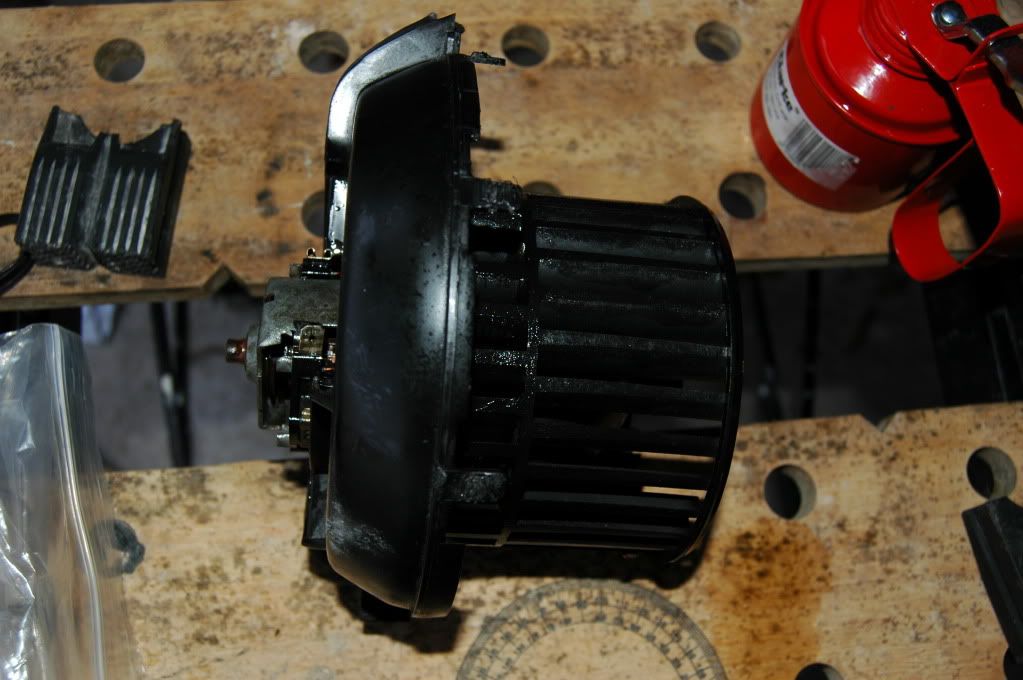
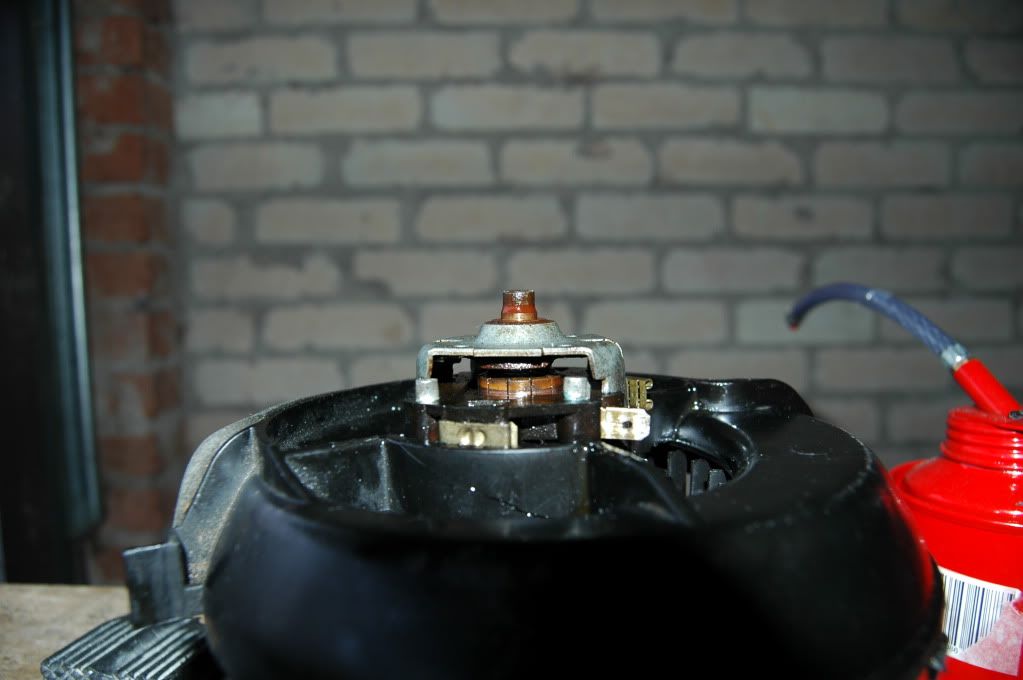
6. I then discovered the heater blower assembly to be very thoroughly assembled. After much cursing and careful hammering and levering I finally managed today to get the top off. Revealing the sight below
The fan could turn but was stiff so I sprayed it with some WD40 and it started turning a lot easier straight away. Upon closer inspection however you can see the state of the plastic behind the resistor.
I'm taking a stab in the dark that this means the resistor will knackered and that could be the real cause of my problem.
My questions are as follows.
1. How can I check if the blower motor is working? I was thinking of running a wire from the battery straight to the motor, bypassing the resistor, or using a jump start pack as I believe that this will be 12v as well. If this works can I then use the same method in front of the resistor to check that?
2. If it is the resistor then are the brickwerks ones the best to go for.
3. Once that is fixed what would the best practice/best ideas for cleaning up any rust underneath/cleaning/ insulating etc etc.
4. How should I reattach the top of the heater blower cover I'm very reluctant to stick it back together as it was a pig to get apart and I don't intend getting rid of the van for a long time so the odds are in favour of me having to go back in there at some point. I've read about there being clips but I've not seen any pictures of any. Are these easy to get hold of and does it still need siliconing?
Thanks for your help with this and wish me luck on my first foray into VW mechanics.
Heater Blower again.. and casing
Moderators: User administrators, Moderators
-
cymru_cowboy
- Registered user
- Posts: 0
- Joined: 05 Jun 2010, 23:45
-
dwayne
- Registered user
- Posts: 497
- Joined: 19 Apr 2008, 13:18
- 80-90 Mem No: 5649
- Location: Writtle Essex
Re: Heater Blower again.. and casing
Hiya , you already have a live feed to the motor it is the yellow one that comes in to the box from the switch , so it could be a duff switch ,a knackered resistor or a blown motor .
Do you have a multimeter ? can you test continuity in the switch ? if not then....
if you run a live feed to the motor you will know whether the fan works or not , if it does then it will be the switch , though thats not to say the resistor is not shot , I changed both resistor and switch a week or so ago cause both packed up at roughly the same time , it was my second time in the box and last time I sealed it with silicone sealant , made it a doddle to come apart a second time , you only need to put on the tabs though it all fits together well .
to me it sounds more like a switch or heater problem , my plastic was melted as well when I opened it up the first time and the resistor lasted another year .If it turns out to be the switch then , well at least you know what it all looks like
There is a few good threads on here and in the wiki about this , this one here has links and a few pics of how I fitted the brickwerks resistors , cause there is 2 not one . viewtopic.php?f=39&t=77574&start=15
Oh just noticed first post , Well welcome to the club
1988 Autohomes Komet 1.9DG
DIKXEY
DIKXEY
-
cymru_cowboy
- Registered user
- Posts: 0
- Joined: 05 Jun 2010, 23:45
Re: Heater Blower again.. and casing
Dwayne,
Thanks for the help. I've been lurking in the forum background for a while. I'll get stuck in again tomorrow and see what I can figure out.
Kieron
Thanks for the help. I've been lurking in the forum background for a while. I'll get stuck in again tomorrow and see what I can figure out.
Kieron
-
cymru_cowboy
- Registered user
- Posts: 0
- Joined: 05 Jun 2010, 23:45
Re: Heater Blower again.. and casing
Quick Update....
I just stripped down the ends of a piece of wire and hooked up one end to the leisure battery and one then started prodding the other end around. The motor works fine when power is applied direct and on the cable leaving the resistor but not on the cables going in. Also tested it down at the exposed switch and the same thing happened so onto brickwerks it is for some new resistors and sit and wait for the post!!
I just stripped down the ends of a piece of wire and hooked up one end to the leisure battery and one then started prodding the other end around. The motor works fine when power is applied direct and on the cable leaving the resistor but not on the cables going in. Also tested it down at the exposed switch and the same thing happened so onto brickwerks it is for some new resistors and sit and wait for the post!!
-
cymru_cowboy
- Registered user
- Posts: 0
- Joined: 05 Jun 2010, 23:45
Re: Heater Blower again.. and casing
I've just been out to the van patting myself on the back for doing a good job cleaning up and wire brushing the rust ready to rukrust it. When I put the heater blower housing back into position tonight I noticed the following damage to the radiator
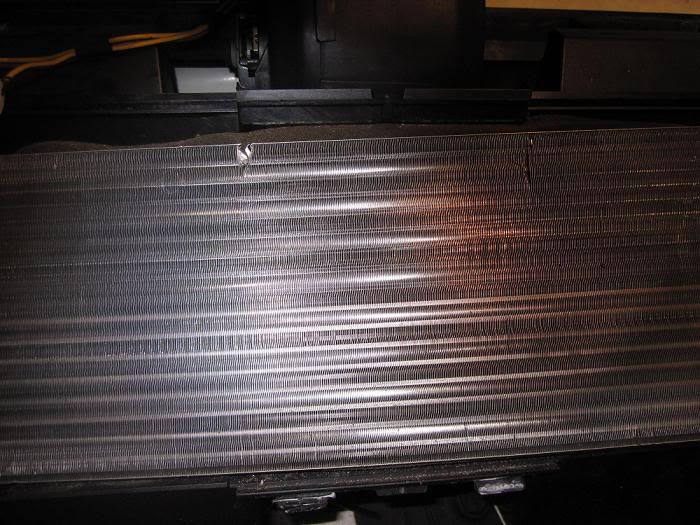
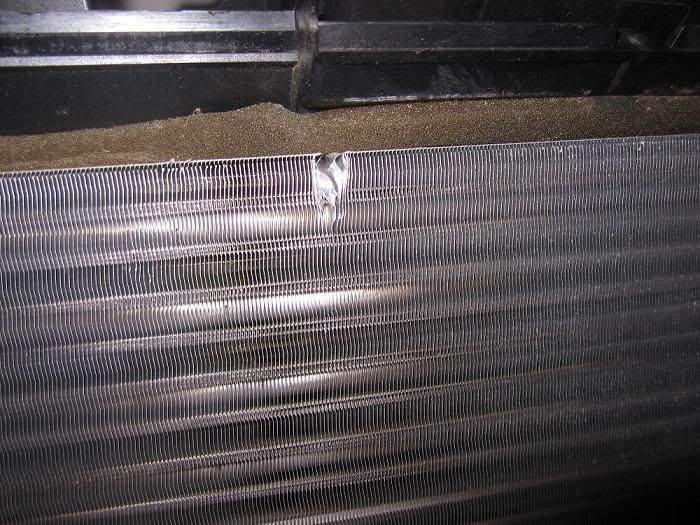
I'm kicking myself!! Anyone got any ideas on how to check and see if the radiator is still working?
I'm kicking myself!! Anyone got any ideas on how to check and see if the radiator is still working?
-
kevtherev

- Registered user
- Posts: 18831
- Joined: 23 Oct 2005, 20:13
- 80-90 Mem No: 2264
- Location: Country estate Wolverhampton Actually
Re: Heater Blower again.. and casing
don't fret they're just vanes off the pipes, they are easily bent due to the thinness .. if there's no water loss you'll be good
AGG 2.0L 8V. (Golf GTi MkIII)
-
cymru_cowboy
- Registered user
- Posts: 0
- Joined: 05 Jun 2010, 23:45
Re: Heater Blower again.. and casing
Kev,
Cheers for the reassurance. One of my mates just happened to have a coolant pressure testing kit so came round and pumped a few bars of pressure in and all is good as gold and I consider myself lucky.
Thanks for your help
Kieron
Cheers for the reassurance. One of my mates just happened to have a coolant pressure testing kit so came round and pumped a few bars of pressure in and all is good as gold and I consider myself lucky.
Thanks for your help
Kieron
-
fullsunian
- Registered user
- Posts: 1516
- Joined: 01 Jun 2008, 23:46
- 80-90 Mem No: 5092
- Location: Grantham
Re: Heater Blower again.. and casing
Seen heater rads alot worse than that when we used to fit them in Mk 3 escorts, you bent all the fins when you slid them incymru_cowboy wrote:Kev,
Cheers for the reassurance. One of my mates just happened to have a coolant pressure testing kit so came round and pumped a few bars of pressure in and all is good as gold and I consider myself lucky.
Thanks for your help
Kieron
Mmm what's that strange smell from my exhaust...
-
cymru_cowboy
- Registered user
- Posts: 0
- Joined: 05 Jun 2010, 23:45
Re: Heater Blower again.. and casing
Just an update and a few questions. Got my new resistors, wired them in and hey presto set the switch to 3 (by passing the resistors) and it works, 2 just about works and 1 gives no movement at all. This is with the motor running and run from the switch (rather than poking about with a wire)
Soooo...
-Checked the resistors and they work as per spec
-After a bit of prodding and poking decided to replace the wiring as thought the old wiring was causing as much resistance as the resistors.
-Unfortunately this produced no change
- On switch 1 I'm getting 1.5V to the motor.
Does anyone know the specs of the motor to work out what should be going through. Trying to work out if the motor is still too stiff or if the battery/alternator is not providing enough charge and what my next step.
Thanks for any tips
Kieron
-
dwayne
- Registered user
- Posts: 497
- Joined: 19 Apr 2008, 13:18
- 80-90 Mem No: 5649
- Location: Writtle Essex
Re: Heater Blower again.. and casing
Hiya , I'm guessing that something is causing the motor to stick , when I first did mine last year I stripped the motor down dipped the bearings in Gunk for the night , cleaned all the bushes . Before I took it apart it seemed to spin ok on the bench , when I'd cleaned it up the fan had lateral movement on the spindle about a 1/4 inch and a real noticeable difference in fan speed , before the fan stopped dead when it was switched off now it runs on for a while . Take it apart and give a good clean whilst you got it all open
1988 Autohomes Komet 1.9DG
DIKXEY
DIKXEY
-
dansimpson
- Registered user
- Posts: 1339
- Joined: 20 Jul 2010, 20:54
- 80-90 Mem No: 8552
- Location: Cheddleton, Staffordshire
Re: Heater Blower again.. and casing
Just checking, so you've got the resistors soldered together in the middle (in series), then white wire on one end - largest resistor, yellow /black in the middle, yellow on smallest resistor ( Ithink??)
1.5 volts to motor sounds way too low IMHO.
When you switch on the motor on speed 2 what volts you got at the motor, and I take it youve got 12v + a bit at the motor when you re on position 3?
Also, on position 1, what volts can you measure across each resistor? ie one end to middle, then middle to other end?
Dan
1990 1.9dg tintop....back in the fold.....
-
cymru_cowboy
- Registered user
- Posts: 0
- Joined: 05 Jun 2010, 23:45
Re: Heater Blower again.. and casing
Just checking, so you've got the resistors soldered together in the middle (in series), then white wire on one end - largest resistor, yellow /black in the middle, yellow on smallest resistor ( Ithink??)
Yep, got the two separate resistors from Brickwerks so got White wire from 1 going into 1.4 ohm resistor then into 0.7 ohm then into motor.
Yellow wire with black stripe running from2 into 0.7 ohm resistor into motor
Yellow wire bypassing the resistors and into motor.
When you switch on the motor on speed 2 what volts you got at the motor, and I take it youve got 12v + a bit at the motor when you re on position 3?
On speed 2 I'm getting 4.5 Volts at the motor. Didn't think to check the Voltage going straight to the motor which would have been a good way to check if theres a power issue. - I will check this in the morning once the doors have defrosted a bit and I can actually get them open!!
Current update - I've now semi dismantled the motor and managed to get it moving a lot more freely so will check voltage and if its made any difference tomorrow.
-
Red Westie
- Registered user
- Posts: 706
- Joined: 06 May 2007, 19:41
- 80-90 Mem No: 4712
- Location: Nottingham UK
Re: Heater Blower again.. and casing
When looking at specs on electric motors, manufacturers often quote the 'start voltage'. For 12volt motors that's typically between 3 - 5 volts so I doubt that the 1.5volt reading you are getting is correct on the first speed.
If you are absolutely sure you have followed Simons instructions regarding wiring these new resistors I would suggest you have further issues somewhere else in the wiring that are adding to the resistance overall.
After running for months/years with a partially seized motor the switches can overheat, switch contacts can burnt out or even just tarnish creating extra resistance and heat. Personally I would be looking at replacing the switch anyway and checking earths and wiring terminals for clean and tight contacts.
Also, if I had gone to all that trouble I would want to be 100% sure (as sure as you can be with these things) that any freeing up of the motor was going to be long lasting....so spraying with WD40 and turning it a few dozen times isn't really good enough....(I'm not saying that's what you've done...I'm just making a point) the bearings need something more permanent, spray grease at a minimum but actually applying grease/packing them and sealing the bearing ends in some way...I've read where people have sealed them with various things to prevent dust/grit entering.
Martin
On wings like angels whispers sweet
my heart it feels a broken beat
Touched soul and hurt lay wounded deep
Brown eyes are lost afar now sleep xxHayleyxx
my heart it feels a broken beat
Touched soul and hurt lay wounded deep
Brown eyes are lost afar now sleep xxHayleyxx
-
cymru_cowboy
- Registered user
- Posts: 0
- Joined: 05 Jun 2010, 23:45
Re: Heater Blower again.. and casing
Cheers for the help guys. I'd already WD40'd the motor and given it a few turns. Then decided to follow the wiki and use motor oil and drill the hole. Thats where I'd got to by my last post and lack of movement on speed 1.
I've now done the following
1) Got the case apart
2)Revealing
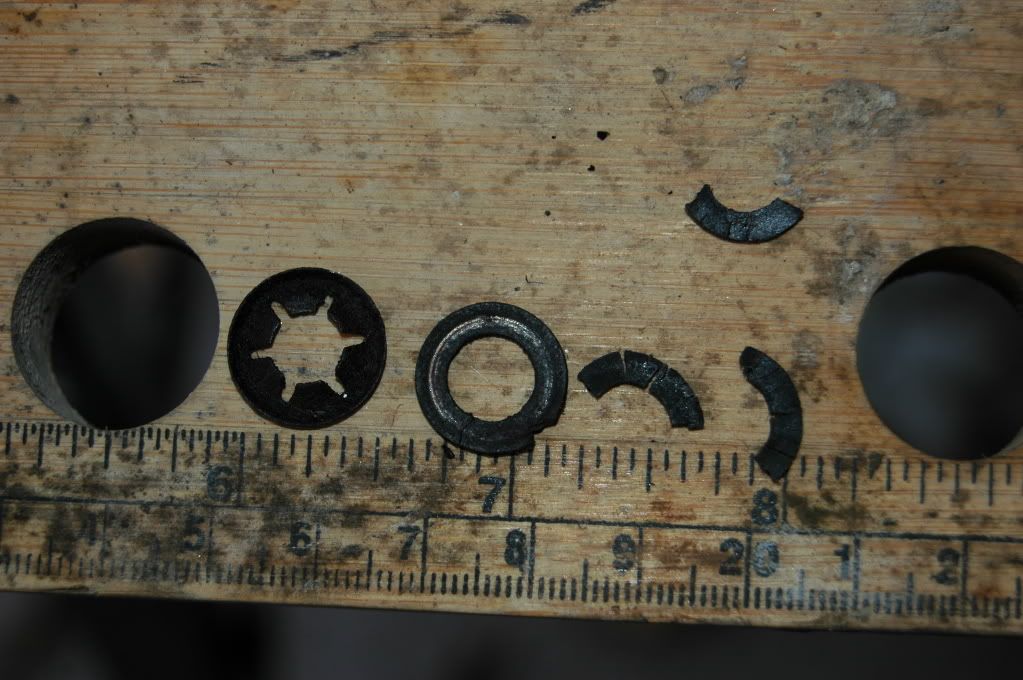
3) I then took the cap washer? if thats the correct term and two washers off the spindle
4) Removed the 2 metal clips and then worked it loose up and down the spindle. Kind of felt a sudden release and started to get the 1/4" play up and down the spindle. A load more oil followed by some spray grease and hooked it up to the van without reassembling and its flying.
5) This just leaves the question of replacing the perished washers. This is probably a really newbie question but anyone got any ideas as to what they would be made of? Nylon? Fibre? Copper? There so perished they look like nothing else on the shelves!!
6) This is as far as I could get the motor apart with my limited knowledge and courage. If I were to decide to remove the bearings and regrease them how would I go about it? Didn't want to start hammering about until I was sure what I was meant to be hitting!!
7) Also has anyone gone about reaspraying the dash? I've noticed some rustwhere it joins the window. There are also some lighsilver spots all over the dash. bartely noticable but not 100% pukka. Originally bought some primer and matt black from Halford along with a sandpaper kit. Any tips, not to do's and such like welcome.
Cheers for your help
Kieron
I've now done the following
1) Got the case apart
2)Revealing
3) I then took the cap washer? if thats the correct term and two washers off the spindle
4) Removed the 2 metal clips and then worked it loose up and down the spindle. Kind of felt a sudden release and started to get the 1/4" play up and down the spindle. A load more oil followed by some spray grease and hooked it up to the van without reassembling and its flying.
5) This just leaves the question of replacing the perished washers. This is probably a really newbie question but anyone got any ideas as to what they would be made of? Nylon? Fibre? Copper? There so perished they look like nothing else on the shelves!!
6) This is as far as I could get the motor apart with my limited knowledge and courage. If I were to decide to remove the bearings and regrease them how would I go about it? Didn't want to start hammering about until I was sure what I was meant to be hitting!!
7) Also has anyone gone about reaspraying the dash? I've noticed some rustwhere it joins the window. There are also some lighsilver spots all over the dash. bartely noticable but not 100% pukka. Originally bought some primer and matt black from Halford along with a sandpaper kit. Any tips, not to do's and such like welcome.
Cheers for your help
Kieron