hi
have just bought a 88 trident. need some help with finding instructions for the electrics, looks like sleepers own brand of zig.
another new trident
Moderators: User administrators, Moderators
-
airdale1000
- Registered user
- Posts: 10
- Joined: 08 Jan 2008, 18:42
- 80-90 Mem No: 4948
- Location: BRISTOL
-
Nicola&Tony

- Registered user
- Posts: 2674
- Joined: 01 Nov 2006, 18:18
- 80-90 Mem No: 3095
- Location: Wallsend, Tyne & Wear
Hi, is it the same as this one?
Tony
Tony
Last edited by Nicola&Tony on 12 Dec 2008, 20:16, edited 1 time in total.
Looking for: window apertures for side windows, at the back of the van
T25; 1985; RHD; 1.9DG petrol / LPG; white Autosleeper high-top; Looking rusty again!
LT31; 1993; RHD; 2.4L petrol; high-top; diy camper project.
T25; 1985; RHD; 1.9DG petrol / LPG; white Autosleeper high-top; Looking rusty again!
LT31; 1993; RHD; 2.4L petrol; high-top; diy camper project.
-
1664

- Registered user
- Posts: 8746
- Joined: 30 Mar 2006, 15:20
- 80-90 Mem No: 3299
- Location: Coventry Member
Re: another new trident
airdale1000 wrote:hi
have just bought a 88 trident. need some help with finding instructions for the electrics, looks like sleepers own brand of zig.
The Zig used in the Tridents is a long thin type but I think it's still a zig unit. Try the Wiki or google the zig unit number
Vorsprung Durch Technik my ar$e!
-
airdale1000
- Registered user
- Posts: 10
- Joined: 08 Jan 2008, 18:42
- 80-90 Mem No: 4948
- Location: BRISTOL
zig
Nicola&Tony wrote:Hi, is it the same as this one?
[IMG:512:384]http://i198.photobucket.com/albums/aa78 ... or/05R.jpg[/img]
Tony
yes it is.
tony
-
Nicola&Tony
- Registered user
- Posts: 2674
- Joined: 01 Nov 2006, 18:18
- 80-90 Mem No: 3095
- Location: Wallsend, Tyne & Wear
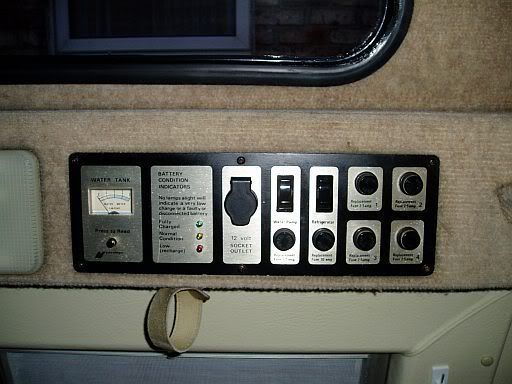
We didn't get any instructions when we got our van, but as far as the control panel is concerned the unit in the photo isn't really a zig unit as it doesn't have any facility to switch from one battery to another. Working from left to right across the panel:
1. water tank and battery condition indicator: if you've got water in your fresh water tank and you press the button the needle guage shows how much water is in the tank.
2. Press the same button to see an approximate indication of how much charge is left in your leisure / auxilliary battery (behind the passenger seat).
3. 12v socket outlet: some caravan shops sell an adapter that plugs into this and then gives you a cigarette lighter size socket for plugging things into e.g. mobile phone charger (handy if you're wild camping somewhere with no electric hook-up).
4. water pump: switch in the downwards position turns the pump on so that water comes out of the tap in your sink (assuming that you've got water in your fresh water tank). IMPORTANT: Autosleeper fitted in-line pumps rather than submersible ones. Submersible pumps are self-priming but the in-line ones aren't. I didn't know this and wrecked our pump shortly after getting the van by switching the pump on when it wasn't primed.
 To prime the pump get a short length of plastic tubing that will fit onto the end of the tap in your sink and suck on the tube until water comes through from the tank. Then you can switch the pump on. System stays primed unless you accidentally run the tank dry or deliberately drain it all down again.
5. Fridge switch: when driving around in the van, if you want your fridge running on battery (i.e. from the alternator) this switch needs to be in the down position (and the other switches on the fridge need to be in the right position). IMPORTANT: as soon as you switch the engine off though you need to take the fridge off the battery setting or flick the control panel switch upwards again, otherwise you'll quickly flatten your starter battery for the engine! 
6. Spare fuses for 4 and 5.
Hope this gives you the info that you were hoping for, but if not, just keep asking away, there's loads of helpful people on here.
Tony
DISCLAIMER: I'm not an expert at anything, but a novice at lots of things! 
1. water tank and battery condition indicator: if you've got water in your fresh water tank and you press the button the needle guage shows how much water is in the tank.
2. Press the same button to see an approximate indication of how much charge is left in your leisure / auxilliary battery (behind the passenger seat).
3. 12v socket outlet: some caravan shops sell an adapter that plugs into this and then gives you a cigarette lighter size socket for plugging things into e.g. mobile phone charger (handy if you're wild camping somewhere with no electric hook-up).
4. water pump: switch in the downwards position turns the pump on so that water comes out of the tap in your sink (assuming that you've got water in your fresh water tank). IMPORTANT: Autosleeper fitted in-line pumps rather than submersible ones. Submersible pumps are self-priming but the in-line ones aren't. I didn't know this and wrecked our pump shortly after getting the van by switching the pump on when it wasn't primed.
5. Fridge switch: when driving around in the van, if you want your fridge running on battery (i.e. from the alternator) this switch needs to be in the down position (and the other switches on the fridge need to be in the right position). IMPORTANT: as soon as you switch the engine off though you need to take the fridge off the battery setting or flick the control panel switch upwards again, otherwise you'll quickly flatten your starter battery for the engine!
6. Spare fuses for 4 and 5.
Hope this gives you the info that you were hoping for, but if not, just keep asking away, there's loads of helpful people on here.
Tony
DISCLAIMER: I'm not an expert at anything, but a novice at lots of things!
Looking for: window apertures for side windows, at the back of the van
T25; 1985; RHD; 1.9DG petrol / LPG; white Autosleeper high-top; Looking rusty again!
LT31; 1993; RHD; 2.4L petrol; high-top; diy camper project.
T25; 1985; RHD; 1.9DG petrol / LPG; white Autosleeper high-top; Looking rusty again!
LT31; 1993; RHD; 2.4L petrol; high-top; diy camper project.
-
airdale1000
- Registered user
- Posts: 10
- Joined: 08 Jan 2008, 18:42
- 80-90 Mem No: 4948
- Location: BRISTOL
Nicola&Tony wrote:We didn't get any instructions when we got our van, but as far as the control panel is concerned the unit in the photo isn't really a zig unit as it doesn't have any facility to switch from one battery to another. Working from left to right across the panel:
1. water tank and battery condition indicator: if you've got water in your fresh water tank and you press the button the needle guage shows how much water is in the tank.
2. Press the same button to see an approximate indication of how much charge is left in your leisure / auxilliary battery (behind the passenger seat).
3. 12v socket outlet: some caravan shops sell an adapter that plugs into this and then gives you a cigarette lighter size socket for plugging things into e.g. mobile phone charger (handy if you're wild camping somewhere with no electric hook-up).
4. water pump: switch in the downwards position turns the pump on so that water comes out of the tap in your sink (assuming that you've got water in your fresh water tank). IMPORTANT: Autosleeper fitted in-line pumps rather than submersible ones. Submersible pumps are self-priming but the in-line ones aren't. I didn't know this and wrecked our pump shortly after getting the van by switching the pump on when it wasn't primed.
5. Fridge switch: when driving around in the van, if you want your fridge running on battery (i.e. from the alternator) this switch needs to be in the down position (and the other switches on the fridge need to be in the right position). IMPORTANT: as soon as you switch the engine off though you need to take the fridge off the battery setting or flick the control panel switch upwards again, otherwise you'll quickly flatten your starter battery for the engine!
6. Spare fuses for 4 and 5.
Hope this gives you the info that you were hoping for, but if not, just keep asking away, there's loads of helpful people on here.
Tony
DISCLAIMER: I'm not an expert at anything, but a novice at lots of things!
thanks that is a great help.
tony
-
andylekker

- Registered user
- Posts: 48
- Joined: 18 Jun 2007, 12:44
- 80-90 Mem No: 0
- Location: Brighton
hi guys, you will find this site invaluable
i found this manual in the wiki section which is well worth downloading and printing out
https://club8090.co.uk/wiki/Au ... ent_manual
enjoy!
i found this manual in the wiki section which is well worth downloading and printing out
https://club8090.co.uk/wiki/Au ... ent_manual
enjoy!