Hi everybody, during a holiday with heavy rain I became aware of some loud drips to the rear of our van (wasn't the wife having a piddle), and discovered that it was the rain running down and dripping into the rear air vents. I have since fixed this by making up some 'guttering' out of thin aluminium which was bent in a vice and tweaked with pliers and painted black, these were then inserted between the plastic vent and the rear panel and were held by the screw that secures the vents. I then used a sealant to seal around the edges and guess what - they work a treat and haven't heard a drip since. I presume this is a common problem with these vents, anybody else stopped the drips successfully?
PS Sorry, tried to insert photo - totally baffled!
Dave[/quote]
Drip, drip and drip
Moderators: User administrators, Moderators
-
pilch
- Registered user
- Posts: 5
- Joined: 18 Jun 2007, 06:26
- 80-90 Mem No: 3715
- Location: dorset
- Contact:
Drip, drip and drip
Dave
1986 Autosleeper
D408 LFX
1986 Autosleeper
D408 LFX

Pics of the aqarium (behind rear lights) and where the water comes seeping out again in the end
http://img293.imageshack.us/my.php?imag ... 004zi3.jpg
http://img293.imageshack.us/slideshow/p ... 55yas.smil
(the brown stuff in the pic isn't rust, jsut some waxoyl kind of stuff ...which now has been applied generously to the inside of the "aquarium" sealing the seams and preventing rust from forming there)
Ex German army Syncro for sale
-
pilch
- Registered user
- Posts: 5
- Joined: 18 Jun 2007, 06:26
- 80-90 Mem No: 3715
- Location: dorset
- Contact:
Hi peasant, At least two of us are in the dry now, I was expecting a toad to jump out the screen on your slide show. For safe measure I have drilled a hole in centre of that area which holds the water and have put a rubber grommit in it to allow water to drain out if I should ever get water in there again.
dave
dave
Dave
1986 Autosleeper
D408 LFX
1986 Autosleeper
D408 LFX


-
Nicola&Tony

- Registered user
- Posts: 2674
- Joined: 01 Nov 2006, 18:18
- 80-90 Mem No: 3095
- Location: Wallsend, Tyne & Wear
Re: Drip, drip and drip
pilch wrote: . . . anybody else stopped the drips successfully?
I've been hanging onto the big sponges that I use to wash the car and van, once they've passed their best. I packed a couple of these into each of the recesses in the engine bay, below the air vents. It stopped the loud dripping noise that used to wake me during the night and hopefully the heat from the engine dries the sponges out again (but I haven't checked to make sure that this is the case
Tony
Looking for: window apertures for side windows, at the back of the van
T25; 1985; RHD; 1.9DG petrol / LPG; white Autosleeper high-top; Looking rusty again!
LT31; 1993; RHD; 2.4L petrol; high-top; diy camper project.
T25; 1985; RHD; 1.9DG petrol / LPG; white Autosleeper high-top; Looking rusty again!
LT31; 1993; RHD; 2.4L petrol; high-top; diy camper project.
Placing a sponge in there is not a good idea ...that'll make an ideal breeding ground for rust.
Water will aways get in through the vents, either directly through rain, or sucked in while driving in the wet.
A bit of guttering around the vents will only prevent the runoff from the roof gutter to run straight down (thus also stopping the drip) but some water will always get down there.
If the van is driven regularly that shouldn't be a problem, as through motion and heat the water will run off/dry out. But leave your van out in the wet on a slight rearward slope for a long while and you will have a fish (and rust) hatchery behind your rear lights.
No need to accelerate that artificially with a spongue
Ex German army Syncro for sale
-
Nicola&Tony
- Registered user
- Posts: 2674
- Joined: 01 Nov 2006, 18:18
- 80-90 Mem No: 3095
- Location: Wallsend, Tyne & Wear
Thanks for the info peasant, I'll take the sponges out and see if there's any sign of moisture there. We've never had standing water in those recesses though and the van is used a few times each week, for varying amounts of time.
Tony
Tony
Looking for: window apertures for side windows, at the back of the van
T25; 1985; RHD; 1.9DG petrol / LPG; white Autosleeper high-top; Looking rusty again!
LT31; 1993; RHD; 2.4L petrol; high-top; diy camper project.
T25; 1985; RHD; 1.9DG petrol / LPG; white Autosleeper high-top; Looking rusty again!
LT31; 1993; RHD; 2.4L petrol; high-top; diy camper project.
On some vans you may actually have a factory fitted spongue ...sound deadening material. If you happen on that and it's moist ...rip it out or else...
[img:500:375]http://farm1.static.flickr.com/104/2861 ... d8a6b5.jpg[/img]
[img:500:375]http://farm1.static.flickr.com/104/2861 ... d8a6b5.jpg[/img]
Ex German army Syncro for sale

-
Nicola&Tony
- Registered user
- Posts: 2674
- Joined: 01 Nov 2006, 18:18
- 80-90 Mem No: 3095
- Location: Wallsend, Tyne & Wear
maximus wrote:I have plastic ties on vents if you want pics let me know
Yes please Maximus! The day after I spotted this thread I had a look in the engine bay to check the sponges that I'd put in a few weeks ago. They were wet and hadn't been drying out with the heat of the engine, as I'd hoped!
Any photos of effective solutions would be much appreciated.
Tony
Looking for: window apertures for side windows, at the back of the van
T25; 1985; RHD; 1.9DG petrol / LPG; white Autosleeper high-top; Looking rusty again!
LT31; 1993; RHD; 2.4L petrol; high-top; diy camper project.
T25; 1985; RHD; 1.9DG petrol / LPG; white Autosleeper high-top; Looking rusty again!
LT31; 1993; RHD; 2.4L petrol; high-top; diy camper project.
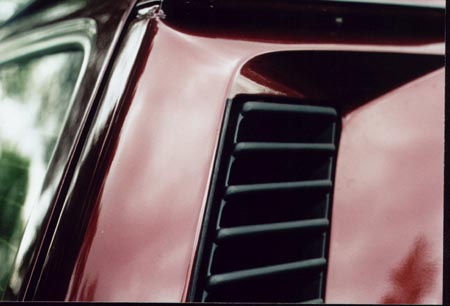
[img:450:306]http://www.t3-infos.de/images/Wasserabw ... inlass.jpg[/img]
You can hardly see it, but there is a black bead of sealant on the sheet metal just beside the plastic vent. That diverts all rain water dripping down from the roof gutter along the body and keeps it out of the vent.
Some direct rain water will still get in, but that's negligible and shouldn't drip audibly either
Ex German army Syncro for sale
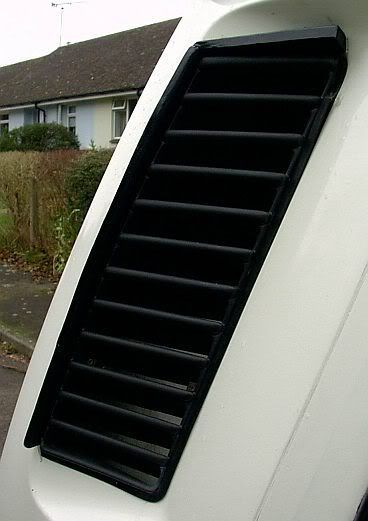
Its not that clear sorry  will try another but you can see the cable tie at the bottom its tied on from about the 3rd vent from the bottom
[IMG:640:480]http://i163.photobucket.com/albums/t317 ... NAH011.jpg[/img]
[IMG:640:480]http://i163.photobucket.com/albums/t317 ... NAH011.jpg[/img]
Membership Number---2930
O- -vw- -O
Vanless for a while
O- -vw- -O
Vanless for a while
-
Nicola&Tony
- Registered user
- Posts: 2674
- Joined: 01 Nov 2006, 18:18
- 80-90 Mem No: 3095
- Location: Wallsend, Tyne & Wear
Thanks for the photos, they're a big help. I also got in touch with pilch (see first post above) and he sent me some photos and info. about his solution, which he said I could post on here.
Pilch's air vent guttering:
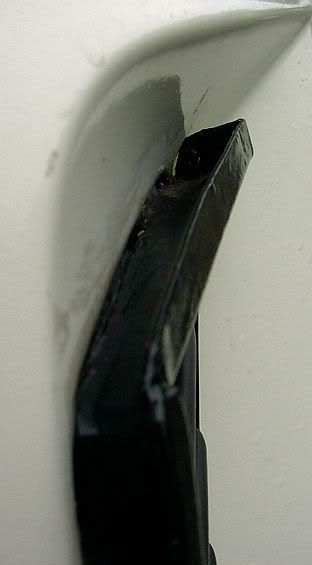

"Its made out of thin aluminium sheet that can be bent into shape by pliers and a vice. Its a bit hard to explain but what you need is one strip the length of the vent and another two inches longer than the length of top of vent and they need to be about 3 inches depth
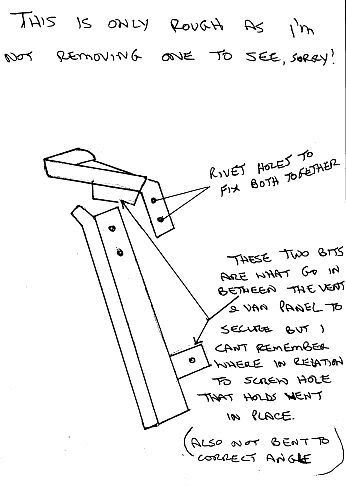
If you take the vents out (two screws to undo) you will see how far in the metal needs to be bent in to be able to secure it with the screw. The two pieces of metal once you have bent them into the gutter shape and the section that is going to go inside between the vent and van panel, you can then rivet the two together (I made it in two sections as it would be a lot easier to bend in one straight line rather than with the kink in it.
I then sprayed with primer and painted with black gloss. The other side is the same but don't forget its a mirror image so you can use the first one as a copy but check it is up the right way. When they were in I used a flexible clear filler to between the gaps. This job took the best part of a day as the bending of metal took a lot of checking and back up to shed and back again.
You might like to do the following as well, around the complete vent edge you have a gap which is quite wide in some places, I used some left over black rubber sealant strips from my double-glazing on house and after being cut to correct width I used a screwdriver and pushed it in and that made an all round seal around the vent. Also inside the engine compartment on both sides where the water used to come in from the vent and sit at the bottom of area (the panel has like a cross shape indent in it) I drilled a hole in this and inserted a rubber gromit so that if I ever did get water in there it would drain away, touch wood never had any in their since." (quoted from pilch's email)
Thanks everyone, I can get this properly sorted out now!
Tony
Pilch's air vent guttering:
"Its made out of thin aluminium sheet that can be bent into shape by pliers and a vice. Its a bit hard to explain but what you need is one strip the length of the vent and another two inches longer than the length of top of vent and they need to be about 3 inches depth
If you take the vents out (two screws to undo) you will see how far in the metal needs to be bent in to be able to secure it with the screw. The two pieces of metal once you have bent them into the gutter shape and the section that is going to go inside between the vent and van panel, you can then rivet the two together (I made it in two sections as it would be a lot easier to bend in one straight line rather than with the kink in it.
I then sprayed with primer and painted with black gloss. The other side is the same but don't forget its a mirror image so you can use the first one as a copy but check it is up the right way. When they were in I used a flexible clear filler to between the gaps. This job took the best part of a day as the bending of metal took a lot of checking and back up to shed and back again.
You might like to do the following as well, around the complete vent edge you have a gap which is quite wide in some places, I used some left over black rubber sealant strips from my double-glazing on house and after being cut to correct width I used a screwdriver and pushed it in and that made an all round seal around the vent. Also inside the engine compartment on both sides where the water used to come in from the vent and sit at the bottom of area (the panel has like a cross shape indent in it) I drilled a hole in this and inserted a rubber gromit so that if I ever did get water in there it would drain away, touch wood never had any in their since." (quoted from pilch's email)
Thanks everyone, I can get this properly sorted out now!
Tony
Looking for: window apertures for side windows, at the back of the van
T25; 1985; RHD; 1.9DG petrol / LPG; white Autosleeper high-top; Looking rusty again!
LT31; 1993; RHD; 2.4L petrol; high-top; diy camper project.
T25; 1985; RHD; 1.9DG petrol / LPG; white Autosleeper high-top; Looking rusty again!
LT31; 1993; RHD; 2.4L petrol; high-top; diy camper project.