Before starting this upgrade you will need to purchase a PWM Controller this works by a variable controller to allow any motor attached to it to be switched on in a gradual controlled movement instead of a switch that we currently have to control the heater blower in 4 movements.
I purchased a 20amp one as there are various different rated ones on the market, 20amp is enough to not burn out the motor. You can get them with an on/off switch or without i opted for the without, but if you want to kill the power to it completely then get one with a switch. See below pics of each one

so the one on the left is what i purchased, yes its chinese made but isn't most stuff these days, you can buy different models but they all do the same thing, the one on the right has the switch attached to it to isolate the power.
You will also need to buy some wiring, i bought some fresh Brown coloured Earth wire and some crimped connectors. I bought a new blower motor(Brickwerks one), and the heater box refurb kit.
Once you have this stuff you can set about starting, now you will have to remove your dash to do this as you need access to the heater box which has the resistor inside it and the blower motor itself. There are videos online on how to remove your dash if you want to see ahead how its done.

This picture i found on the internet so not mine, but you can see the speed resistor and blower motor in place.
This is a good thing because you can refurb your heater box at the same time and fit a brand new blower motor if required. See below pics.
Heater box taken apart.

Refurb kit for Heater box from Brickwerks

Refurb kit all ready and good to go back together, with blower unit all ready aswell.

So now this has been done you can move onto fitting back in heater box and then removing the speed resistor from the blower motor connections, earth crown and switch, this will not be needed and you should have removed what is in the below picture, i had 2 of these so ignore the one on the right.

As you can see i removed the black/red wire from the switch as this will be used to provide power to the PWM controller, i also used one of the longest yellow wires as my positive wire from the PWM Controller to blower motor, the rest is not needed.
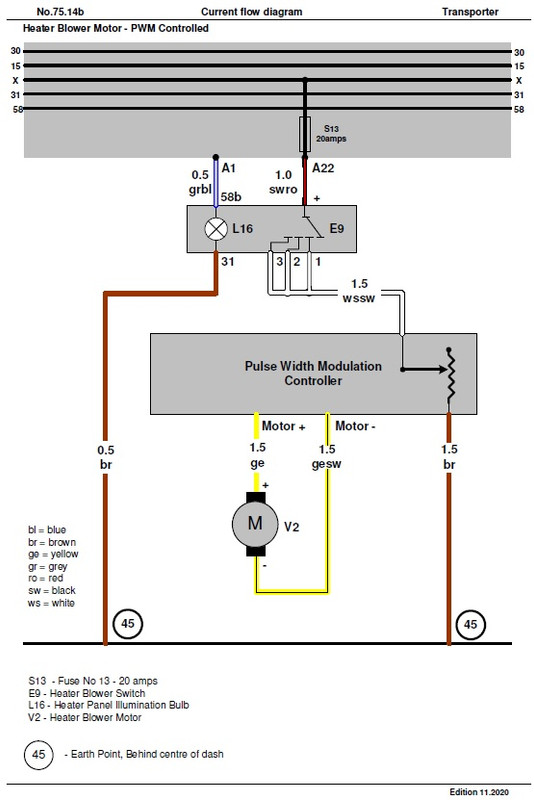
Once you have removed this you can then wire up the PWM controller, here is a wiring diagram of one with a switch but its fairly straight forward to connect if you dont have a switch as there are only 4 wires, Pos/Neg to PWM, then Pos/Neg to motor.

If you look on both Pam the colour coding of the wires and where they go to are shown, the negative from PWM i ran a new earth wire to the earth crowns that sit behind the Fuse Panel. You need to make sure you connect the correct side of the Blower motor aswell or else it will go in reverse. Positive is the top connection on the Blower Motor itself.
Once you have done this and connected the wires up, it would be a good time to test the operation of the blower motor before fitting the top part of the heater box back in, if all good then the heater box can be fitted together completely. The pwm controller i fitted to the left brace bar of the dash and tie wrapped it in place.
The dash panel can go back together now once you have completed this and ready for the next step.
This is where you need to connect the variable switch on the PWM to the heater control panel the one with the sliders on it, a bit of modification is required as the switch is slightly to small to fit through and fix in place with the nut, in order to do this i cut away some of the back of the control panel with a dremmel to allow enough of the thread to sit on the other side so the fixing nut can be tightened on. See Pics

be careful when doing this as cutting away too much might crack the panel its fitted to, this was enough for me on my mod.

as you can see i have cut enough away for me to be able to secure the nut and then i can place this back on the dash carefully, and attach the knob that sits on it.
And that's it job done, i now have a variable controlled heater blower, and i have now dispensed with the switch, and speed resistor that was inside the heater box.
Obviously this is all done at your own risk and if you don't feel upto this sort of task then dont do it. But you will have renewed your blower motor, referred the heater box, and anything else you could do whilst the dash is out. If you got any questions then feel free to ask.