Hi Guys,
I am looking to give my interior a bit of a spruce up. I am planning on keeping the basic look of my tired Viking interior with new units/doors etc and better hinges/catches. The question is what material is best to use for the Carcass work/units? I work at a Joinery company (not as a joiner unfortunately) so we tend to use 15-18mm Pre-Veneered MDF. Should I be looking at using a lightweight board of some kind or is it not going to make that much difference if I use MDF?
Any thoughts would be appreciated:)
Cheers CLive
Molly The Viking - Interior almost finished
Moderators: User administrators, Moderators
-
MOLLYTHEVIKING
- Registered user
- Posts: 50
- Joined: 20 Jan 2014, 22:08
- 80-90 Mem No: 0
Molly The Viking - Interior almost finished
Last edited by MOLLYTHEVIKING on 02 Jul 2014, 13:10, edited 3 times in total.
-
discipleofsketch

- Registered user
- Posts: 629
- Joined: 27 Aug 2012, 18:13
- 80-90 Mem No: 11538
- Location: Bristol
- Contact:
Re: Bespoke Interior to replace my Viking original
I'm not an expert on this, but I seem to remember someone on here saying how MDF absorbs too much moisture/ expands, so marine ply is a better choice?
Former owner of 1983 DG panel van and 1983 Devon moonraker pop-top, 1.9 tdi (1z) conversion
-
MOLLYTHEVIKING
- Registered user
- Posts: 50
- Joined: 20 Jan 2014, 22:08
- 80-90 Mem No: 0
Re: Bespoke Interior to replace my Viking original
I can get moisture resistant MDF so that will prevent any movement, just more concerned about the weight but not really sure its going to make that much difference?

Re: Bespoke Interior to replace my Viking original
Clive
Someone on here (don't remember who I'm afraid) suggested that for a true lightweight solution you should construct a frame from, say, three-quarter inch square timber, and simply fix lightweight panels over the frame. Seems like a sensible approach, as the panels themselves don't typically carry much load.
Someone on here (don't remember who I'm afraid) suggested that for a true lightweight solution you should construct a frame from, say, three-quarter inch square timber, and simply fix lightweight panels over the frame. Seems like a sensible approach, as the panels themselves don't typically carry much load.
"I'm a man of means, by no means....King of the Road!"
1983 Viking Xplorer, 2.1DJ
1983 Viking Xplorer, 2.1DJ

Re: Bespoke Interior to replace my Viking original
I'm going down the route of using 12mm Birch ply to construct my interior, strong and lightweight. Also a third of the price compared to vohringer etc. its easy on the eye when varnished or stained. Using MDF is not the route I tell anyone to take.
1986 1.6 D Bundeswehr T3 Kombi
-
MOLLYTHEVIKING
- Registered user
- Posts: 50
- Joined: 20 Jan 2014, 22:08
- 80-90 Mem No: 0
Re: Bespoke Interior to replace my Viking original
I may use Birch Ply and then laminate it with a wood effect?
Re: Bespoke Interior to replace my Viking original
No need, it finishes nice as is or you can stain for a darker look etc.
1986 1.6 D Bundeswehr T3 Kombi
-
MOLLYTHEVIKING
- Registered user
- Posts: 50
- Joined: 20 Jan 2014, 22:08
- 80-90 Mem No: 0
Re: Bespoke Interior to replace my Viking original
Its only so that I can match the existing ceiling that is in a Walnut effect laminate....
-
mark
- Registered user
- Posts: 1248
- Joined: 05 Jun 2011, 11:06
- 80-90 Mem No: 9768
- Location: hull. f*** me the city of culture
Re: Bespoke Interior to replace my Viking original
you can use a veneered far eastern ply, build a frame and use 4mm ply to clad (do it this way if you can). if your going to use mdf because of the size of the individual units I would be tempted to use 9mm veneered mdf, but if your getting your mdf cheap then I wouldn't be bothered. the problem with mdf is it will not take a screw and if they do feel tight they will come loose with time, and if you cant trench and glue the units together you could well end up with a timber frame any way.
mark
mark
1988 1.9 dg Caravel.
https://i.imgur.com/oIt3VLk.jpg
https://i.imgur.com/oIt3VLk.jpg
-
MOLLYTHEVIKING
- Registered user
- Posts: 50
- Joined: 20 Jan 2014, 22:08
- 80-90 Mem No: 0
Re: Bespoke Interior to replace my Viking original
I've started stripping the units out now so need to make my mind up lol. I think I may go along the route of a basic stud frame clad in thin plywood to form the internals. I may then use a veneered MDF board for the fronts/doors so they have some thickness to them (15-19mm) for a bit of quality. My next conundrum is i like the idea of real wood rather than the laminate option. The only problem is that it won't be quite as hardwearing. The plus side will be that if it gets scuffed/scratched i can sand the face and respray it. Am thinking of a thin Corian worktop as well rather than timber......

Re: Bespoke Interior to replace my Viking original
I recently ripped my old interior out of the van and much of it was MDF, the amount of moisture it had absorbed is scary, the doors were the least affected but still swollen and very very heavy. I'd probably consider exterior grade ply personally.
1985 1.9TD AAZ -Starlight Interior
2015 California Beach
2015 California Beach
-
MOLLYTHEVIKING
- Registered user
- Posts: 50
- Joined: 20 Jan 2014, 22:08
- 80-90 Mem No: 0
Re: Bespoke Interior to replace my Viking original
Thats my concern with MDF. Moisture resistant MDF won't do this but Ply is definitely more stable.
On another note. I assume that the reason most interiors have overlay doors rather than flush is so that if there is any movement the door gaps aren't visible. I am going to go with the flush route as I prefer the look. But am planning on using a quality kitchen hinge with catches to keep them closed so in theory they shouldnt move.....Hopefully!
On another note. I assume that the reason most interiors have overlay doors rather than flush is so that if there is any movement the door gaps aren't visible. I am going to go with the flush route as I prefer the look. But am planning on using a quality kitchen hinge with catches to keep them closed so in theory they shouldnt move.....Hopefully!
-
MOLLYTHEVIKING
- Registered user
- Posts: 50
- Joined: 20 Jan 2014, 22:08
- 80-90 Mem No: 0
Re: Bespoke Interior to replace my Viking original
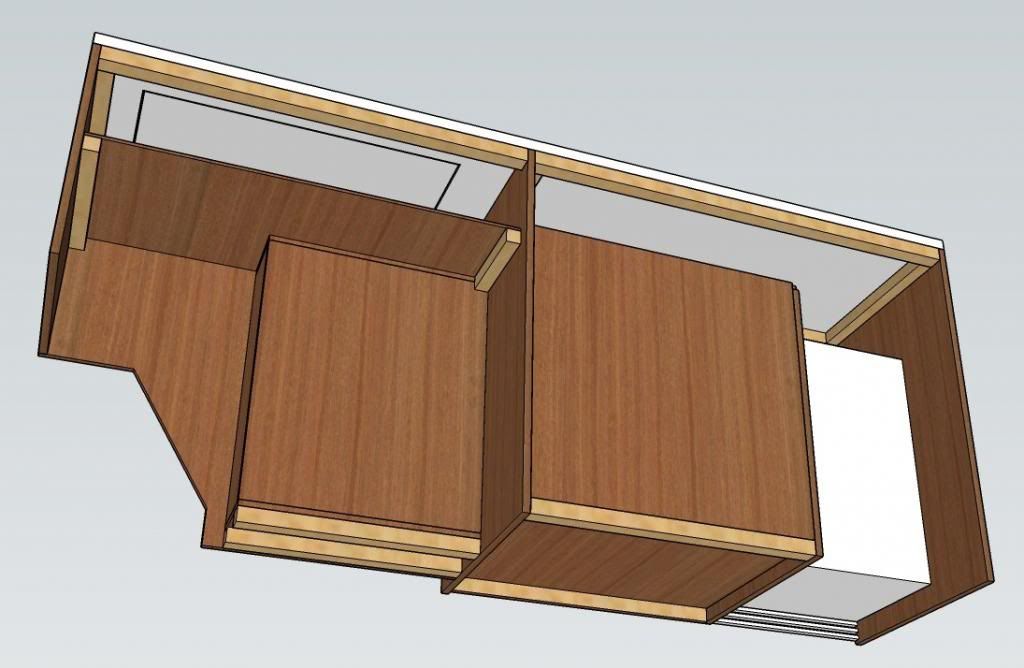
Had a quick go at laying out the new design. Not much different to how it was, but thought I would crank the worktop out slightly to give me more room for the Hob/Sink. Looking at using Corian for the worktop as it is completely water resistant. I just need to tweak the cubby hole next to the seat.....
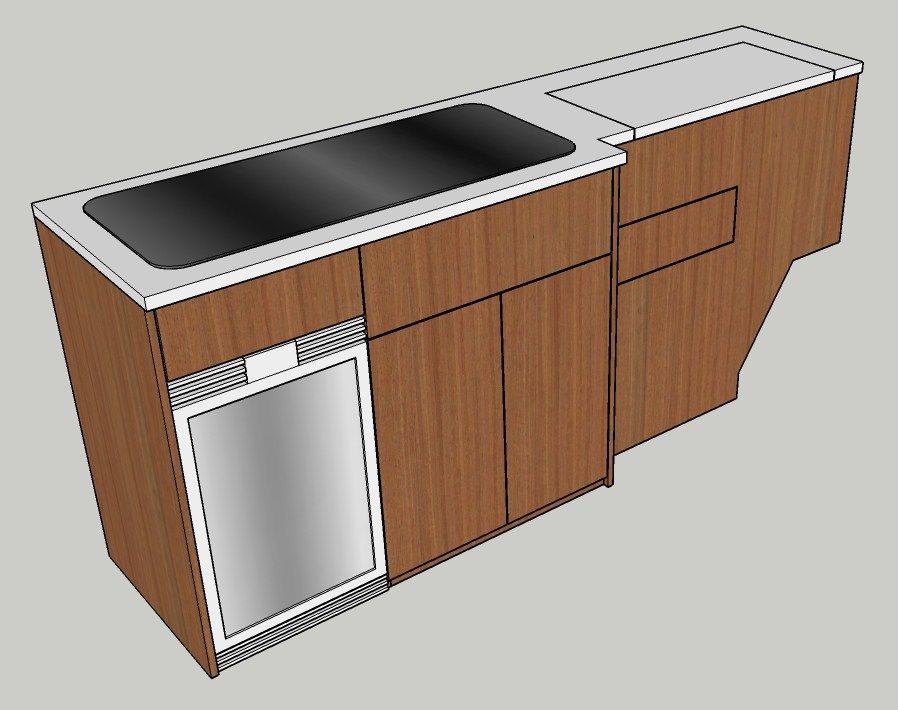


Last edited by MOLLYTHEVIKING on 05 Mar 2014, 08:41, edited 1 time in total.
Re: Bespoke Interior to replace my Viking original
Looks nice. That cubby next to the seat is an interesting problem. The space behind it was for the large on-board water carrier, as you know. I see that you've so far not reused that space - are you planning to put a water tank/carrier there? When I removed my water tank I briefly made that space accessible by putting a removable base in the cupboard above, but it would definitely be reserved for occasional use since access to it would require the cupboard above to be emptied.
I've now installed a Propex on the floor where the water tank was:
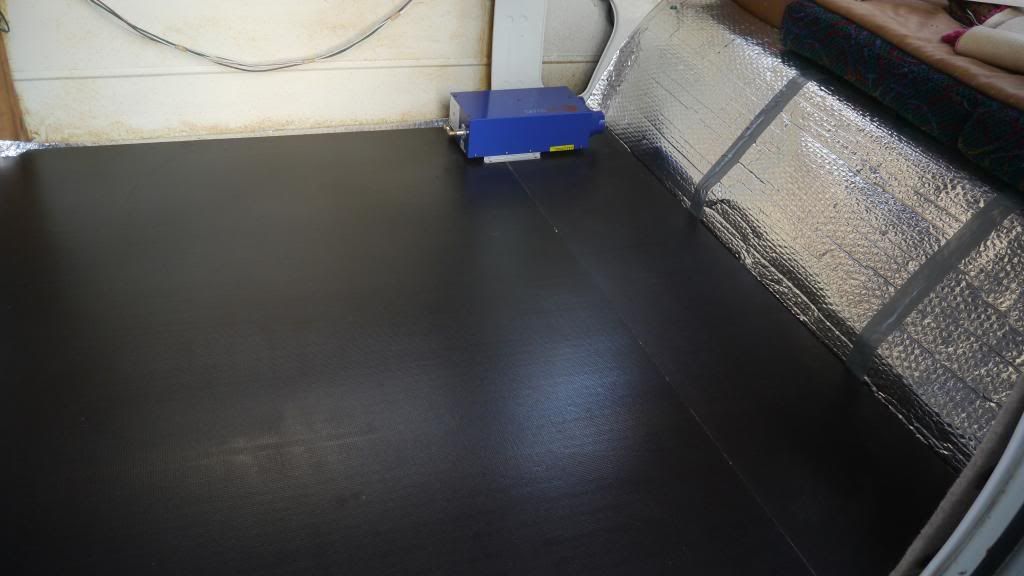
That takes up a lot less space than the water tank. The challenge now is to make that extra space accessible more conveniently. My current thought is to box around the propex and the wheel arch, leaving a big space that is accessible through both the worktop 'lid' and the cubby flap. Maybe a half width shelf in there might make the space more useful too. Since removing the on-board water tank I'm using a 10 litre portable carrier and a drop in pump - provided that space is easily accessible it might be a good place to put that carrier, rather than under the sink.
It's quite a tricky space to use well, so I'd be interested to see what you've got planned.
I've now installed a Propex on the floor where the water tank was:
That takes up a lot less space than the water tank. The challenge now is to make that extra space accessible more conveniently. My current thought is to box around the propex and the wheel arch, leaving a big space that is accessible through both the worktop 'lid' and the cubby flap. Maybe a half width shelf in there might make the space more useful too. Since removing the on-board water tank I'm using a 10 litre portable carrier and a drop in pump - provided that space is easily accessible it might be a good place to put that carrier, rather than under the sink.
It's quite a tricky space to use well, so I'd be interested to see what you've got planned.
"I'm a man of means, by no means....King of the Road!"
1983 Viking Xplorer, 2.1DJ
1983 Viking Xplorer, 2.1DJ
-
MOLLYTHEVIKING
- Registered user
- Posts: 50
- Joined: 20 Jan 2014, 22:08
- 80-90 Mem No: 0
Re: Bespoke Interior to replace my Viking original
I still haven't decided on what to do with regards to the water tank, for what we are going to use the camper for ( more day trips and weekends away) I may we'll go with a water carrier and pump rather than the tank. This will then free up a lot more storage space. Out of interest what tank are you using? If I find a suitable one I can play around with the design a bit more 