Page 4 of 6
Re: Gear selection problem.
Posted: 11 Oct 2012, 09:26
by joe75
alewing wrote:Please find link to a couple of threads i started re my diesel tank. however, filler pipe differs for the pick up and a b*gger to get the correct gaskets/seals....but after some searching ~ vw classics and german ebay came up trumps...in fact i think i have 2 off everything associated with the filler pipe and seals.
my tanks straps were fully serviceable, only light surface corrosion - media blasted and painted like new. I didnt have to remove sender to remove/refit tank, but i did remove it for other reasons. all feed/return & breather pipes replaced for new.
https://club8090.co.uk/forum/viewtopic.php?f=4&t=94396
hopefully some useful bits in this link. let me know if you need any further information etc.
good luck with it all.
cheers,
Ash
Hey Ash,
Thanks for the link to your post. I think i will continue my tank rebuild on the end of your post as that way it will keep all the info in the same place.

Today was a day of cleaning. 25yr old dirt... lovely! VW managed to design some great dirt traps along the chassis rails and being the suspension spring towers. I had to get the hover up in there to suck out all the crap, there was tons of it.
I also took the time to pressure wash my tank and gearbox.

So just a matter of ordering parts and getting it back together... All this due to a bad gear change!
Re: Gear selection problem.
Posted: 11 Oct 2012, 12:57
by HarryMann
I had to get the hoover up in there to suck out all the crap, there was tons of it.
Yes, using a rattle wire (fence wire of various lengths and shapes) and a powerful hoover is a good way of working... it is very important to dry out/rattle out and vacuum out as much detritus as possible (before Dinitrolling/Waxoyling)
Here are some tools I've been using for years now:-
https://club8090.co.uk/wiki/Ge ... ning_tools
I've also acquired some very long handled wire brushes that my local DIY sell (long progressuvely curved thin wooden handles, about 15" at a guess)
and here is a useful inspection method:-
https://club8090.co.uk/wiki/Te ... inspection
Compressed air is also useful, using a two foot long 1/4" bore stiff tube with nozzle, try alternating with vacuuming
Then your trusty HD vac-cleaner,
with some step-down rubber hoses taped onto wedge-tool can often get access, to suck a lot of (dry) matter out... can be a long winded job though

, 5 minutes it is not! Half a day barely covers it actually
https://club8090.co.uk/wiki/Ge ... um_cleaner
Currently, I've about 1.2 metres of 5/8" water hose gaffer taped to a spare crevice tool.. this allows me to vacuum the full length of the rear chassis legs, across the rear cross-member and the whole front sills
Another tip is to use a hot air gun (on low) to dry and loosen muck, then rattle it with wire, then vac and blast alternately.
Currently using Dinitrol 3124 and 3654, rusty parts with RC800/900 and then painted with Chassis Black Enamel of somekind.
.. and finally, try not to block up any of the small swaged drain holes, or folded sections that are made deliberately to leave hones (e.g. those in the bottom corners of the rear suspension towers). The sills have at least one of these drains under the C pillar area
Cheers
Re: Gear selection problem.
Posted: 11 Oct 2012, 15:51
by HarryMann
Good link Ashley...
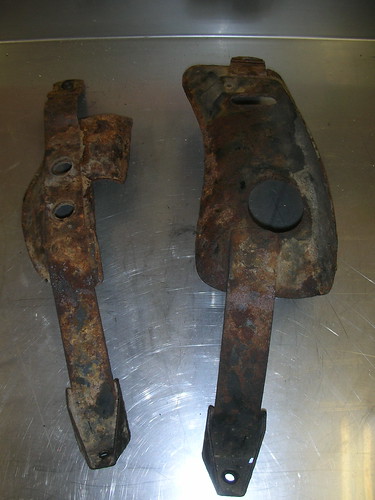
Those tank straps look mint c.f. mine

..try a twist-knot wire brush on them, maybe they will then show some perforation, but they don't have to be too strong, just future-corrosion-proof and they'll be fine!
-filler neck rubber hose (only found on van cafe web site) expensive for a rubber hose?
Yes, I bet

It
is special stuff and a strange diameter, over here it'd be 2nd hand if at all possible
Isn't the sender tube hose a breather?
I removed a tank with the sender in too
I also just removed my Doka n/s tank strap without removing the fuel pipe.. by slotting it, will put a picture up.
Then dropped tank a bit quite enough for some good access above with my special cleaning tools, hehe
Dinitroled above and behind (the tank crash-load frame) and back up... hope I didn't disturb any pipework

Re: Gear selection problem.
Posted: 17 Oct 2012, 19:38
by lhd
Joe what are the lobes like on the release fork?
I had a similar problem and it was due to the lobes being almost flat, this causes the bearing to not slide true back and forth.
Rob.
Re: Gear selection problem.
Posted: 18 Oct 2012, 03:30
by joe75
lhd wrote:Joe what are the lobes like on the release fork?
I had a similar problem and it was due to the lobes being almost flat, this causes the bearing to not slide true back and forth.
Rob.
i will have a look

Re: Gear selection problem.
Posted: 18 Oct 2012, 13:21
by HarryMann
Joe,
Here is a pciture from the 80-90Wikipedia, that shows medium flatting wear of the forks, as a reference
 From here in the Wiki
Re: Gear selection problem.
Posted: 18 Oct 2012, 22:57
by joe75
Re: Gear selection problem.
Posted: 18 Oct 2012, 23:50
by HarryMann
Sorry, mislinked that picture, with urls instead of imgs, now fixed!
Can round those flats off with stone, or at least take the edges off them, so the transition is not so bad.
Re: Gear selection problem.
Posted: 19 Oct 2012, 01:26
by lhd
Looks similar to the problem I had.
The release bearing had come unclipped on the same side.
It's definitely worn, it wasn't until I saw an un worn one that I realised how much mine was worn.
Whether its excessive, I'm sure Aiden will be along shortly, but at between 20-40 euros new, I personally would replace it, but that's just me.
Rob.
Re: Gear selection problem.
Posted: 19 Oct 2012, 01:32
by joe75
lhd wrote:Looks similar to the problem I had.
The release bearing had come unclipped on the same side.
It's definitely worn, it wasn't until I saw an un worn one that I realised how much mine was worn.
Whether its excessive, I'm sure Aiden will be along shortly, but at between 20-40 euros new, I personally would replace it, but that's just me.
Rob.
I agree with replacing it. Do it once, do it properly attitude.
Seen the parts in the USA on links below. Anyone know of
good quality UK parts. As they are small parts I can get them sent to good old Mum & Dad who will repackage them and sent on to NZ saving myself lots of dosh on P&P.
http://www.van-cafe.com/home/van_1350604251933/page_646" onclick="window.open(this.href);return false;
http://www.van-cafe.com/home/van_1350604251933/page_645" onclick="window.open(this.href);return false;
Re: Gear selection problem.
Posted: 19 Oct 2012, 05:58
by Aidan
fork is fine
personally if replacing either use a genuine VW one from classic parts £55 ish or better still a RJES one which are mega strong - the cheap ones are badly welded and oversize/undersize on the diameter/splines
but as I say that one still looks fine, a little tickle with a stone that's all, plenty of copper slip on the back of the release bearing tabs where they ride/pivot on the fork and to lube the spring where it clips in the back of the knee
slight end float is fine, the guide tube guides the bearing and keeps it centred
Re: Gear selection problem.
Posted: 19 Oct 2012, 09:23
by HarryMann
plenty of copper slip on the back of the release bearing tabs where they ride/pivot on the fork and to lube the spring where it clips in the back of the knee
Yes, that's the important bit, copper-slip.
NB. Aidan will well remember an arm of my clutch fork breaking at the weld to the shaft, an original VW one.
So whenever you have the box out, just check the fork welds for any incipient hairline cracks, because that's a show stopper!


The repaired one is now in my
'touring' toolbox!
NB. Notice also the stoning of the fork's flats; as Aidan says, just lightly round off the edges of the flats to regain a smooth disengagement
Re: Gear selection problem.
Posted: 30 Oct 2012, 05:09
by joe75
So the parts are slowly coming in from all over the world.

It may be over kill replacing some parts but the van is on it's last chance
. By that I mean if it keeps letting us down it will have to be sold as we can't have a daily driver that keeps going wrong
all the time, and we have certainly had our share of problems with it even taking into account its age.
Anyway ....
I ordered a new cross shaft and see that the welds are as bad as everyone says even though it is a VW one. I will brace it and weld it before I fit it.

As I have a new bushing kit I will need to remove the brass bushing below that is in the gearbox. Anyone got any tips getting the old one out of the gearbox? I really don't want to damage my box. As for fitting the new bush back into the box I have seen on a samba post that using dry ice to shrink the new bush means it will fit without damaging it. Ideas, thoughts and advice gratefully accepted.


Re: Gear selection problem.
Posted: 30 Oct 2012, 06:27
by Aidan
slide hammer to remove the old bush, the new one just taps in, it's split so it can reduce diameter slightly and be a snug fit, top tip fit the shaft before the nylon bush and remember the inner circlip, thrust washer and gland seal before putting the nylon bush in
Re: Gear selection problem.
Posted: 30 Oct 2012, 07:59
by joe75
Thanks Aidan.
I have used a slide hammer for body work but never to remove a bush like this. I will look into how this works....


