Stands under the ends of the moustache bar for most jobs or at the ends of the rear chassis crossmember for a drivetrain drop or swingarm removal. It wont go anywhere.
If the ground isnt level its dicey, full stop.
Tyres are soft and the van will wag from side to side while working, ramps have side rails to stop the tyre escaping and have a much larger footprint than your flat, smooth woodblocks that I can see.
Again, with respect, not a technique to be encouraged.
One man photo guide to removing a late Petrol van gearbox.
Moderators: User administrators, Moderators
-
silverbullet
- Trader
- Posts: 17629
- Joined: 08 Jun 2009, 09:51
- 80-90 Mem No: 6908
- Location: Surrey Syncronaut #156
- Contact:
Re: One man photo guide to removing a late Petrol van gearbox.
1985 Oettinger 3.2 wbx-6 Caravelle RHD syncro twin slider. SA Microbus bumpers, duplex winch system, ARC 7X15 alloys,
"Schrödinger's syncro"
Syncronaut #156
"Schrödinger's syncro"
Syncronaut #156
-
itchyfeet

- Registered user
- Posts: 12428
- Joined: 23 Jul 2007, 17:24
- 80-90 Mem No: 12733
- Location: South Hampshire
Re: One man photo guide to removing a late Petrol van gearbox.
Sitting on it's tyres on blocks or ramps on firm ground is no problem at all IMO, this is exactly where it usually sits and the ground is solid. There is no 'wagging' on my tyres that's going to cause any problems, it's not going to fall off.
You will notice I said ...... I prefer to jack and lower on ramps (opposite so it can't roll off) or wooden blocks.
This is my preference but your point is well noted that safety is very important and there are many ways to jack a vehicle.
I have added recommendation is that people research it for themselves and do what they are happy with, to keep you happy I have deleted that picture.
With respect I wouldn't encourage people to modify brakes with parts that have not been designed by VW but I see no reason why others should not do that if they are happy with it
1988 DG WBX LPG Tin Top
itchylinks
itchylinks
-
silverbullet
- Trader
- Posts: 17629
- Joined: 08 Jun 2009, 09:51
- 80-90 Mem No: 6908
- Location: Surrey Syncronaut #156
- Contact:
Re: One man photo guide to removing a late Petrol van gearbox.
Please, I dont have time for this. Nobody has to modify their brakes, I wouldnt encourage the inexperienced to ever do that. But diy servicing should always be done safely, there is no excuse for not having the basic tools and I count axle stands among them.
Still cant see why you feel it necessary to lift both ends of the van for this job though.
Offski.
Still cant see why you feel it necessary to lift both ends of the van for this job though.
Offski.
1985 Oettinger 3.2 wbx-6 Caravelle RHD syncro twin slider. SA Microbus bumpers, duplex winch system, ARC 7X15 alloys,
"Schrödinger's syncro"
Syncronaut #156
"Schrödinger's syncro"
Syncronaut #156
-
itchyfeet
- Registered user
- Posts: 12428
- Joined: 23 Jul 2007, 17:24
- 80-90 Mem No: 12733
- Location: South Hampshire
Re: One man photo guide to removing a late Petrol van gearbox.
silverbullet wrote:Please, I dont have time for this. Nobody has to modify their brakes, I wouldnt encourage the inexperienced to ever do that. But diy servicing should always be done safely, there is no excuse for not having the basic tools and I count axle stands among them.
Still cant see why you feel it necessary to lift both ends of the van for this job though.
Offski.
You don't have time but you keep pushing the point, Your safety concerns were noted on my first reply, I have changed the post and deleted the pic what more do you want?
I have axle stands but I prefer blocks of wood and ramps, it's my choice I don't need excuses it's a one man job so I don't endanger others by my actions.
I have removed the box with the front down, yes it can be done but I found it much easier with the front up, I'm not fat but the time it takes pays off imo as there is so much more room to work.
Any vehicle modification carries risk, being experienced is not enough imo, vehicle manufactureres spend alot of money doing extensive testing which nobody making parts to modify vehicles can possibly match.
1988 DG WBX LPG Tin Top
itchylinks
itchylinks
-
itchyfeet
- Registered user
- Posts: 12428
- Joined: 23 Jul 2007, 17:24
- 80-90 Mem No: 12733
- Location: South Hampshire
Re: One man photo guide to removing a late Petrol van gearbox.
do you mean the spring ' fingers' I didn't know this, I wonder how many people do?Aidan wrote:The little sachet of grease in the clutch kit is for the tips of pressure plate.
Can't see it mentioned in Bentley.
1988 DG WBX LPG Tin Top
itchylinks
itchylinks
-
what2do
- Registered user
- Posts: 2857
- Joined: 05 Oct 2012, 08:55
- 80-90 Mem No: 11974
- Location: Salisbury
Re: One man photo guide to removing a late Petrol van gearbox.
silverbullet wrote:Back to the start.
Tyres on wood blocks on grass at the heavy end? See you in casualty....
This should never be endorsed.
If you are forced to work on soft ground then please at least put down a 8'x4' sheet of 3/4" ply and use chassis/axle stands to support the vehicle.
Too many enthusiasts get crushed by their own car every year. Dont join them.
Good tip!!! I'll remember to carry a full sheet of ply when next working on a tractor that spat it's dummy out in a field!!
Why would the glass be anything other than half full?
'89 panel van, 1.9 DG.
'89 panel van, 1.9 DG.
-
silverbullet
- Trader
- Posts: 17629
- Joined: 08 Jun 2009, 09:51
- 80-90 Mem No: 6908
- Location: Surrey Syncronaut #156
- Contact:
Re: One man photo guide to removing a late Petrol van gearbox.
Somewhat out of context I think! Heavy plant and farm machinery is in another league when it comes to maiming and mortality.
Work safe.
Work safe.
1985 Oettinger 3.2 wbx-6 Caravelle RHD syncro twin slider. SA Microbus bumpers, duplex winch system, ARC 7X15 alloys,
"Schrödinger's syncro"
Syncronaut #156
"Schrödinger's syncro"
Syncronaut #156
-
what2do
- Registered user
- Posts: 2857
- Joined: 05 Oct 2012, 08:55
- 80-90 Mem No: 11974
- Location: Salisbury
Re: One man photo guide to removing a late Petrol van gearbox.
I believe you're right which is why I somewhat cheekily posted the comment. I still believe a block of solid timber is as good as anything in this instance, large enough to support the necessary object yet having a small enough footprint for it to 'compress' the ground beneath it, thus 'firming' it up to prevent movement whilst working. On a side note, I genuinely believe there are less accidents involving enthusiasts than that with professionals that have become complacent. My reason for this belief..........today I was sent a youtube link titled 'crane fails' - holy cow, beyond comprehension.
One job I'd do with the gearbox removed is undo/drill out/grind off the fastener that keeps the brake union fixed to the body. The one that the fuel line fastens to on the sloped part of the floor pan. Mine refuses to move and I've nothing more than the strength of a toddler at the angles required to get a grip on it. New fuel line is currently 'loose' at that point and I doubt very much that my tester will approve. Hey ho.
One job I'd do with the gearbox removed is undo/drill out/grind off the fastener that keeps the brake union fixed to the body. The one that the fuel line fastens to on the sloped part of the floor pan. Mine refuses to move and I've nothing more than the strength of a toddler at the angles required to get a grip on it. New fuel line is currently 'loose' at that point and I doubt very much that my tester will approve. Hey ho.
Why would the glass be anything other than half full?
'89 panel van, 1.9 DG.
'89 panel van, 1.9 DG.
-
itchyfeet
- Registered user
- Posts: 12428
- Joined: 23 Jul 2007, 17:24
- 80-90 Mem No: 12733
- Location: South Hampshire
Re: One man photo guide to removing a late Petrol van gearbox.
Aidan has worked his magic on my gearbox and fitted a good used Klingenberg crown and pinion set and a new steel mainshaft bearing retention plate at his emporium of shiny new cogs this week.
So before it goes back next weekend I have to check the end float, foolishly I never did it last time the engine or gearbox was out.
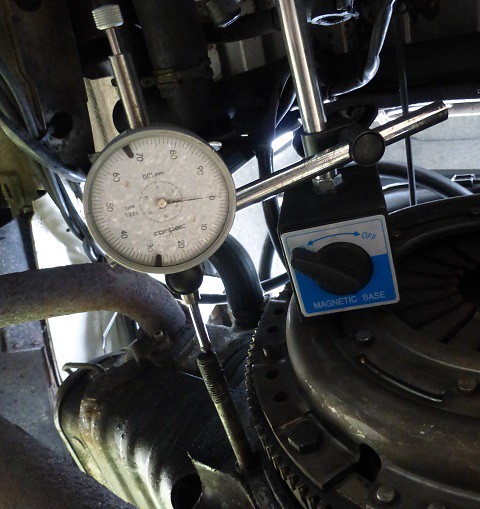
Release aux belt from crank pulley so that crank is free to move.
 P1020784 by Paul_Barr, on Flickr
This is a magnetic stand and a dial gauge, it's what you need really but there are other methods, using brackets bolted on and feeler gauges. I'm lucky enough to be able to borrow this one.
I have done an initial check with the clutch on, you need to pull the flywheel away from the engine, zero the gauge and then push the flywheel in without turning it. Repeat this several times to be sure of the measurement, it should be repeatable or you are doing it wrong.
I had 0.16mm ( should be 0.07-0.13 0.15 limit) so looks like flywheel is coming off.
 P1020788 by Paul_Barr, on Flickr
rotate the engine until you see a hole in the flywheel then insert an m8 bolt to lock the flywheel
 P1020799 by Paul_Barr, on Flickrl]
remove 6 bolts holding clutch pressure plate to flywheel 13mm spanner
 P1020800 by Paul_Barr, on Flickr
prise clutch pressure plate off it's pins without dropping it and remove the friction plate, note the way it is in.
 P1020803 by Paul_Barr, on Flickr
 P1020806 by Paul_Barr, on Flickr
So before it goes back next weekend I have to check the end float, foolishly I never did it last time the engine or gearbox was out.
Release aux belt from crank pulley so that crank is free to move.
P1020784 by Paul_Barr, on FlickrThis is a magnetic stand and a dial gauge, it's what you need really but there are other methods, using brackets bolted on and feeler gauges. I'm lucky enough to be able to borrow this one.
I have done an initial check with the clutch on, you need to pull the flywheel away from the engine, zero the gauge and then push the flywheel in without turning it. Repeat this several times to be sure of the measurement, it should be repeatable or you are doing it wrong.
I had 0.16mm ( should be 0.07-0.13 0.15 limit) so looks like flywheel is coming off.
P1020788 by Paul_Barr, on Flickrrotate the engine until you see a hole in the flywheel then insert an m8 bolt to lock the flywheel
P1020799 by Paul_Barr, on Flickrl]remove 6 bolts holding clutch pressure plate to flywheel 13mm spanner
P1020800 by Paul_Barr, on Flickrprise clutch pressure plate off it's pins without dropping it and remove the friction plate, note the way it is in.
P1020803 by Paul_Barr, on FlickrP1020806 by Paul_Barr, on Flickr
Last edited by itchyfeet on 10 Feb 2018, 16:10, edited 2 times in total.
1988 DG WBX LPG Tin Top
itchylinks
itchylinks
-
itchyfeet
- Registered user
- Posts: 12428
- Joined: 23 Jul 2007, 17:24
- 80-90 Mem No: 12733
- Location: South Hampshire
Re: One man photo guide to removing a late Petrol van gearbox.
remove locking bolt that you put in flywheel, end float checked again with clutch off, if you place your hands one around the stud and the other opposite you can push and pull evenly without rotating, if you rotate the flywheel the measurement is wrong, still 0.16mm
 P1020815 by Paul_Barr, on Flickr
replace locking bolt in flywheel and remove the 5 flywheel bolts, they are tight so you need a breaker bar 18" or 24" and a 10mm hex bit. Once bolts are out ease flywheel off with a screwdriver both sides so it comes off square, it's heavy don't drop it
 P1020819 by Paul_Barr, on Flickr
Oil seal needs to come off, you will need a new one, on a late wbx there is a large shim which if you are not careful you can damage, peel back the seal to see it and avoid it with your prising tool.
 P1020828 by Paul_Barr, on Flickr
 P1020826 by Paul_Barr, on Flickr
my preferred method of removing the seal is to punch it a few times with a screwdriver to distort it, not too hard and don't slip off onto the shims, you can then prise it out but be careful to miss that large shim.
 P1020830 by Paul_Barr, on Flickr
 P1020832 by Paul_Barr, on Flickr
recover the shims and keep in order and direction, if they won't come out because they are stuck with oil use a little wd40 and rotate them to dissolve the oil, don't use tools.
 P1020834 by Paul_Barr, on Flickr
measure and note the thickness, I need to reduce the end float by about 0.06mm so I need to buy thicker shims for 1&2, I may get away with just one thicker, I need to check what sizes are available, probably better to change both to give me options as it will need remeasuring with the new shims . I will also buy a new oil seal, new o ring and felt ring for flywheel, bolts I'm told can be reused, these were new last time.
 P1020840 by Paul_Barr, on Flickr
while I'm there quick check of the clutch 1.7mm to rivets so that's ok, pressure plate and flywheel look a bit mottled blueish but from what I have seen that is quite common.
 P1020843 by Paul_Barr, on Flickr
 P1020846 by Paul_Barr, on Flickr
spigot bearing was replaced last time the gearbox was off so I'm not doing that again
https://club8090.co.uk/wiki/Pe ... ft_bearing" onclick="window.open(this.href);return false;
more later when it goes back.
P1020815 by Paul_Barr, on Flickrreplace locking bolt in flywheel and remove the 5 flywheel bolts, they are tight so you need a breaker bar 18" or 24" and a 10mm hex bit. Once bolts are out ease flywheel off with a screwdriver both sides so it comes off square, it's heavy don't drop it
P1020819 by Paul_Barr, on FlickrOil seal needs to come off, you will need a new one, on a late wbx there is a large shim which if you are not careful you can damage, peel back the seal to see it and avoid it with your prising tool.
P1020828 by Paul_Barr, on FlickrP1020826 by Paul_Barr, on Flickrmy preferred method of removing the seal is to punch it a few times with a screwdriver to distort it, not too hard and don't slip off onto the shims, you can then prise it out but be careful to miss that large shim.
P1020830 by Paul_Barr, on FlickrP1020832 by Paul_Barr, on Flickrrecover the shims and keep in order and direction, if they won't come out because they are stuck with oil use a little wd40 and rotate them to dissolve the oil, don't use tools.
P1020834 by Paul_Barr, on Flickrmeasure and note the thickness, I need to reduce the end float by about 0.06mm so I need to buy thicker shims for 1&2, I may get away with just one thicker, I need to check what sizes are available, probably better to change both to give me options as it will need remeasuring with the new shims . I will also buy a new oil seal, new o ring and felt ring for flywheel, bolts I'm told can be reused, these were new last time.
P1020840 by Paul_Barr, on Flickrwhile I'm there quick check of the clutch 1.7mm to rivets so that's ok, pressure plate and flywheel look a bit mottled blueish but from what I have seen that is quite common.
P1020843 by Paul_Barr, on FlickrP1020846 by Paul_Barr, on Flickrspigot bearing was replaced last time the gearbox was off so I'm not doing that again
https://club8090.co.uk/wiki/Pe ... ft_bearing" onclick="window.open(this.href);return false;
more later when it goes back.
Last edited by itchyfeet on 10 Feb 2018, 16:13, edited 2 times in total.
1988 DG WBX LPG Tin Top
itchylinks
itchylinks
-
silverbullet
- Trader
- Posts: 17629
- Joined: 08 Jun 2009, 09:51
- 80-90 Mem No: 6908
- Location: Surrey Syncronaut #156
- Contact:
Re: One man photo guide to removing a late Petrol van gearbox.
To check crank endfloat its best to use a modest lever at the pulley end. The clutch disengagement pressure is far more than can be achieved by hand, so the measured endfloat figure will be bigger.
No need to go mad, a long flat screwdriver with a bit of flex will do the job. Levering at the opposite end of the crank from point of measurement helps to reduce any errors or influence.
No need to go mad, a long flat screwdriver with a bit of flex will do the job. Levering at the opposite end of the crank from point of measurement helps to reduce any errors or influence.
1985 Oettinger 3.2 wbx-6 Caravelle RHD syncro twin slider. SA Microbus bumpers, duplex winch system, ARC 7X15 alloys,
"Schrödinger's syncro"
Syncronaut #156
"Schrödinger's syncro"
Syncronaut #156
-
silverbullet
- Trader
- Posts: 17629
- Joined: 08 Jun 2009, 09:51
- 80-90 Mem No: 6908
- Location: Surrey Syncronaut #156
- Contact:
Re: One man photo guide to removing a late Petrol van gearbox.
PS always check for distorted or dished thrust washers, they can go quite a bit out of flat, making a mockery of corect shim selection.
1985 Oettinger 3.2 wbx-6 Caravelle RHD syncro twin slider. SA Microbus bumpers, duplex winch system, ARC 7X15 alloys,
"Schrödinger's syncro"
Syncronaut #156
"Schrödinger's syncro"
Syncronaut #156
-
itchyfeet
- Registered user
- Posts: 12428
- Joined: 23 Jul 2007, 17:24
- 80-90 Mem No: 12733
- Location: South Hampshire
Re: One man photo guide to removing a late Petrol van gearbox.
silverbullet wrote:To check crank endfloat its best to use a modest lever at the pulley end. The clutch disengagement pressure is far more than can be achieved by hand, so the measured endfloat figure will be bigger.
No need to go mad, a long flat screwdriver with a bit of flex will do the job. Levering at the opposite end of the crank from point of measurement helps to reduce any errors or influence.
Thanks I will check it again with a bit more wellie, I know what you mean about dished shims, which is why I think getting two with half the extra is better giving me options on re check
1988 DG WBX LPG Tin Top
itchylinks
itchylinks
-
New Kentish Campers

- Registered user
- Posts: 1739
- Joined: 12 Oct 2010, 06:16
- 80-90 Mem No: 8994
- Location: Near Linton, Kent.
- Contact:
Re: One man photo guide to removing a late Petrol van gearbox.
And do remember, upon reassembly, to put the gear selector bracket on the correct side to avoid heart attack issues upon road test when you discover you only have 2 forward gears.... as I discovered 48 hours before going on holiday.... 
 thankfully, Oldie but goodie pointed me wise
-
itchyfeet
- Registered user
- Posts: 12428
- Joined: 23 Jul 2007, 17:24
- 80-90 Mem No: 12733
- Location: South Hampshire
Re: One man photo guide to removing a late Petrol van gearbox.
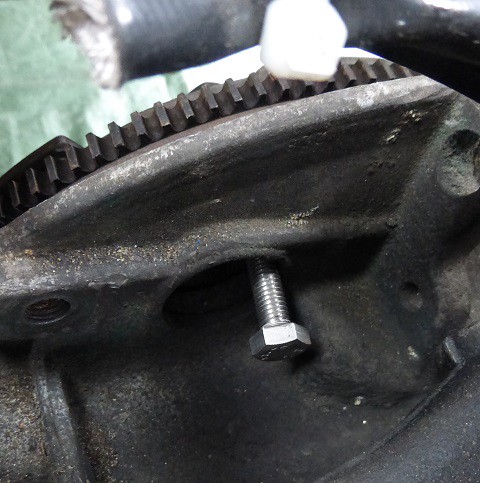
remeasured endfloat with a bit more wellie and I'm happy with the 0.16mm measurement so I think I will get a a 0.38 shim in place of a 0.32, that's 0.06 extra taking the end float down to 0.10mm which is in the middle of the range.
No fuel line attached to mine... self tapper managed to get plus gas on the thread from the other side of the cross member and mole grips on it, new screw and copper grease I think.
 P1020850 by Paul_Barr, on Flickr
what2d wrote:
One job I'd do with the gearbox removed is undo/drill out/grind off the fastener that keeps the brake union fixed to the body. The one that the fuel line fastens to on the sloped part of the floor pan. Mine refuses to move and I've nothing more than the strength of a toddler at the angles required to get a grip on it. New fuel line is currently 'loose' at that point and I doubt very much that my tester will approve. Hey ho.
No fuel line attached to mine... self tapper managed to get plus gas on the thread from the other side of the cross member and mole grips on it, new screw and copper grease I think.
P1020850 by Paul_Barr, on Flickr
Last edited by itchyfeet on 10 Feb 2018, 16:16, edited 1 time in total.
1988 DG WBX LPG Tin Top
itchylinks
itchylinks