I'm on the vinegar strokes of my gti conversion, and have taken pics of every step I took (even the "feck"-ups like yanking the input shaft out of the box when i removed the diesel engine!). If it helps, I'm gonna knock up a website on the process in a week or two when its done. The only problem I have now is how to go about fitting the diesel dipstick to the gti block, anyone have any advice? Or do I stick with the original dipstick?
Is it feasible to fill the proper amount of oil in the sump, then measure it on the dipstick and take that as nominal?
8v gti conversion - a furthr question.
Moderators: User administrators, Moderators
-
Mr Self Destruct

- Registered user
- Posts: 8
- Joined: 13 Dec 2005, 12:30
- 80-90 Mem No: 0
- Location: Coventry - Like Birmingham, but better!
- Contact:
8v gti conversion - a furthr question.
Last edited by Mr Self Destruct on 27 Aug 2006, 12:19, edited 1 time in total.
www.coventryaircooled.co.uk
Its big and its black and it's sold!
Its big and its black and it's sold!
-
Diamond Hell
- Registered user
- Posts: 961
- Joined: 09 Oct 2005, 17:27
- 80-90 Mem No: 830
With the sump off you can simply drive out the GTI dipstick with a tool as advanced as a long M8 bolt. The dieseldonicely one then slides into the hole. The only issue you are then faced with is how to secure it.
Fill the sump with the correct quantity of oil and stamp whatever dipper you decide to use at the point the oil comes up to.
Nice NIN reference, too
Fill the sump with the correct quantity of oil and stamp whatever dipper you decide to use at the point the oil comes up to.
Nice NIN reference, too
Diamond Hell
Still Syncro, just much fasterer
Still Syncro, just much fasterer
-
Sir Chad
- Registered user
- Posts: 85
- Joined: 16 Apr 2006, 20:50
- 80-90 Mem No: 3969
- Location: West Sussex
fitted an 8V GTI into mine on saturday.
I found the seal on the diesel lump was knackered so i cut the GTi and the diesel dipstick tubes at the point where they meet the spigot (push fit into the block on a GTi) and welded therm together. I stuck a screw driver up the two halves to keep them concentric. Used the diesel dipstick and I'm going to fill it with the 'book volume' of oil and mark the pipstick to suit.
I also found out that I needed a Diesel starter motor which isn't on the WIKI then found a really cheap recon with no surcharge...RESULT
Good luck
Chad

Also note that with some diesel dipsticks the correct oil level won't even get on it, so shortening the dipstick tube is the normal remedy (for the AAZ boys). About an inch and a quarter from memory, or where there's a natural change in section, then the yellow plastic scroll-clip can be re-fitted finishing it nicely.
Correct oil level is then about minimum on stick, but calibrate anyway.
All above Wiki'd now, thanks for pointing that out
Correct oil level is then about minimum on stick, but calibrate anyway.
All above Wiki'd now, thanks for pointing that out
The 80-90 Tech Wikipedia Your 1st port of call
Syncro Kastenwagen / 16" Kombi Camper
Syncronaut No. 1
-
Mr Self Destruct
- Registered user
- Posts: 8
- Joined: 13 Dec 2005, 12:30
- 80-90 Mem No: 0
- Location: Coventry - Like Birmingham, but better!
- Contact:
Cheers for that guys, good job I read through it again as I'd completely forgotten about the diesel spigot bearing in the end of the crank!
Pisser, I've just thrown the old diesel block out....
Pisser, I've just thrown the old diesel block out....
www.coventryaircooled.co.uk
Its big and its black and it's sold!
Its big and its black and it's sold!
Two a penny aren't they?
The 80-90 Tech Wikipedia Your 1st port of call
Syncro Kastenwagen / 16" Kombi Camper
Syncronaut No. 1
Perzaxtly Sir Chad 
The 80-90 Tech Wikipedia Your 1st port of call
Syncro Kastenwagen / 16" Kombi Camper
Syncronaut No. 1
-
Mr Self Destruct
- Registered user
- Posts: 8
- Joined: 13 Dec 2005, 12:30
- 80-90 Mem No: 0
- Location: Coventry - Like Birmingham, but better!
- Contact:
Usually I'm tighter than a shark's a***, but I think I can stretch to £6! 
www.coventryaircooled.co.uk
Its big and its black and it's sold!
Its big and its black and it's sold!
-
Sir Chad
- Registered user
- Posts: 85
- Joined: 16 Apr 2006, 20:50
- 80-90 Mem No: 3969
- Location: West Sussex
I like the idea of a website.
I'm after some top tips on accelerator cables, what's the best way to connect to a late 8V, is a diesel cable longer than a 1.9WBX one?
I've been having a laugh constructing an induction system out of drain pipe, sounds bonkers but it's a perfect fit onto the airbox which I've sited on the opposite side of the engine bay - where all the space is.
-
syncroand101
- Registered user
- Posts: 1567
- Joined: 27 Sep 2005, 18:42
- 80-90 Mem No: 500
- Location: Somewhere in my Syncro
I'm after some top tips on accelerator cables, what's the best way to connect to a late 8V[/quote]
Stumble across a friendly AA/RAC Man - they can make up acc. cables to most lengths
Yep, been there, done that - vacuum tube from a milking parlour. Just remember to seal it up very nicely as any leak will/can screw performance
Stumble across a friendly AA/RAC Man - they can make up acc. cables to most lengths
Sir Chad wrote:constructing an induction system out of drain pipe, sounds bonkers but it's a perfect fit onto the airbox which I've sited on the opposite side of the engine bay
Yep, been there, done that - vacuum tube from a milking parlour. Just remember to seal it up very nicely as any leak will/can screw performance
-
Mr Self Destruct
- Registered user
- Posts: 8
- Joined: 13 Dec 2005, 12:30
- 80-90 Mem No: 0
- Location: Coventry - Like Birmingham, but better!
- Contact:
Another question


Took some pics while trial fitting the engine, but can't quite see where to 'clearance' the engine bay. Is it the chassis rail itself, the panel above it, or both? And what about the wiring loom, should that be re-routed at all?
Has anyone else got pics of this conversion?
www.coventryaircooled.co.uk
Its big and its black and it's sold!
Its big and its black and it's sold!
-
doovan
- Registered user
- Posts: 19
- Joined: 26 Jan 2006, 23:41
- 80-90 Mem No: 0
- Location: kinlochbervie Scotland
gti t3
firstly try this one http://volksweb.relitech.com/convert.htm I have run a 2.0 for three or four years now but its a 2.o `AGG` from a 95 car, it certainly does need the chassis leg cut vertically and moved back 10mm just where the inlet manifold gets close, it may have appeared clear but you have got to allow for torque, i did also reroute the wiring but just by lifting it up that panel, it takes it in to view when the engine is in and keeps it clear of the heat, i have had the spigot bearing from the diesel which i did manage to remove , running all this time !!
best of luck
best of luck
From the doovan's relitech link above 
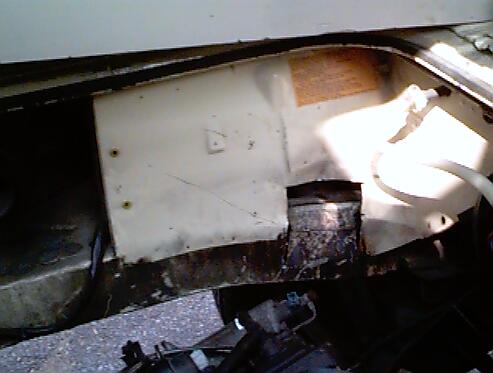
This shows the approxinmate position fore-aft. It's hard to see but the inner face of the chassis rail has been slit and knocked back a bit, as well as the flitch plate (white). He hasn't yet welded filler plates in to strengthen the chassis
The one I've seen fouling the chassis rail was a 2.0 litre (slightly higher engine). It looked like the whole section including the flange protruding at the bottom of the inner face would need to be cut and moved outwards about a quarter of an inch. The interference seemed to be lower down than in the photo above, say from about half way down the rail's height to the bottom, and the flitch wasn't a problem. It had those large curvy ally manifold pipes
The 80-90 Tech Wikipedia Your 1st port of call
Syncro Kastenwagen / 16" Kombi Camper
Syncronaut No. 1