OK as promised some pics of the install. I've done the passenger seat first as there is better access, it's not electric and I can still drive the van whilst the work is being done!
There are a number of ways of doing it, for example, fitting the seat runners from a VW seat to the donor seats and using the existing rails on the van or removing the existing rails and using the donor ones. I opted for the latter as I'll likely add swivel bases at some stage so wanted to keep the height increase to a minimum (or ideally have no increase at all) and it simply feels safer to me - especially with these seats where the rails are maybe 4-5cm wider apart than original so I'd have welding to the edges of the undersides.
So, first job is to remove the rails fixed to the seat boxes in the van. I've been told they can be chiseled / drilled out (drilling the spot welds) but I couldn't see the spot welds to get at and my attempts with a chisel quickly started to cause damage to the seat box (which is the upper side of the inner wheel arch so we don't want any extra holes in there thank you very much!).

Therefore the only choice I could see was to set to with the angle grinder. Not an overly tricky job but time consuming and made a lot of mess in the van. Be careful where the sparks go (not least of your eyes and other painful bits - wear appropriate PPE!) but also any fabric they alight on they'll leave a little pin prick burn. Anyway, several discs later I was getting down to something like a flat surface to mount on.

There was a bit more work done after this to get the mount area flatter but I didn't take a photo of that as the rain was threatening!
Next job is to remove the brackets from the underside of the RX8 seat undersides - basically anything that can come off does leaving a flat runner. These various brackets are held on with what are essentially large non flush rivets so it is not too difficult to grind the heads off then tap the brackets off. Before and after shots (against courtesy of the angle grinder):


After that it is 'merely' a case of getting them lined up on the seat boxes. I found that lining up the back of the lower RX8 rail (i.e. the bit you fix to the van) 0.5cm forward of the where the old rail used to finish got my the position I wanted. Laterally i went as far towards the outside of the van as possible without fouling the seat belt so as to maximise the walk through area. There is a lip you can sit up against that then meas there is no visible gap between the seat side trim and the 'floor' of the van (actually the wheel arch of course). This also meant I was pretty much iun the middle of the main mounting areas so best for strength. Then drill through the lower rails (I used 8mm drill for 8mm zinc plated nuts and bolts) and mount. I've mounted with 4 bolts initially but when I change to the swivel bases I'll bolt AND weld for extra security. One 'gotcha' - check inside your wheel arch before drilling - there are likely to be expansion bottles for the fuel tank in there (1.9DG petrol in my case) and you don't want to drill into that, or the top of your tyre for that matter! Do, of course, make sure the frame sits totally square or the seats won't run back and forth easily. On the inner mounts (i.e. nearest the handbrake) you are working entirely inside the van, it is bit tricky to get the nut on but the old blu-tack on the end of a finger trick did the job. I used 8mm dia bolts with a 13mm head - any bigger on the head and you'd struggle to get a socket into the rails to tighten plus the seat may not slide over the bolts (the rails have built in end stops - unlike some they don't rely on the mounting to act as a stop).
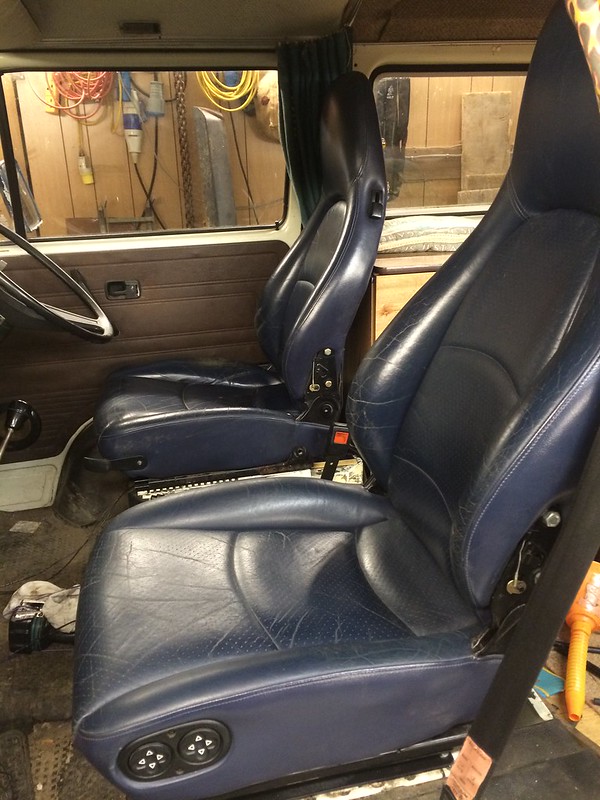
So here's the finished result and a second pic showing that the ride height is, if anything, a touch lower (leaving room for the swivel base in due course), albeit hard to show as with a parallax you can make it look higher or lower in a photo, I did try to take the pic at eye level!


So I still need to re-trim around it (I'm changing from the plastic trim to carpet anyway) and wire up the heated pad; I will do that in due course as i have the correct Mazda switch for the dash but need to create a dedicated fused circuit of the correct rating. I won't bother with the seat belt warning circuit on the passenger side as it is annoying when you put your shopping there! I was able to use the seat belt 'receiver' which is mounted on the seat so have done away with the VW one mounted on the side of the seat box.
Driver's side will be a bit trickier as i suspect i'll need to apply power to it before fitting to get the rails to move. I didn't separate the lower rail from the runner (frankly couldn't see how) so just accessed the front and rear mounting holes by running the seat to one extreme or the other.
Well, I think they look ok, and it is certainly very comfortable. Will get a good test this weekend on the run to jimmy's Farm for Alive and VDubbin.
1986 1.9DG WBX LPG, 4 spd manual. Westy poptop. Renogy lithium leisure. 175W solar. CR50 fridge. Propex. RX8 seats.