Hello, I'm new here and since May my family and I have been the proud owners of a 1984 T25 Westcountry high-top. We are about to put it under cover for the winter but have just noticed a couple of issues we're inclined to address before doing so: the first is a tiny crack in the paint down one of the seams (tried to attach photo but apparently "board attachment quota has been reached"). Should we treat this with something to prevent rust? The second issue is a few spots of rust bubbling up on the very front panel on the driver's side. Worst patch is about 15mm high (would ideally like to attach photo, so if anyone knows another way of doing so, please let me know!) Should we treat this with something to kill it/prevent it spreading? Unfortunately we don't know if the van is painted with 2pack or cellulose and I understand this may make a difference to the kind of product we should apply...? Is there any way of telling retrospectively what kind of paint has been used on the van??
Sorry for the long post and thanks in advance for any help
Small rust bubbles / cracks in seams
Moderators: User administrators, Moderators
Small rust bubbles / cracks in seams
1984 Westcountry high-top, 4 berth. 1.9 petrol, 4-speed manual, RHD.
-
tforturton
- Registered user
- Posts: 2185
- Joined: 17 Mar 2012, 23:06
- 80-90 Mem No: 11177
- Location: Cardiff
Re: Small rust bubbles / cracks in seams
Hello and welcome,
First up, you need to sort out the picture posting business, as any bodywork question really needs pictures. You cannot post pictures directly to this site - as you found out, it just can't handle it.
You need to open an account with a picture hosting site such as photobucket. On your computer, first re-size the picture to a reasonable sixe (400x600), then save it to your Photobucket account. Then you need to have both Photobucket and 80-90 open at the same time, in order to transfer the photo from one to the other. Open your thread in 80-90, then go to Photobucket and pick up the IMB code (third box down on the right, I think). Copy this code to the thread, and it will show as a line of code. When you post the thread it will show the picture. It's worth checking 'Preview' to see if it has worked properly. It is a bit of a faff, but you get used to it, and it works reasonably well.
All rust needs looking at sooner or later, it just depends how bad it is, and whether it's likely to cause you serious problems, either very soon or maybe later on. These vehicles ALWAYS rust in the seams, especially at the back, and there's not many T25s without some sort of paint cracking in that location. It might be that your van has had a quick blow-over to cover the dreaded seam-rash - we can't really tell until we see some pictures. Some people are obsessive about rust, others just keep an eye on it, and do the work when it's needed (or when the windscreen starts leaking). Seam rash isn't usually fatal anyway - the locations to worry about are the door steps, front wheel arches, around the petrol filler, behind the fridge, both sills, and all four jacking points.
But don't panic! Let us see some photos, and we can all weigh in with our opinions. Be prepared - there will be people who will let you know in no uncertain terms if they think you have been 'done', so steel yourself!
1990 2.1 DJ Syncro Caravelle/Westfalia conversion RHD
-
tforturton
- Registered user
- Posts: 2185
- Joined: 17 Mar 2012, 23:06
- 80-90 Mem No: 11177
- Location: Cardiff
Re: Small rust bubbles / cracks in seams
It's also a good idea to add your location and vehicle details, as this means people who might be able to help don't have to ask questions first. See the line at the bottom of my post - tells you all you need to know about my bus, in one line.
1990 2.1 DJ Syncro Caravelle/Westfalia conversion RHD
Re: Small rust bubbles / cracks in seams
Thanks for the advice about photos, that's really helpful. Here are the worst of the rust bubbles on the driver's door (about 15mm high). 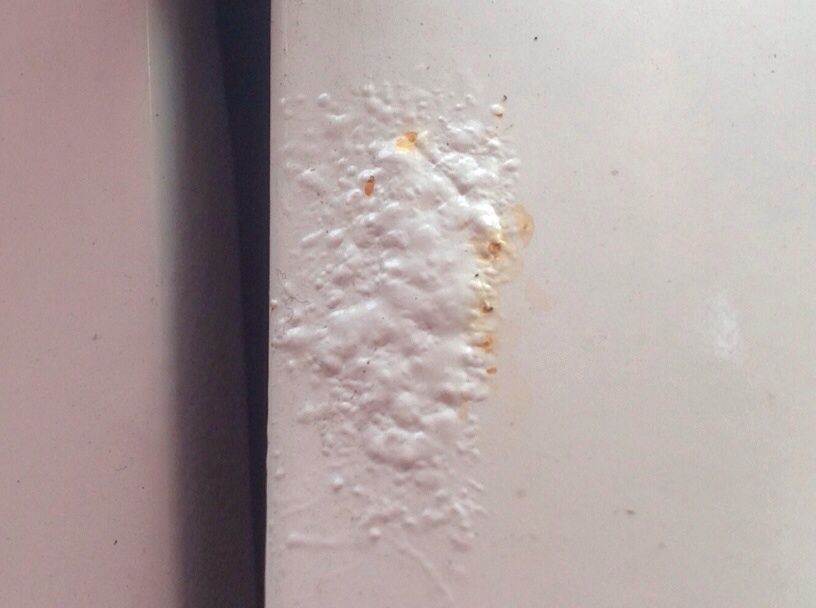

1984 Westcountry high-top, 4 berth. 1.9 petrol, 4-speed manual, RHD.
Re: Small rust bubbles / cracks in seams
And here is the cracked seam: 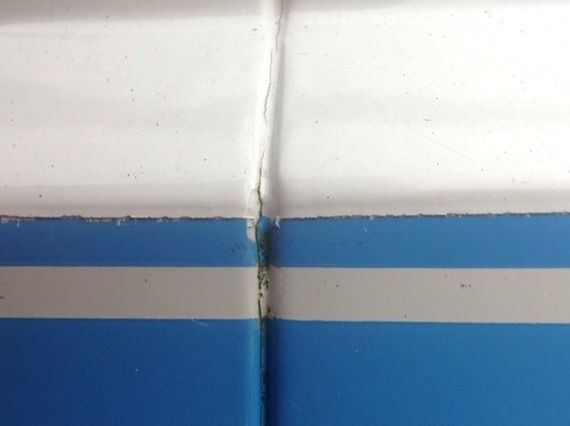

1984 Westcountry high-top, 4 berth. 1.9 petrol, 4-speed manual, RHD.
-
tforturton
- Registered user
- Posts: 2185
- Joined: 17 Mar 2012, 23:06
- 80-90 Mem No: 11177
- Location: Cardiff
Re: Small rust bubbles / cracks in seams
If that's all you have to worry about, then you're a lucky man! The door rust could do with a rub down and repaint, if you feel like it. The seam looks like it's been filled and repainted, and it's cracked as the filler has cured. Up to you whether or not you do anything about it, but it certainly wouldn't keep me awake at night.
1990 2.1 DJ Syncro Caravelle/Westfalia conversion RHD
Re: Small rust bubbles / cracks in seams
Thank you, that's very reassuring! If we did want to do something about the seam what would you (or anyone else) recommend? Is there a risk it will rust if we leave it? And when we do come to deal with the rust bubbles on the driver's door, is there any way of telling whether it's 2pack or cellulose paint that's been used previously?
1984 Westcountry high-top, 4 berth. 1.9 petrol, 4-speed manual, RHD.
-
tforturton
- Registered user
- Posts: 2185
- Joined: 17 Mar 2012, 23:06
- 80-90 Mem No: 11177
- Location: Cardiff
Re: Small rust bubbles / cracks in seams
I'm no expert, but the seam looks as though it has been repainted (possibly more than once), so you'd hope that whoever did it has already done the work. Due to a design/manufacturing fault, when these things were built, the facing panels on either side of the rear seams were not properly rust-proofed, which means that they will always rust eventually. After 25-odd years, most vans have either got rust, or have had it treated. If it's been done well, it will last a long time - if it's been done slap-happy, then the rust will be back within a few years, maybe less.
Did you get any history from the people you bought it off? Had they had any bodywork done?
You have a couple of choices... 1. Don't worry about it. 2. Run a bit of silicon down the crack, and leave it alone.
3. Strip it back, clean out the gap, and re-paint.
I know what I'd do (Option 1 or 2).
Did you get any history from the people you bought it off? Had they had any bodywork done?
You have a couple of choices... 1. Don't worry about it. 2. Run a bit of silicon down the crack, and leave it alone.
3. Strip it back, clean out the gap, and re-paint.
I know what I'd do (Option 1 or 2).
1990 2.1 DJ Syncro Caravelle/Westfalia conversion RHD
-
kevtherev

- Registered user
- Posts: 18831
- Joined: 23 Oct 2005, 20:13
- 80-90 Mem No: 2264
- Location: Country estate Wolverhampton Actually
Re: Small rust bubbles / cracks in seams
Tabwela wrote: We are about to put it under cover for the winter .....
erm...I wouldn't.
T3's don't much like being laid up, try and use it regularly.
Covers keep moisture inside, carnuba wax is better. (Applied once every 6 months)
campers are for life ..not just the summer
oh and here's my little bubble

Tip of the iceberg

AGG 2.0L 8V. (Golf GTi MkIII)
-
New Kentish Campers

- Registered user
- Posts: 1739
- Joined: 12 Oct 2010, 06:16
- 80-90 Mem No: 8994
- Location: Near Linton, Kent.
- Contact:
Re: Small rust bubbles / cracks in seams
There is a - risky - way of telling if the van is finished in cellulose or the factory paint. You need a piece of clean cloth, and some cellulose thinner. Put a little - dont saturate the cloth- thinner on the cloth and wipe a small 1 inch section, ideally in a place where it won't show should it be finished in cellulose, like underneath a bumper end cap for example. If it is cellulose, paint will nigh immediately transfer to the cloth. If it's factory 2 pack, it wont. The risk is that you could spoil your pant work, hence do it where it's not going to show too much should the worst happen.
From looking at your images, I would think it's likely cellulose on there or perhaps a 1 pack acrylic because you can see an over-painted chip in the paint. Cellulose isn't too great for filling properties hence why you have to apply several coats of paint and then cut it for a decent finish. And cut it again in 6 months time as it fades down....
Good luck it it and enjoy the van by using it as much as is possible, as, like Kev says, these don't like being laid up.