Overhauling 5 speed gearbox linkage
Moderators: User administrators, Moderators
-
edoh

- Registered user
- Posts: 240
- Joined: 12 Aug 2007, 08:42
- 80-90 Mem No: 3974
- Location: epping essex
Re: Overhauling 5 speed gearbox linkage
top man 
Owner of a red T25 fixed hi top campervan - colour - spikey red - petrol - water cooled - 1.9 dg engine rhd - 1990 g reg n still going strong!-
-
pictonroad
- Registered user
- Posts: 102
- Joined: 20 Dec 2005, 09:19
- 80-90 Mem No: 2432
Re: Overhauling 5 speed gearbox linkage
Brilliant, thank you so much for doing all this, it helps people like me out no end. Gives me the confidence to REALLY get into trouble... 
Member - 2432.
-
mm289
- Registered user
- Posts: 314
- Joined: 31 Dec 2010, 22:00
- 80-90 Mem No: 9111
- Location: Dover, Kent
Re: Overhauling 5 speed gearbox linkage
OK, onto the shift rods and back end of the set-up. Basically there are 3 components involved, the front shift rod, the rear shift rod and the shift lever (actuates the “other shift rod” that goes into the box itself  ).
).
The front and rear shift rods both run in plastic bushes, the shift lever is a ball and cup (socket) affair where the ball is nylon and the socket metal.
In my case all the areas were worn, if you got under the van and held the shift rod you could move it laterally and vertically (about 1-2mm play). There also seemed a fair bit of play in the shift lever ball joint (up/down movement)
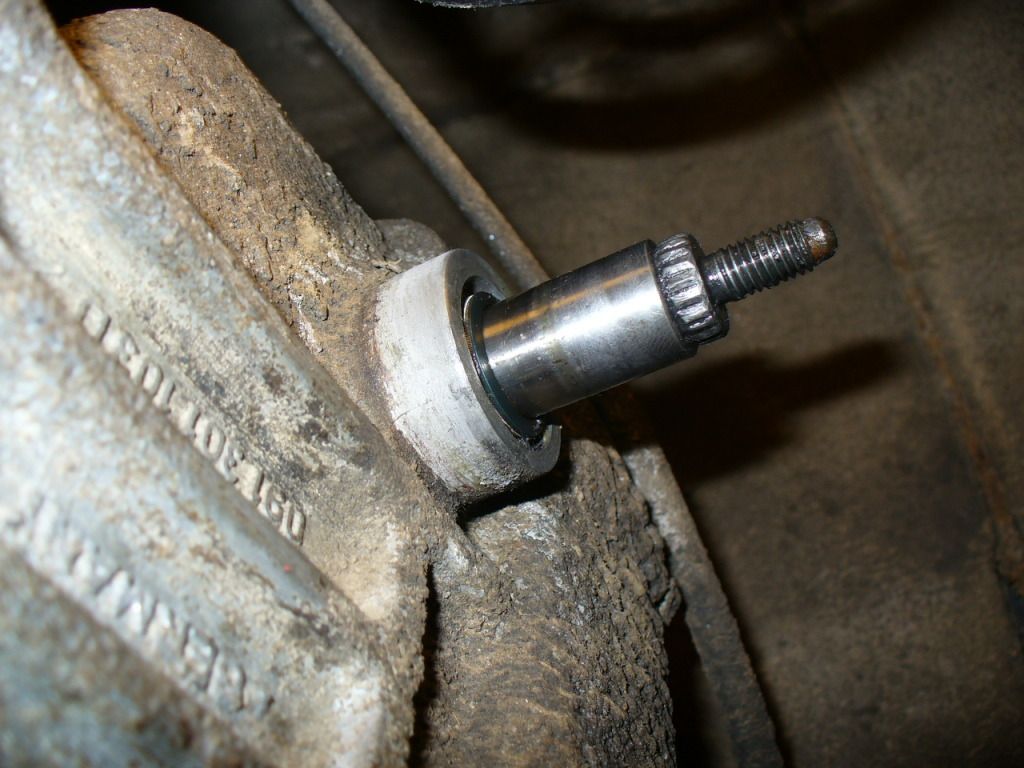
To get at the shift rod bushes you have to disconnect the front and rear shift rods from each other. They are joined by a splined shaft/clamp which allows you to alter not only the length of the shaft but also the orientation i.e. you can rotate the rear shaft relative to the front.
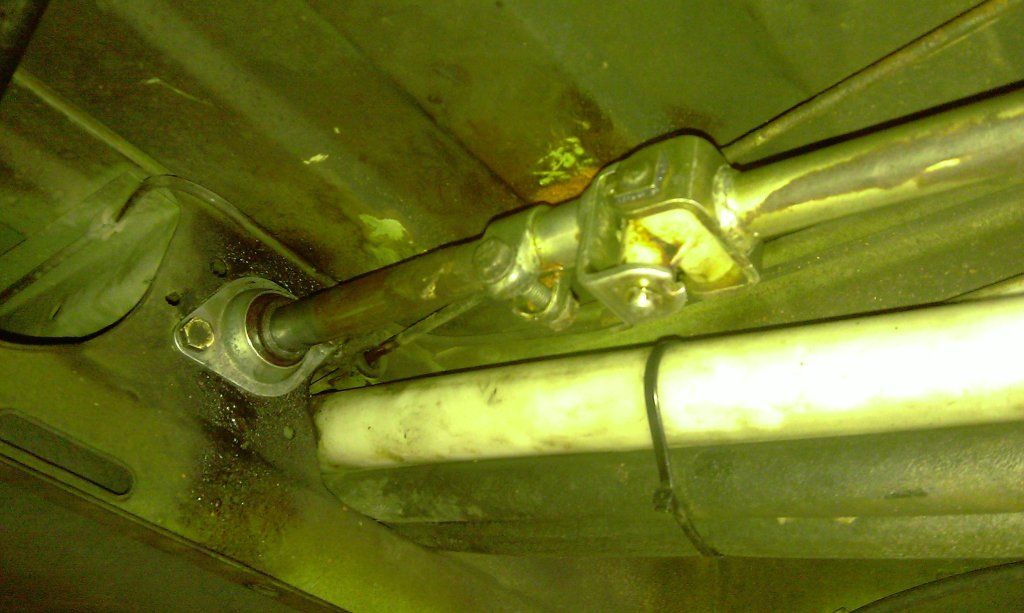
If you were setting up from scratch there are measurements and processes for getting this joint set up correctly as adjustments here fundamentally affect the movement of the shift lever and hence gear selection.
If your selection is working OK already then just make sure you mark/scribe this joint before splitting!! I put a daub of tippex on mine (pretty useless idea really as I then cleaned the shaft ) but also scribed the splines that were showing in the gap of the clamp – which was much more effective.
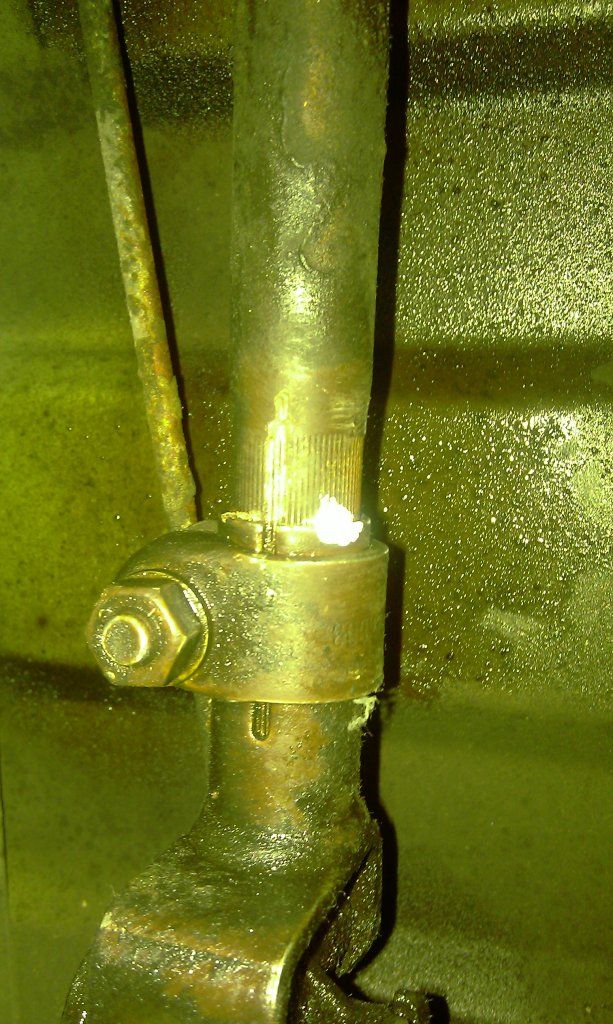
Loosen the clamp bolt, apply releasing fluid and gently work the shaft off the splines. You may find you need to gently tap with a hammer to help move it.
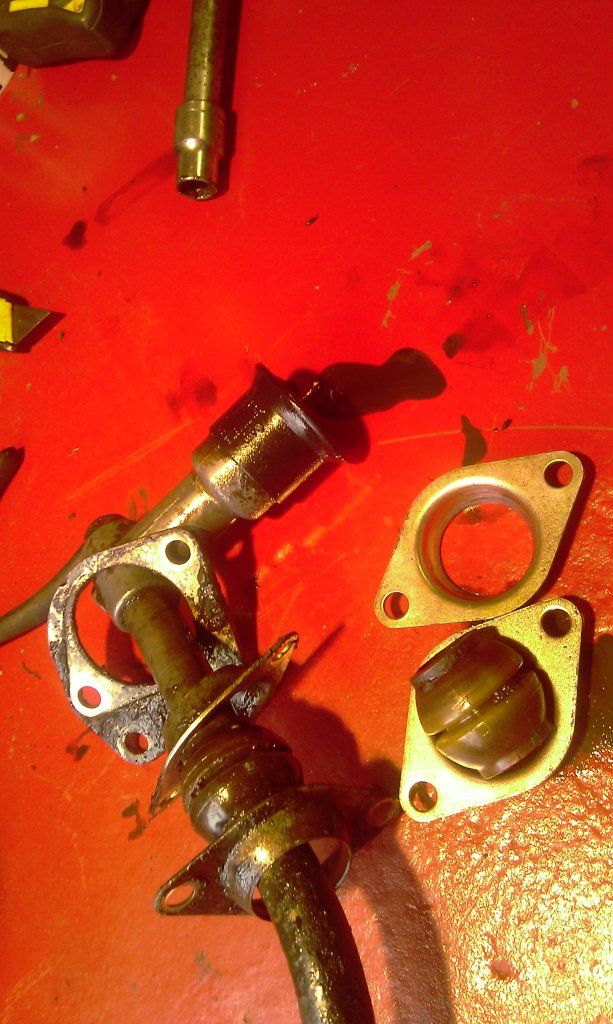
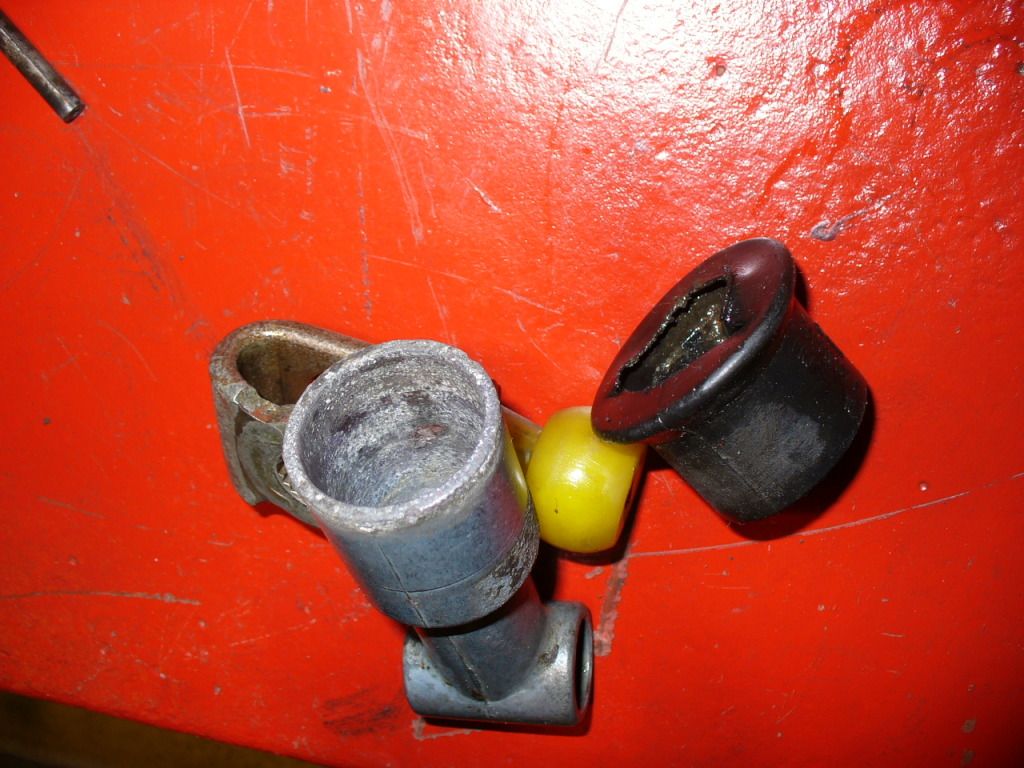
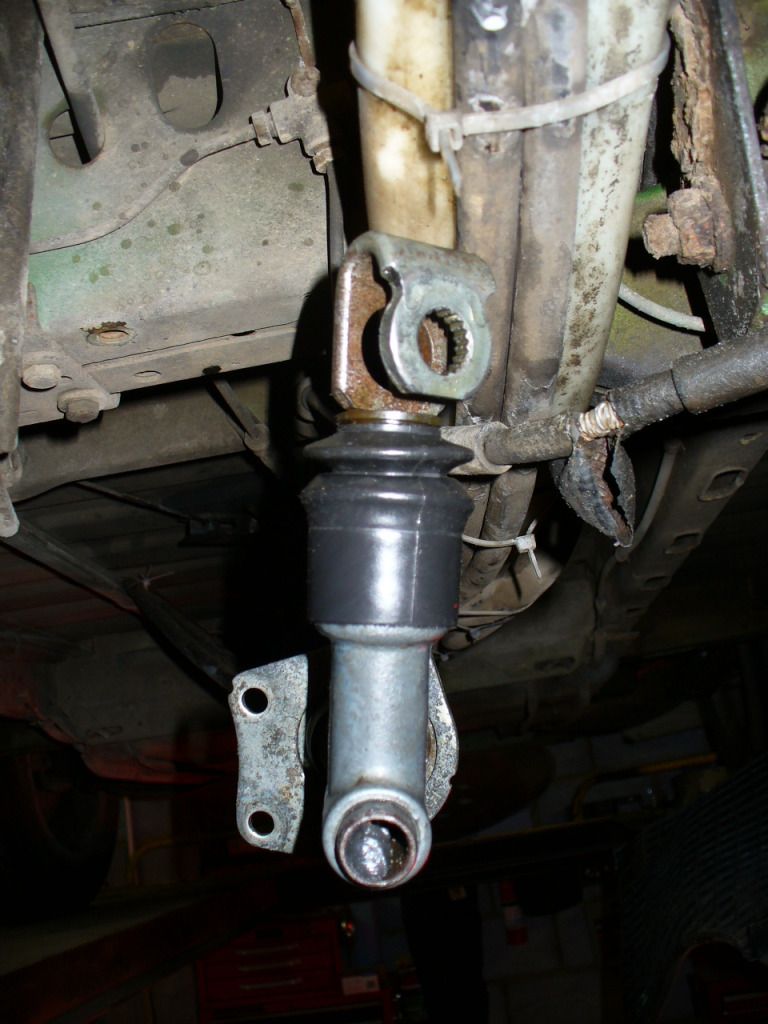
Once removed then undo the 2 bolts securing the bush assembly to the cross member and slide the assembly off the shift rod leaving it looking like this.
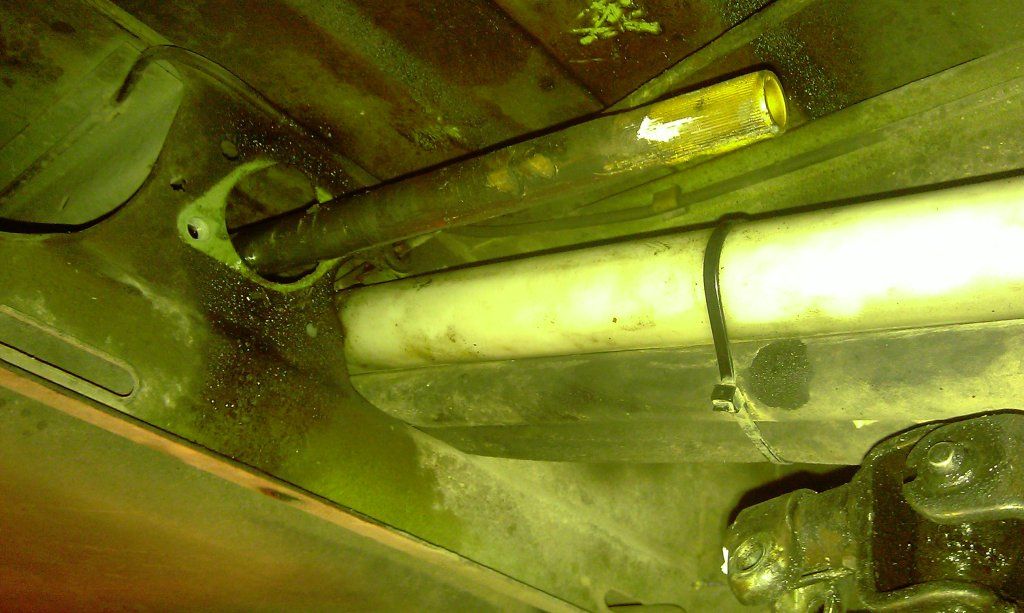
The rear bush mounting is bolted to the front of the transmission.
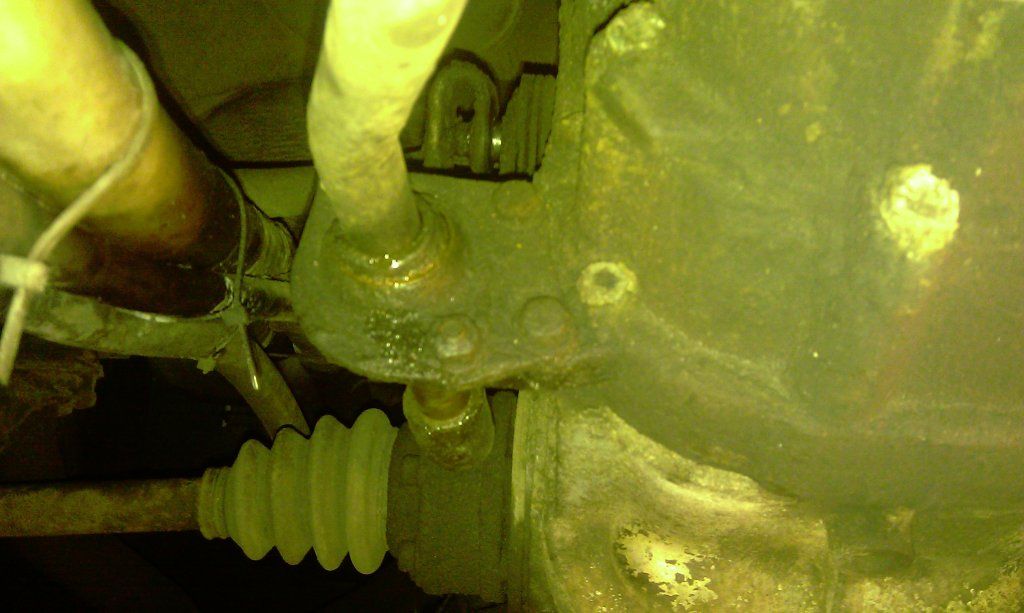
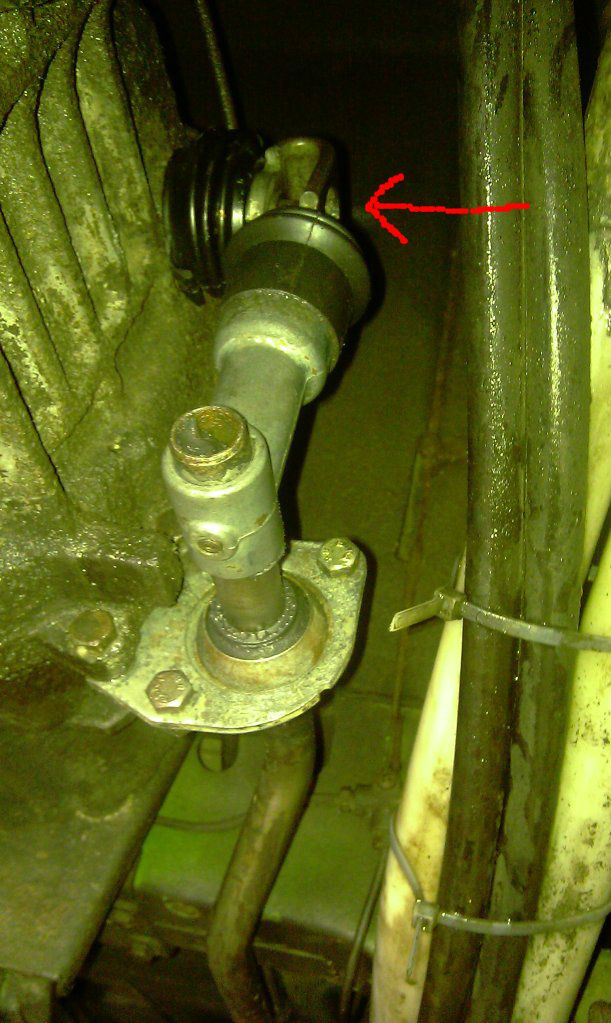
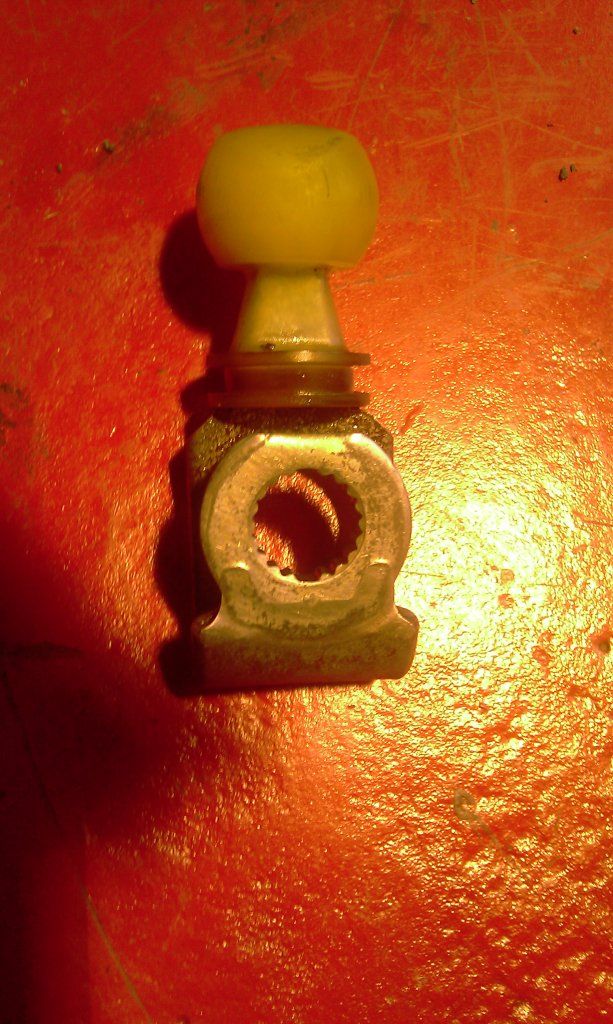
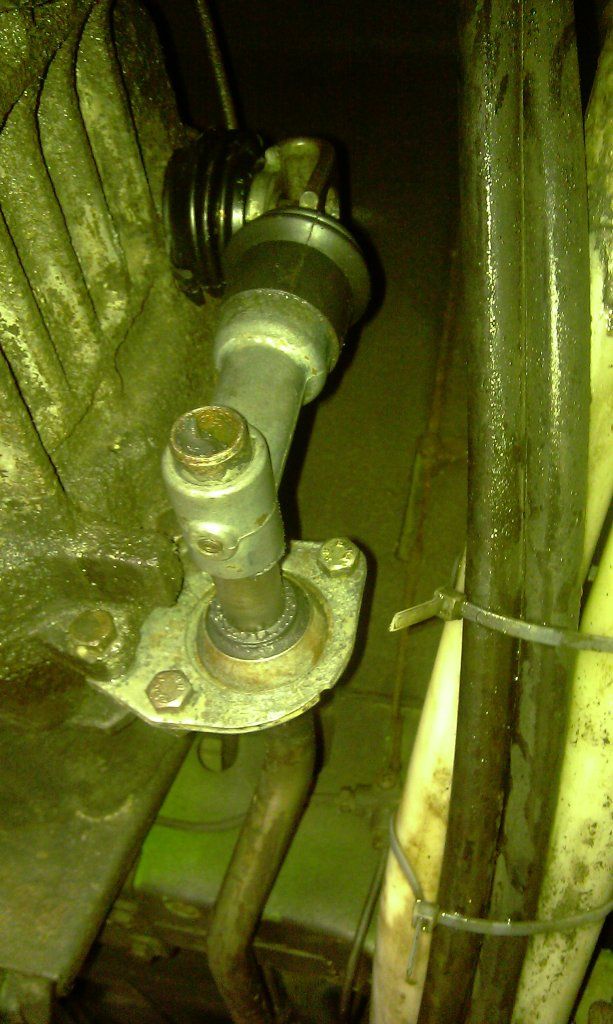
To remove the bushing you will need to remove the shift lever which can’t be done in situ, so undo the two bolts holding the bush mounting to the transmission case. You may find at this point the rear shift lever will drop free as the ball joint will pop out of its socket on the shift lever.
If it doesn’t then the lever is held onto the gearbox shaft with a 13mm retaining nut. Push a socket on where the arrow is and undo this nut then the shift lever will slide of the transmission shift shaft. NOTE: this lever is keyed (will only fit one way) so you don’t have to worry about marking its position.
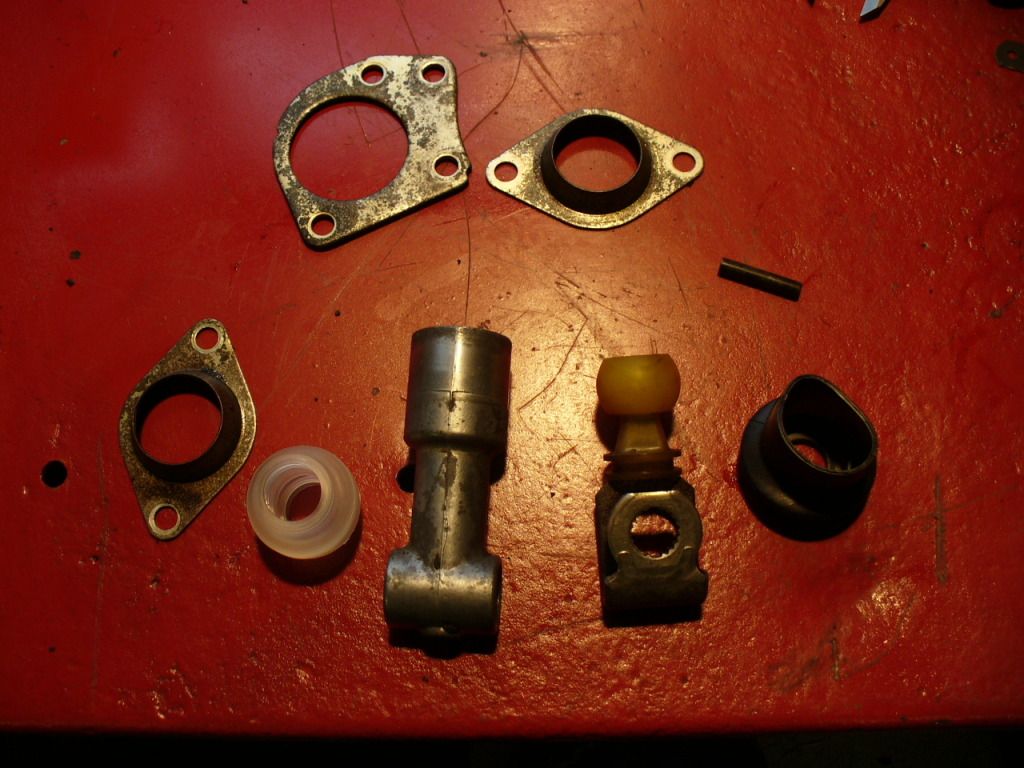
When you have done the two steps above you will have a collection of parts like this on your bench.
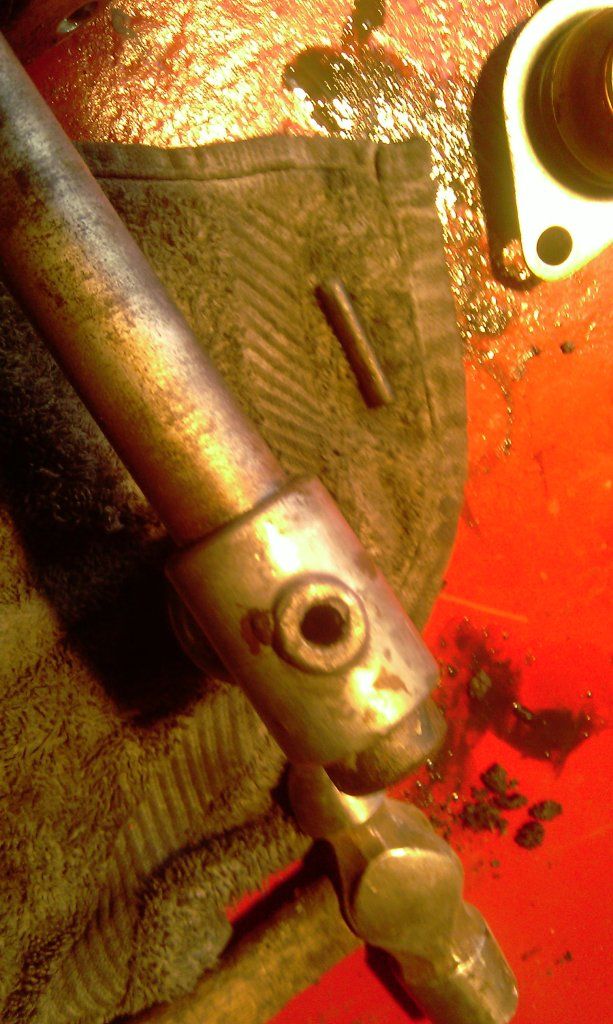
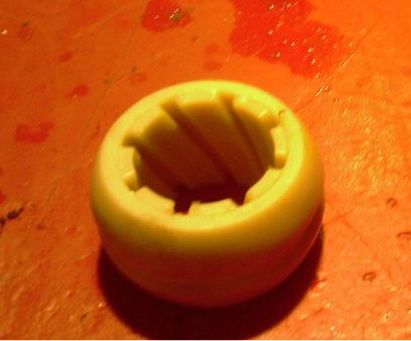
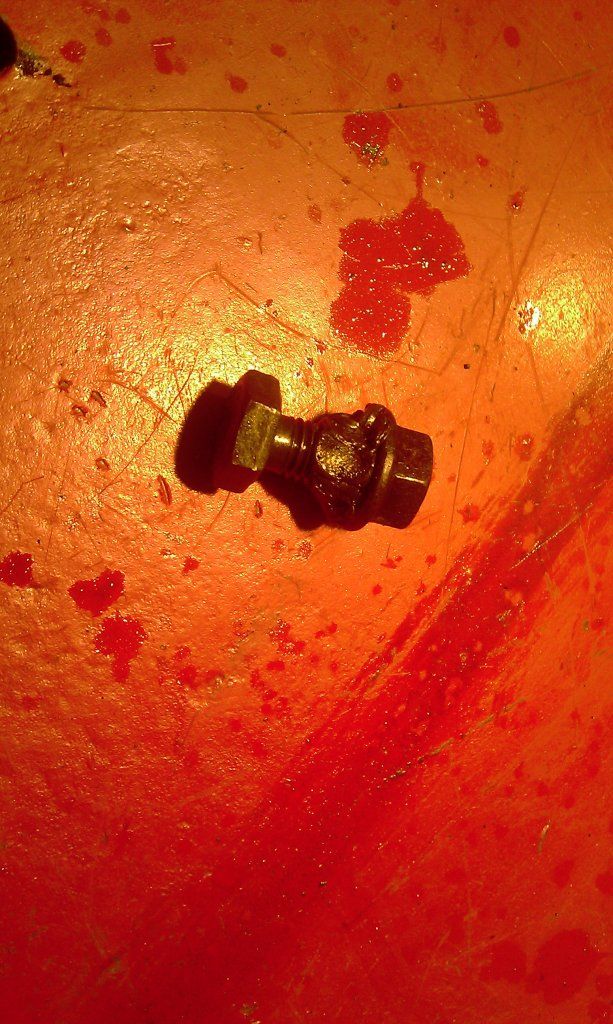
The front bushing will already be in pieces, but to get the rear bushing off you need to remove the shift lever from the shaft. It slides onto the shaft and is secured by a roll pin that goes through the shaft and the shift lever.
Find a suitable drift and drive the pin out INTO THE SOCKET. When you have do that the shift lever will slide off the shaft (with a bit of encouragement) leaving you with a nice collection of parts to clean.
Depending on the age of your vehicle you will either have 2 bushes that look like this (part no. 251 711 207 D)
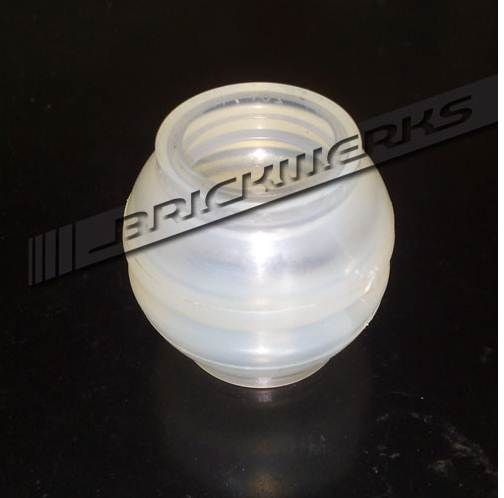
Or one of the above and another like this (part no. 251 711 207 E)
In theory later vans (85 onwards?) have the “one of each” variety, but Myrtle is an ’86 and has 2 the same so who knows! I would have a look underneath and check before ordering otherwise (like me) you will end up with the wrong bush.
Just out of interest I measured the bushes up with a vernier. The new bush measured 20.00mm, the old ones were 20.80 - 21.20 (front) and 20.80 - 21.00 (rear), so worn about a mil and oval.
Next I turned my attention to the shift lever. The ball didn’t look in too bad condition, I have measured it and it worked out at 29.57mm. It would be useful to know what a new one measures up at if anyone has one handy?
The socket, on the other hand, was in a right state. The rubber boot had perished and the ally was heavily corroded – it may well be that this will need replacing – I will have to see what the finished setup is like. At the top of the socket this measured 30.40mm, about 0.6mm bigger than the ball.
I also checked the shift lever shaft on the transmission as Aidan had pointed out that there looked to be a small oil leak. The shaft has no horizontal play but does have some vertical movement, with the shaft pulled out (4th/5th position) the end of the shaft moved about 0.25mm. Also, when sliding the shaft in and out there is a noticeable deposit of oil on the shaft so I reckon the seal needs replacing. Haven’t got one of these so that will have to be ordered up and fitted later.
Reassembly is pretty straight forward. I cleaned up the shafts, refitted the shift lever and drove the pin in from inside the cup (NOTE, one end of the roll pin was noticeably smaller than the other – If you have a vernier or micrometer it is useful to know this and put the smaller end in first!)
I then filled the cup with moly grease and fitted a new boot to the socket.
I also cleaned and refilled the transmission shift lever boot with grease, it is actually easier to fit the ball end of the shift lever to the transmission shaft before loosely bolting the rear bush housing to the FRONT of the transmission (see Aidan’s note in the wiki – if you bolt the plate behind the mount on the transmission housing it will throw out the selector settings ).
).
I then reassembled the front bushing and shifter rod and loosely bolted on before recoupling the splined shaft and clamp. To be honest I found the alignment pretty easy as I set the shift lever on the transmission so it was in neutral in the 2nd/3rd position (lever is vertical). If you then fit the splines 1 out you will find the fork on the gear lever won’t line up with the bushing on the front of the shift rod.
Once the splines were clamped up I then tighten all the other bushing mountings and this is what the finished product looks like:
I still have a few more bits to do and will report back on impressions after test driving tomorrow.
MM
The front and rear shift rods both run in plastic bushes, the shift lever is a ball and cup (socket) affair where the ball is nylon and the socket metal.
In my case all the areas were worn, if you got under the van and held the shift rod you could move it laterally and vertically (about 1-2mm play). There also seemed a fair bit of play in the shift lever ball joint (up/down movement)
To get at the shift rod bushes you have to disconnect the front and rear shift rods from each other. They are joined by a splined shaft/clamp which allows you to alter not only the length of the shaft but also the orientation i.e. you can rotate the rear shaft relative to the front.
If you were setting up from scratch there are measurements and processes for getting this joint set up correctly as adjustments here fundamentally affect the movement of the shift lever and hence gear selection.
If your selection is working OK already then just make sure you mark/scribe this joint before splitting!! I put a daub of tippex on mine (pretty useless idea really as I then cleaned the shaft
Loosen the clamp bolt, apply releasing fluid and gently work the shaft off the splines. You may find you need to gently tap with a hammer to help move it.
Once removed then undo the 2 bolts securing the bush assembly to the cross member and slide the assembly off the shift rod leaving it looking like this.
The rear bush mounting is bolted to the front of the transmission.
To remove the bushing you will need to remove the shift lever which can’t be done in situ, so undo the two bolts holding the bush mounting to the transmission case. You may find at this point the rear shift lever will drop free as the ball joint will pop out of its socket on the shift lever.
If it doesn’t then the lever is held onto the gearbox shaft with a 13mm retaining nut. Push a socket on where the arrow is and undo this nut then the shift lever will slide of the transmission shift shaft. NOTE: this lever is keyed (will only fit one way) so you don’t have to worry about marking its position.
When you have done the two steps above you will have a collection of parts like this on your bench.
The front bushing will already be in pieces, but to get the rear bushing off you need to remove the shift lever from the shaft. It slides onto the shaft and is secured by a roll pin that goes through the shaft and the shift lever.
Find a suitable drift and drive the pin out INTO THE SOCKET. When you have do that the shift lever will slide off the shaft (with a bit of encouragement) leaving you with a nice collection of parts to clean.
Depending on the age of your vehicle you will either have 2 bushes that look like this (part no. 251 711 207 D)
Or one of the above and another like this (part no. 251 711 207 E)
In theory later vans (85 onwards?) have the “one of each” variety, but Myrtle is an ’86 and has 2 the same so who knows! I would have a look underneath and check before ordering otherwise (like me) you will end up with the wrong bush.
Just out of interest I measured the bushes up with a vernier. The new bush measured 20.00mm, the old ones were 20.80 - 21.20 (front) and 20.80 - 21.00 (rear), so worn about a mil and oval.
Next I turned my attention to the shift lever. The ball didn’t look in too bad condition, I have measured it and it worked out at 29.57mm. It would be useful to know what a new one measures up at if anyone has one handy?
The socket, on the other hand, was in a right state. The rubber boot had perished and the ally was heavily corroded – it may well be that this will need replacing – I will have to see what the finished setup is like. At the top of the socket this measured 30.40mm, about 0.6mm bigger than the ball.
I also checked the shift lever shaft on the transmission as Aidan had pointed out that there looked to be a small oil leak. The shaft has no horizontal play but does have some vertical movement, with the shaft pulled out (4th/5th position) the end of the shaft moved about 0.25mm. Also, when sliding the shaft in and out there is a noticeable deposit of oil on the shaft so I reckon the seal needs replacing. Haven’t got one of these so that will have to be ordered up and fitted later.
Reassembly is pretty straight forward. I cleaned up the shafts, refitted the shift lever and drove the pin in from inside the cup (NOTE, one end of the roll pin was noticeably smaller than the other – If you have a vernier or micrometer it is useful to know this and put the smaller end in first!)
I then filled the cup with moly grease and fitted a new boot to the socket.
I also cleaned and refilled the transmission shift lever boot with grease, it is actually easier to fit the ball end of the shift lever to the transmission shaft before loosely bolting the rear bush housing to the FRONT of the transmission (see Aidan’s note in the wiki – if you bolt the plate behind the mount on the transmission housing it will throw out the selector settings
I then reassembled the front bushing and shifter rod and loosely bolted on before recoupling the splined shaft and clamp. To be honest I found the alignment pretty easy as I set the shift lever on the transmission so it was in neutral in the 2nd/3rd position (lever is vertical). If you then fit the splines 1 out you will find the fork on the gear lever won’t line up with the bushing on the front of the shift rod.
Once the splines were clamped up I then tighten all the other bushing mountings and this is what the finished product looks like:
I still have a few more bits to do and will report back on impressions after test driving tomorrow.
MM
'89 Autosleeper Trident
2.1 DJ
Member 9111
2.1 DJ
Member 9111
-
Plasticman
- Trader
- Posts: 8085
- Joined: 12 Oct 2005, 20:55
- 80-90 Mem No: 1948
- Location: lincolnshire
Re: Overhauling 5 speed gearbox linkage
You know what they say about cobblers and shoes. nice photo record of the job,
mm
mm
-
mm289
- Registered user
- Posts: 314
- Joined: 31 Dec 2010, 22:00
- 80-90 Mem No: 9111
- Location: Dover, Kent
Re: Overhauling 5 speed gearbox linkage
metalmick8y wrote: nice photo record of the job,
mm
I blame it all on CovKid, he wanted a "How to" for the wiki, spent longer writing it up than I did doing the job - don't know how you do such long write ups on the resto's
MM
'89 Autosleeper Trident
2.1 DJ
Member 9111
2.1 DJ
Member 9111
-
Plasticman
- Trader
- Posts: 8085
- Joined: 12 Oct 2005, 20:55
- 80-90 Mem No: 1948
- Location: lincolnshire
Re: Overhauling 5 speed gearbox linkage
Well while Im sat here with the idiot lantern on , cans on my head with good(to me ) sounds, text banging away madly and other stuff on another screen then its sort of not taking up time as your doing other stuff as well,so its a fit in,
also as you will find, when you write up about a task, you end up thinking about it and how to communicate it, and this in turn helps me to understand what I do and think of better /easier ways to do it. .
anyhow I like your write up and the pickies are nice and clear and it will be good for the wiki and help loads of folk in the future ..
mm
-
mm289
- Registered user
- Posts: 314
- Joined: 31 Dec 2010, 22:00
- 80-90 Mem No: 9111
- Location: Dover, Kent
Re: Overhauling 5 speed gearbox linkage
Hey Meggles was asking about writing books earlier, we should package all this stuff and do a book on keeping T25's on the road

MM
MM
'89 Autosleeper Trident
2.1 DJ
Member 9111
2.1 DJ
Member 9111
-
Plasticman
- Trader
- Posts: 8085
- Joined: 12 Oct 2005, 20:55
- 80-90 Mem No: 1948
- Location: lincolnshire
Re: Overhauling 5 speed gearbox linkage
yep but better idea,,,  I hear there are several newscorp boyo's out of wotrk at the moment
mm
mm
-
CovKid

- Trader
- Posts: 8413
- Joined: 30 Apr 2006, 13:19
- 80-90 Mem No: 3529
- Location: Ralph - Coventry (Retired)
- Contact:
Re: Overhauling 5 speed gearbox linkage
I'll rebalance the colours in the photos for you and copy it across to the WIKI on Friday. Many thanks for going to SO much trouble. Car manuals tend to be written for grease monkeys but WIKI articles need to work on the basis that the reader doesn't have a clue (or the money sometimes) and you've done that perfectly. Many, many thanks.
Roller paint your camper at home: http://roller.epizy.com/55554/" onclick="window.open(this.href);return false; for MP4 download.
-
mm289
- Registered user
- Posts: 314
- Joined: 31 Dec 2010, 22:00
- 80-90 Mem No: 9111
- Location: Dover, Kent
Re: Overhauling 5 speed gearbox linkage
OK, final report time.
Fitted the remaining shift rod bush (the one I had the wrong part for initially) and did final checks etc.
Then changed the transmission oil as well - which turned out to be a bit of a epic. The fill plug takes a 17mm hex socket, no probs there then even though it must have been done up by a gorilla!!
Just for a laugh the drain plug is a 16mm hex, which isn't a standard size and it was also done up like a Scotsman's wallet
So, in the end had to improvise, found a 16mm bolt, then welded a nut onto it so i could use it as a hex socket. First attempt snapped the bolt so had to find a stronger bolt and eventually won  .
.
Drain plug christmas tree didn't look too bad,
and this is the improvised hex key
so, what about the test drive?
What a difference, the shift is TRANSFORMED
There is hardly any sloppiness at all, just a nice positive shift. 1st > 2nd (dogleg) is a piece of cake, just goes straight in. The only thing I could improve is the 3rd > 4th shift which has a bit too much lateral movement, but this is because of the plastic cap I am missing on the shift mechanism.
So, I would thoroughly recommend this repair to anyone with a sloppy gear change - it makes a huge difference to the driveability of the van.
At the end of the day I replaced the shift lever bearing/mechanism, 2 shift rod bushes and 2 bellows. Total parts cost from Brickwerks (incl 8090 discount) was £80.
In terms of time I reckon its a solid days work if you take the approach I did and clean down all the parts properly etc. I have the advantage of doing it on a proper lift in my workshop (a non-hitop will fit in thank goodness!), doing it on your back on the floor will take you a bit longer (and be more uncomfortable )
All in all, well worthwhile though. If you don't fancy doing it yourself and are near Kent then drop me a PM and we can have a chat
Hope you enjoyed.
Cheers,
MM
Fitted the remaining shift rod bush (the one I had the wrong part for initially) and did final checks etc.
Then changed the transmission oil as well - which turned out to be a bit of a epic. The fill plug takes a 17mm hex socket, no probs there then even though it must have been done up by a gorilla!!
Just for a laugh the drain plug is a 16mm hex, which isn't a standard size
So, in the end had to improvise, found a 16mm bolt, then welded a nut onto it so i could use it as a hex socket. First attempt snapped the bolt
Drain plug christmas tree didn't look too bad,
and this is the improvised hex key
so, what about the test drive?
What a difference, the shift is TRANSFORMED
There is hardly any sloppiness at all, just a nice positive shift. 1st > 2nd (dogleg) is a piece of cake, just goes straight in. The only thing I could improve is the 3rd > 4th shift which has a bit too much lateral movement, but this is because of the plastic cap I am missing on the shift mechanism.
So, I would thoroughly recommend this repair to anyone with a sloppy gear change - it makes a huge difference to the driveability of the van.
At the end of the day I replaced the shift lever bearing/mechanism, 2 shift rod bushes and 2 bellows. Total parts cost from Brickwerks (incl 8090 discount) was £80.
In terms of time I reckon its a solid days work if you take the approach I did and clean down all the parts properly etc. I have the advantage of doing it on a proper lift in my workshop (a non-hitop will fit in thank goodness!), doing it on your back on the floor will take you a bit longer (and be more uncomfortable
All in all, well worthwhile though. If you don't fancy doing it yourself and are near Kent then drop me a PM and we can have a chat
Hope you enjoyed.
Cheers,
MM
'89 Autosleeper Trident
2.1 DJ
Member 9111
2.1 DJ
Member 9111
-
CovKid
- Trader
- Posts: 8413
- Joined: 30 Apr 2006, 13:19
- 80-90 Mem No: 3529
- Location: Ralph - Coventry (Retired)
- Contact:
Re: Overhauling 5 speed gearbox linkage
WIKI page will be at location below. Will take me a few days to resize, reformat and carry relevant text across. Bear with me. Clearly I can't paste every photo as it, simply because of the loading time, hosting limitations and 80/90 bandwidth but if you look, you'll see how I'm already placing some side by side where it works better that way:
https://club8090.co.uk/wiki/Ge ... hanism_Pt1" onclick="window.open(this.href);return false;
https://club8090.co.uk/wiki/Ge ... hanism_Pt1" onclick="window.open(this.href);return false;
Last edited by CovKid on 17 Feb 2012, 20:24, edited 1 time in total.
Roller paint your camper at home: http://roller.epizy.com/55554/" onclick="window.open(this.href);return false; for MP4 download.
-
mm289
- Registered user
- Posts: 314
- Joined: 31 Dec 2010, 22:00
- 80-90 Mem No: 9111
- Location: Dover, Kent
Re: Overhauling 5 speed gearbox linkage
Looking good CovKid, if you need any more info or pictures just ping me.
BTW the final measurements for stick movement are:
Lateral measured from Reverse to 4th - 6"
Vertical measured from 4th to 5th - 6"
Cheers,
MM
BTW the final measurements for stick movement are:
Lateral measured from Reverse to 4th - 6"
Vertical measured from 4th to 5th - 6"
Cheers,
MM
'89 Autosleeper Trident
2.1 DJ
Member 9111
2.1 DJ
Member 9111
-
CovKid
- Trader
- Posts: 8413
- Joined: 30 Apr 2006, 13:19
- 80-90 Mem No: 3529
- Location: Ralph - Coventry (Retired)
- Contact:
Re: Overhauling 5 speed gearbox linkage
Not altering it much except where there are differences between models but because you've done such a good job, I could be some time...... .
Roller paint your camper at home: http://roller.epizy.com/55554/" onclick="window.open(this.href);return false; for MP4 download.
-
mm289
- Registered user
- Posts: 314
- Joined: 31 Dec 2010, 22:00
- 80-90 Mem No: 9111
- Location: Dover, Kent
Re: Overhauling 5 speed gearbox linkage
CovKid wrote:Not altering it much except where there are differences between models but because you've done such a good job, I could be some time......
Enjoy
MM
'89 Autosleeper Trident
2.1 DJ
Member 9111
2.1 DJ
Member 9111
-
Titus A Duxass

- Registered user
- Posts: 5777
- Joined: 24 Nov 2007, 08:22
- 80-90 Mem No: 4475
- Location: Cologne
Re: Overhauling 5 speed gearbox linkage
This is a damn good write up and wiki article.
Top work guys, I shall be using it very shortly.
Cheers
TAD
Top work guys, I shall be using it very shortly.
Cheers
TAD
VW T3 GTi Camper 2,0l