Rear Wheel Bearing Problems
Moderators: User administrators, Moderators
-
T25ScoobySTI
- Registered user
- Posts: 19
- Joined: 02 May 2008, 21:46
- 80-90 Mem No: 0
- Location: Dover
Re: Rear Wheel Bearing Problems
Thought as much, the spare wheel is standard so I'll see if the socket will fit through that on Tuesday when I've got the day off.
Re: Rear Wheel Bearing Problems
When I did mine I ground of the nut very very carefully. Mine were seized solid. Purchased new nuts from GSF.
When You grind one side flat, the pressure that the nut is under.. cracks the nut when you get so far through it. It then comes undone easily
When You grind one side flat, the pressure that the nut is under.. cracks the nut when you get so far through it. It then comes undone easily
Life is not a rehearsal...Live life to the max....Buy a Aircooled VW and get covered in Rust and Oil.......But we all love it really....!!
-
psychonaut
- Registered user
- Posts: 883
- Joined: 07 May 2009, 09:17
- 80-90 Mem No: 6751
- Location: Cardiff
- Contact:
Re: Rear Wheel Bearing Problems
Working on mine as we speak. All 5 bolts at the gearbox end of the drive shaft are off, and four at the wheel end - how difficult are they to get to?! One last one is stubbornly refusing to come out. It looks like either (a) the previous owner , or (b) the last mechanic to have a go in there, have rounded it off. I'm running out of ideas now (tried hex bits, hammering in slightly larger bits, etc.) and I'm pretty sure that it's it too tight to try and get it out with a stud extractor and a drill. Any ideas anyone, to save my sanity?!
I'm taking photos as I go along, as promised
I'm taking photos as I go along, as promised
"There are many paths to redemption.
Not all of them are peaceful...."
Click here for some Visionary 'Nauts.....
For more unchartered heights of disgrace just ring 07872 069462
Not all of them are peaceful...."
Click here for some Visionary 'Nauts.....
For more unchartered heights of disgrace just ring 07872 069462
-
psychonaut
- Registered user
- Posts: 883
- Joined: 07 May 2009, 09:17
- 80-90 Mem No: 6751
- Location: Cardiff
- Contact:
Re: Rear Wheel Bearing Problems
And it's off!! Now, if anyone has any ideas how to get the socket off the end of the bolt I'd be very pleased to hear from you 
"There are many paths to redemption.
Not all of them are peaceful...."
Click here for some Visionary 'Nauts.....
For more unchartered heights of disgrace just ring 07872 069462
Not all of them are peaceful...."
Click here for some Visionary 'Nauts.....
For more unchartered heights of disgrace just ring 07872 069462
-
toomanytoys

- Trader
- Posts: 2872
- Joined: 11 Oct 2005, 18:37
- 80-90 Mem No: 41
- Location: Boston area, South Lincolnshire
Re: Rear Wheel Bearing Problems
put bolt in vice and tap the socket off..
-
ermie571

- Registered user
- Posts: 4970
- Joined: 11 Oct 2005, 11:11
- 80-90 Mem No: 2129
- Location: Minster-on-Sea, Kent: Member 2129 07784052288
Re: Rear Wheel Bearing Problems
Knock it on the kerb....(we don't have a vice  )
)
Em
xx
Em
xx
2.1 DJ 1990 Caravelle (died and gone to heaven)
2.0 AGG (1997 ish) 1984 transporter LPG
2.0 AGG (1997 ish) 1984 transporter LPG
-
psychonaut
- Registered user
- Posts: 883
- Joined: 07 May 2009, 09:17
- 80-90 Mem No: 6751
- Location: Cardiff
- Contact:
Re: Rear Wheel Bearing Problems
I don't have a vice either - all the tools I have, and no vice!! I'll take it to work with me tonight and stick it in the vice in the workshop there
Anyway, wheel bearing housing now off the can, and everything is apart and ready for me to put in the new bearing
But work beckons, so I'll be continuing in the morning
Anyway, wheel bearing housing now off the can, and everything is apart and ready for me to put in the new bearing
But work beckons, so I'll be continuing in the morning
"There are many paths to redemption.
Not all of them are peaceful...."
Click here for some Visionary 'Nauts.....
For more unchartered heights of disgrace just ring 07872 069462
Not all of them are peaceful...."
Click here for some Visionary 'Nauts.....
For more unchartered heights of disgrace just ring 07872 069462
-
psychonaut
- Registered user
- Posts: 883
- Joined: 07 May 2009, 09:17
- 80-90 Mem No: 6751
- Location: Cardiff
- Contact:
Re: Rear Wheel Bearing Problems **PICS NOW ADDED* (lots of 'em)
As promised, here's a few pics I took as I went along. It's not an exhaustive photo story, but hopefully it'll help someone if the Mods think any of them will be useful for the Wiki, please feel free to add them
The first thing to do is get your van's arshe up in the air, crawl underneath her and get the drive shaft off, starting with the gearbox end: -
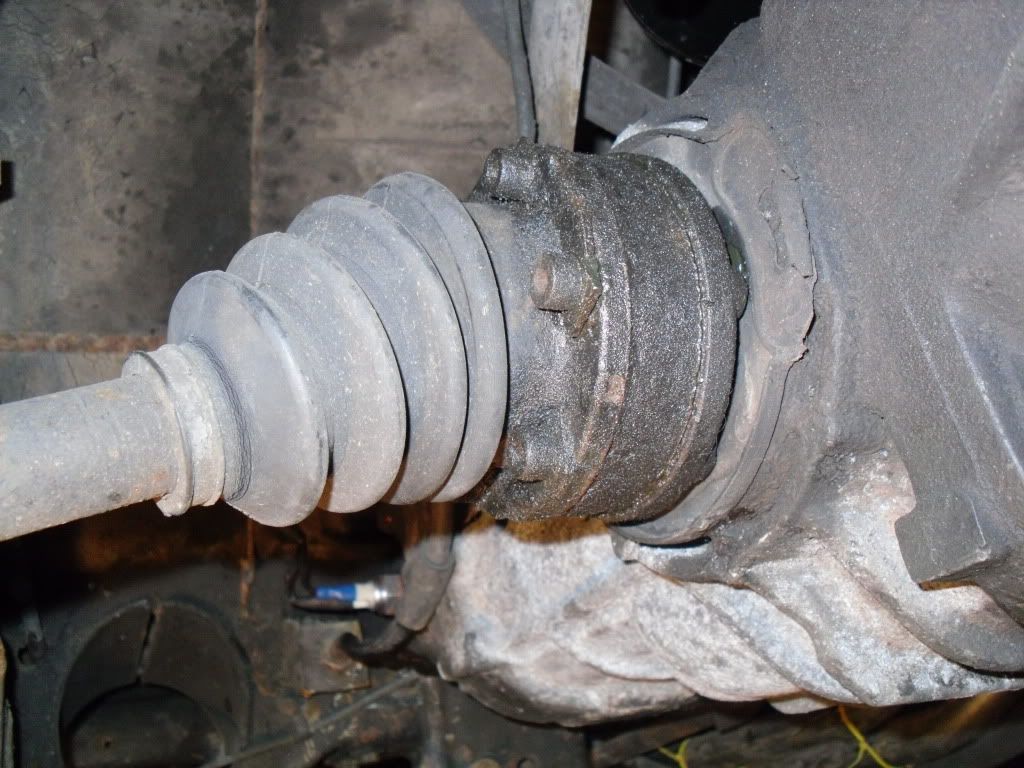
I used a ratchet and hex key as all mine were hex, but sometimes you'll find that some of the bolts are star-shaped - I have a set of star sockets for the Triumph so if I'd have come across any it wouldn't have been a problem.
Next is the end of the drive shaft inside the bearing housing at the wheel end. This is renowned for being a bit tricky. I used an extension bar on the ratchet, and tied up the free end of the drive shaft with string out of the way so that I could get to all the bolts. They all came off bar one,, which was starting to round off as I tried to get it off. In the end I hammered a 10mm (If I remember correctly) onto it with the extension bar, which was a tight enough fit that when I put the ratchet on it, it started to turn. At this point, I order a set of bolts from the Bay of Fleas to replace some of the dodgier looking ones I'd taken off!!
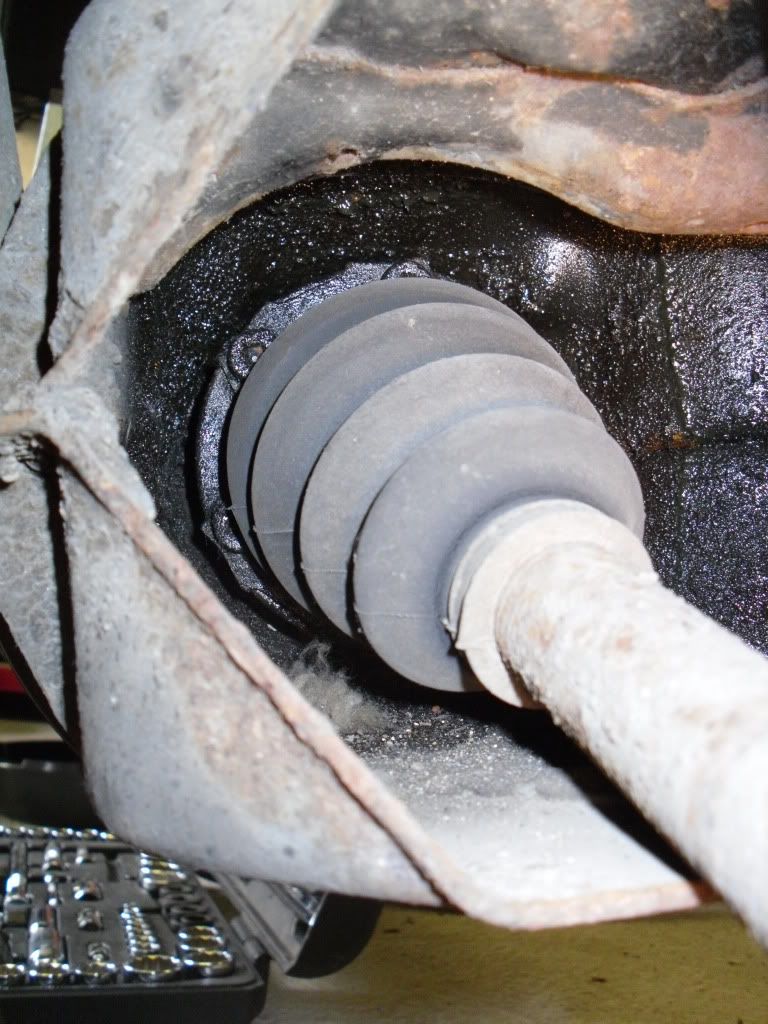
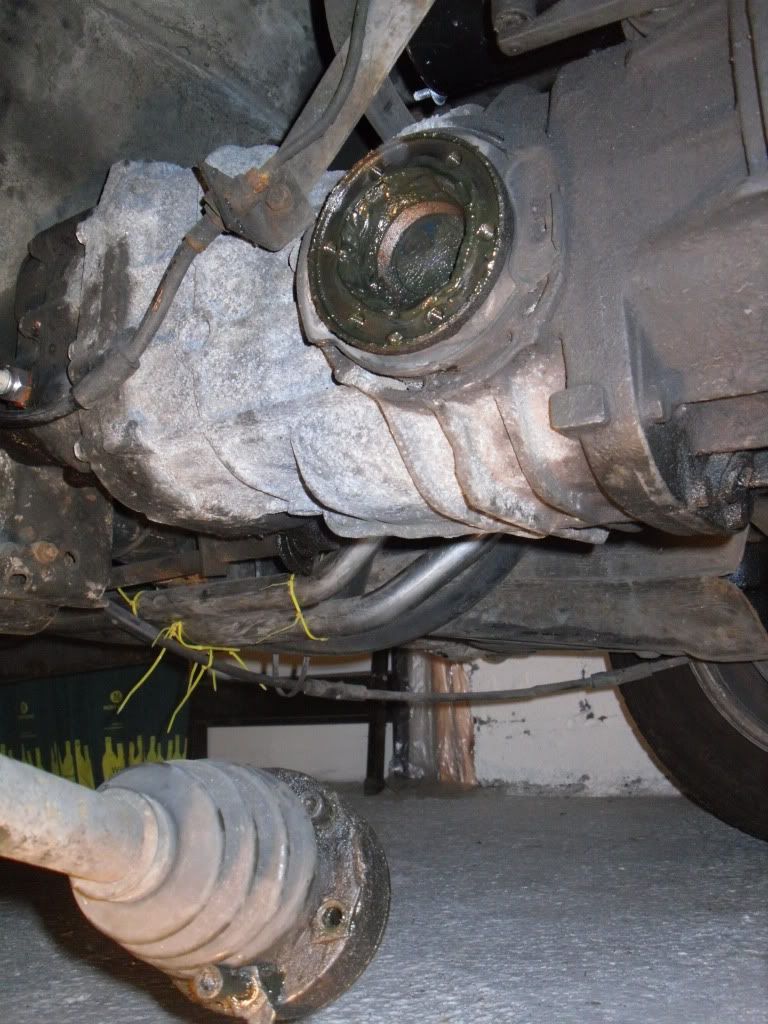
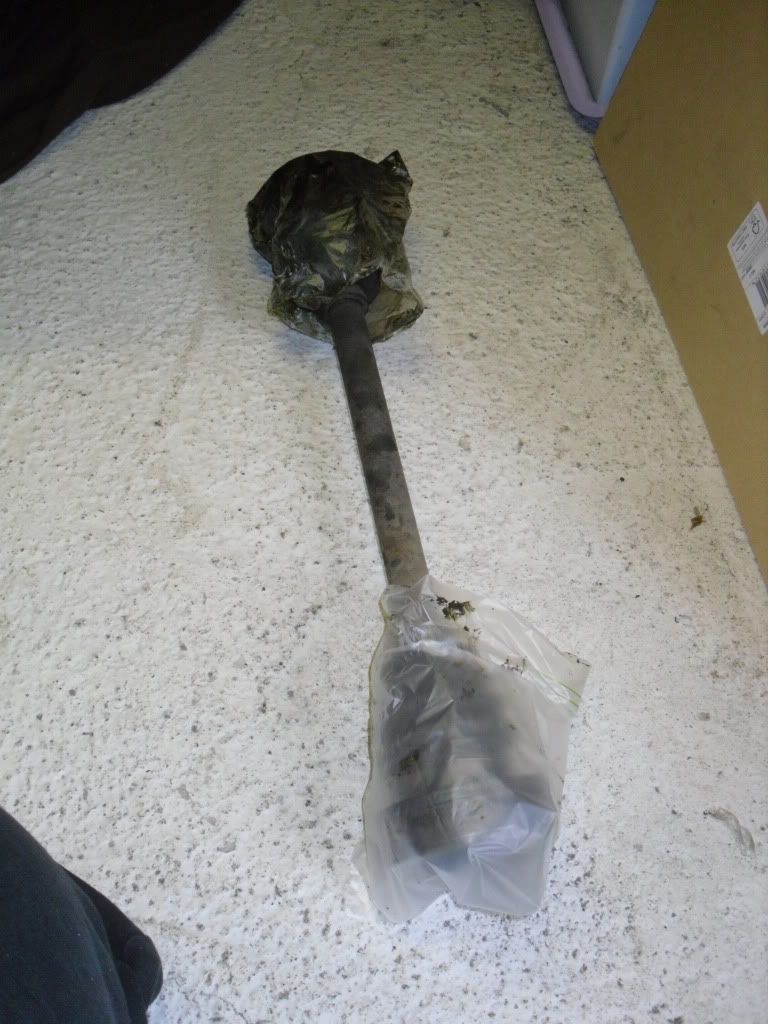
When you've got the driveshaft off, stick a plastic bag over each end to save any muck or grime getting on the joints, or any of the grease coming off them and all over the family cat or the baby, and pop it somewhere safe for the duration of the job.
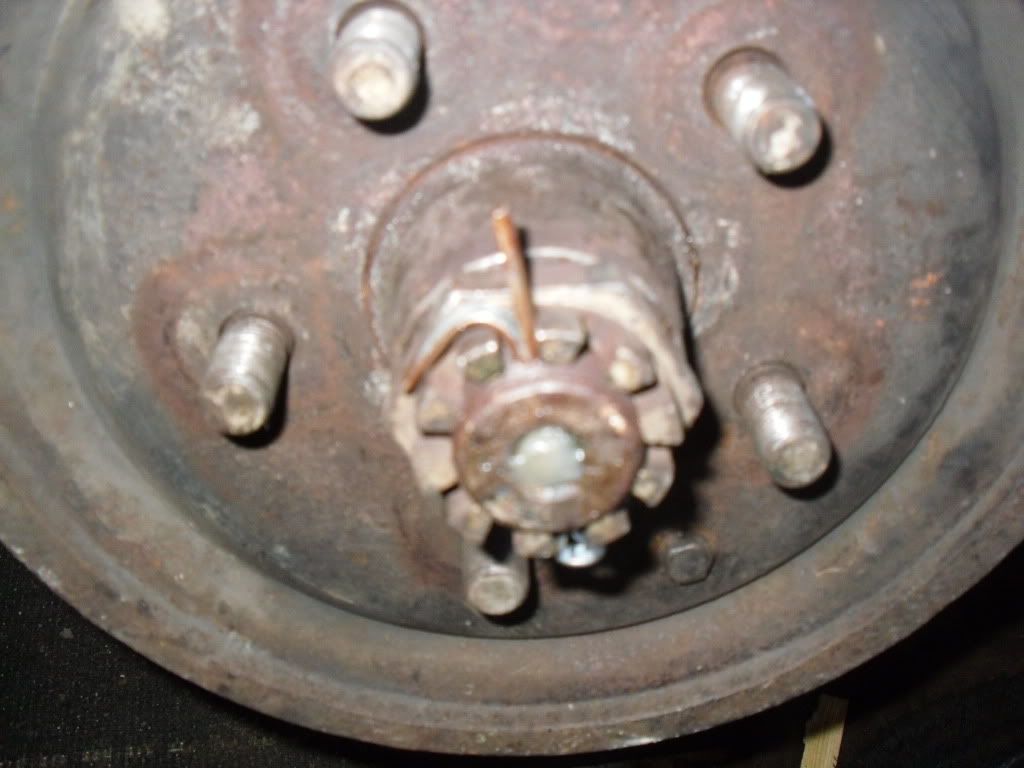
Next job is to remove the split pin, and get the castle nut off. It's a 46mm socket - I had to buy one especially, just over £20 from a local tool specialist. Ouch. Once the split pin is out, you'll almost certainly need to put the wheel back on, drop the van back to the ground, and then loosen the castle nut.
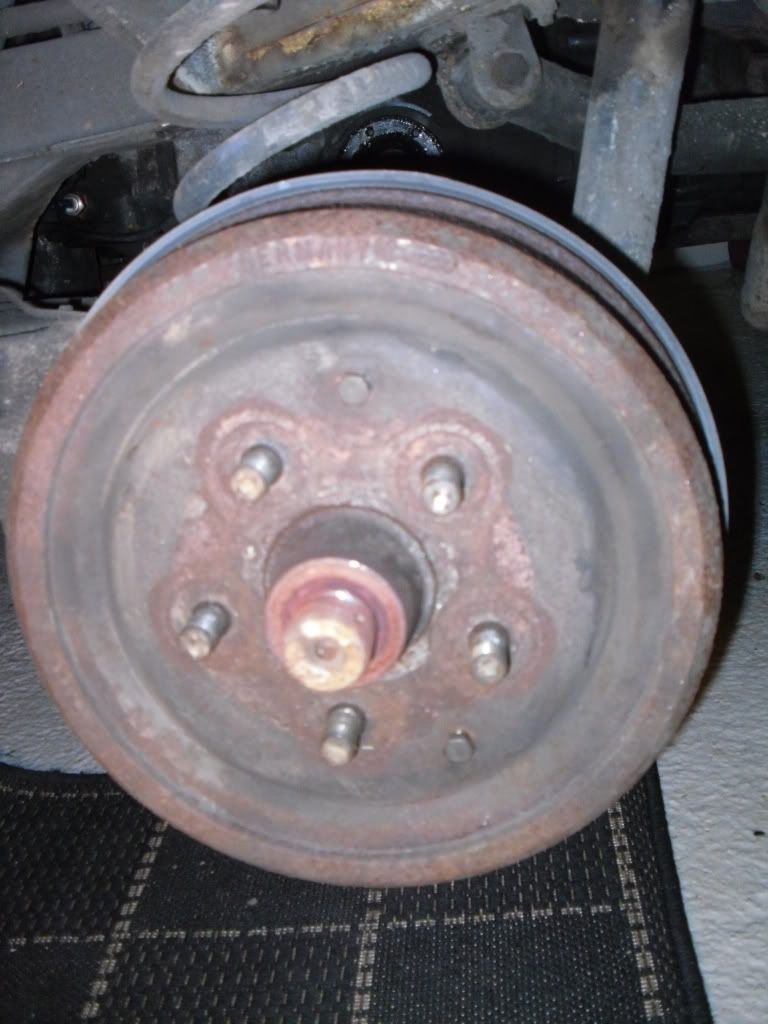
With the van back in the air, and the nut off, it's time to remove the drum. It'll be full of brake dust so be as gentle as you can be. Remove the two retaining bolts first, then simply pull the drum off. Mine needed a few persuasive taps around the edge with a hammer to remove it.
Undo the brake line at the rear. I clamped the rubber part of the brake pipe to minimise fluid loss before doing this. You will still need to bleed the system afterwards though.

The wheel mounting plate should now pull off, although you may need to offer some "gentle persuasion". Once it's off, you'll have all the gubbins inside the brake drum on view. I'd advise taking a photo or two at this point if you're not familiar with how everything goes together, so that you can put it all back together again properly when you've finished This is mine, but after I'd started taking springs and retaining clips out. Photograph yours before you start.


Once everything is out, you can remove the backplate, and then undo the four bolts that hold the wheelbearing housing in place. If you have a hairy-arshed biker with a breaker bar hanging about the place, you'll find him very useful for undoing these bolts, which will likely have not been disturbed for years, and will have been done up very tightly originally

Once the bearing housing is off, I recommend following the instructions in the Haynes manual. I did, they're very clear and accurate, and so long as you follow them exactly, you wont go wrong. I wont reproduce the process here, but a couple of photos may help
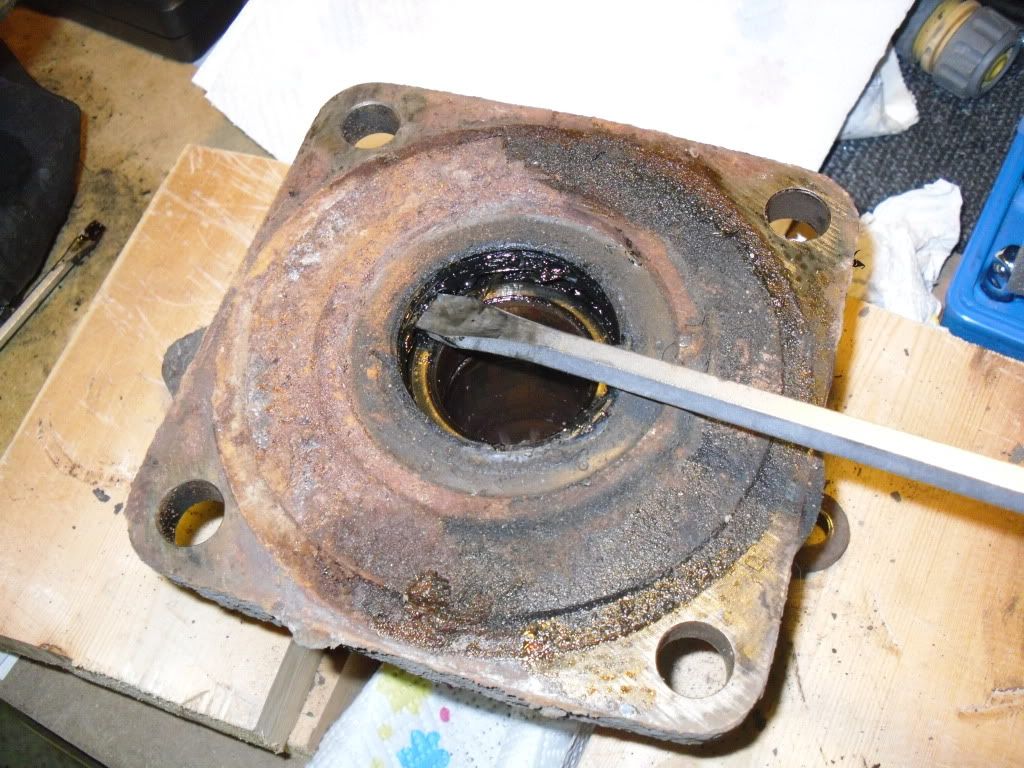
Lifting out the oil seal at the inner end of the bearing: -
And the circlip underneath it: -

Drive out the old bearings with a drift, available for no more than a couple of quid at your local tool specialist. Don't use a screwdriver or anything else big and hard!! An undersized bearing placer would also work. I used a combination of the drift and a small placer.
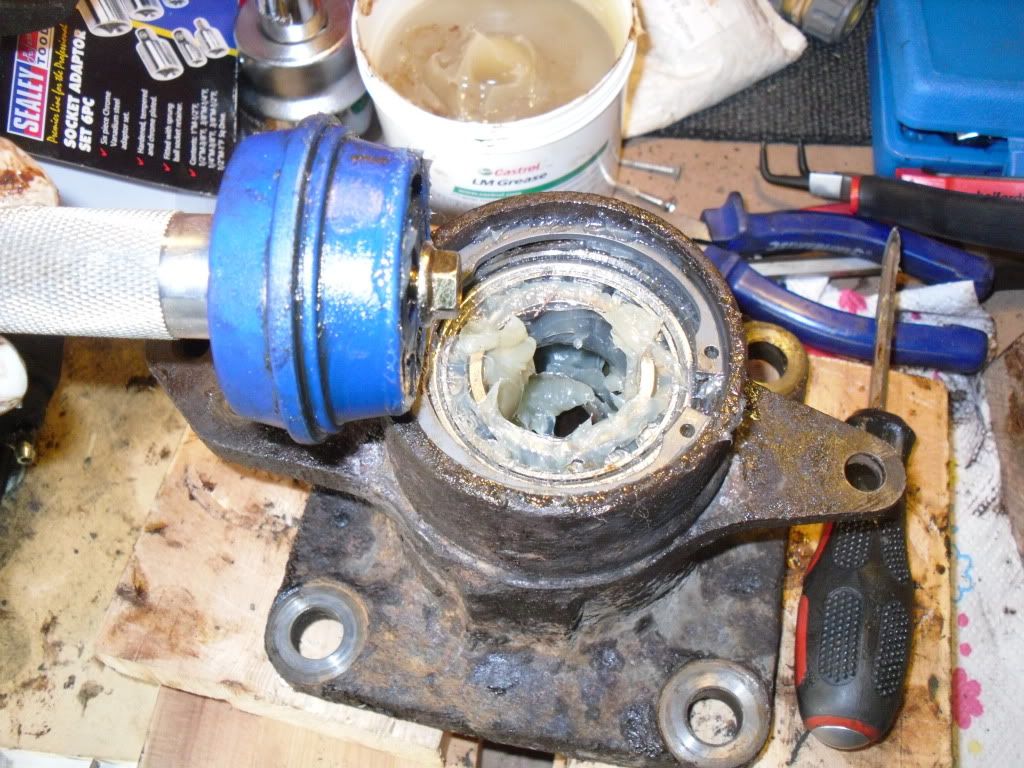
When putting in the new bearing parts, follow the Haynes, and pack *everything* in as much grease as you can. I already had some wheel bearing grease for the collection of motorcycles I have, but Halfords do pots of temperature-tolerant grease especially for wheelbearings for just a few quid. The bearings I bought from Brickwerks had a sachet of grease supplied, but I'd buy a pot anyway. You just know that sachet will end up in the (a) dog, (b) mug of tea, or (c) the baby.
Driving in the outer bearing with a bearing placer: -
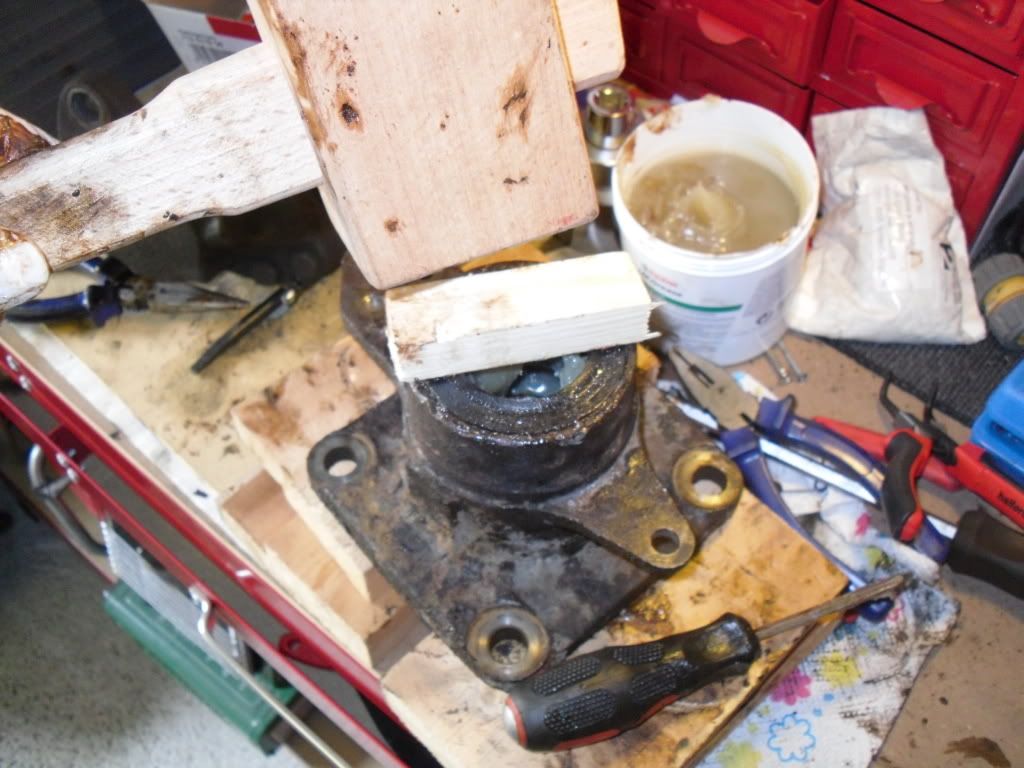
Popping in the outer seal. As you can see, I used a block of wood rather than a placer for this, and tapped GENTLY and squarely to ensure it went in evenly: -
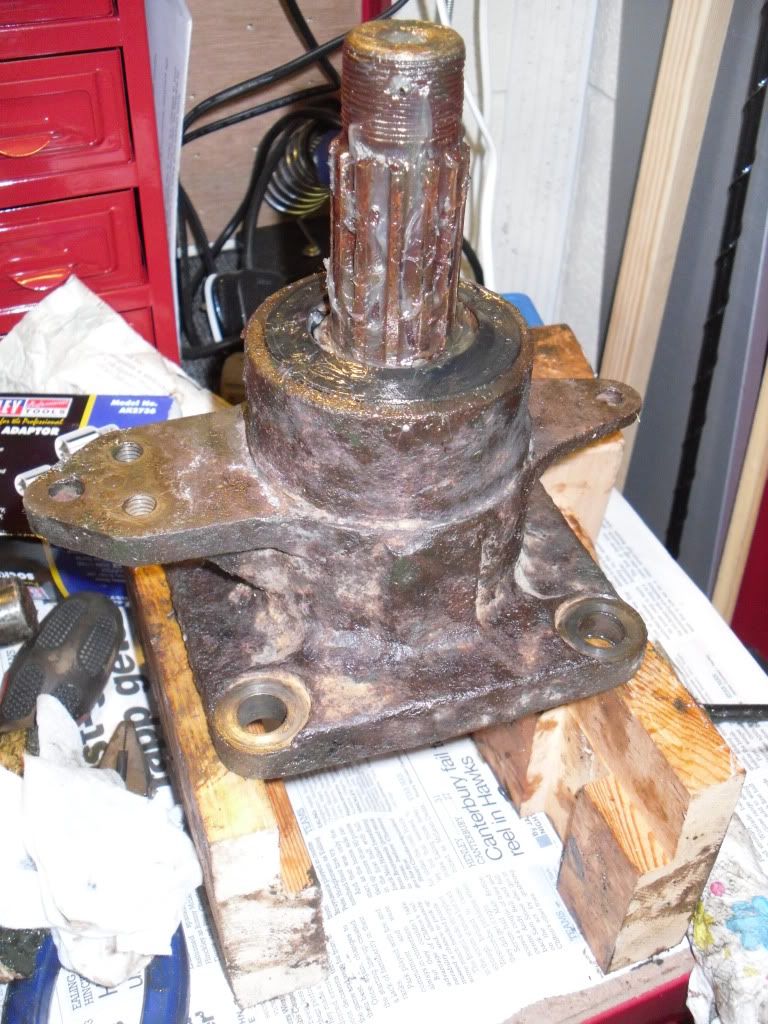
The finished job, before putting everything back on the van: -
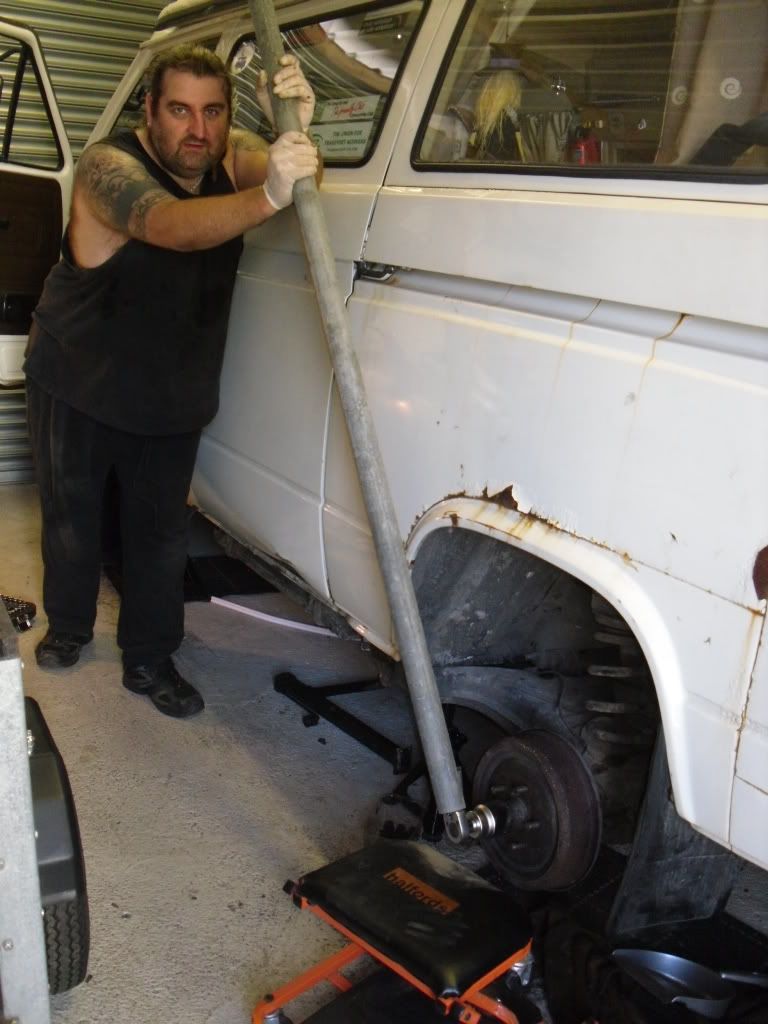
Putting everything back together is simply a reverse of taking it all off. Follow the instructions in the Haynes for adjusting the rear brake shoes once you've got the brake assembly back together. Doing it properly the first time will save a lot of frustration later, I promise you. Putting the drive shaft back on can sometimes be a nightmare, although mine went back very easily. Do the wheel end first, and them have a friend rotate the hub to match up the holes at the gearbox end of the shaft. Again, I tied up the driveshaft with some string to make this job a lot easier. When you are ready to put the castlenut back on, use a length of scaffolding pole over your torque wrench to get the necessary leverage, as per this photograph. Please note though, that this photo is for effect only - your wheel must be on and ON THE GROUND before tightening up.
Once completed, award yourself a night on the lash at a beer festival with friends

The first thing to do is get your van's arshe up in the air, crawl underneath her and get the drive shaft off, starting with the gearbox end: -
I used a ratchet and hex key as all mine were hex, but sometimes you'll find that some of the bolts are star-shaped - I have a set of star sockets for the Triumph so if I'd have come across any it wouldn't have been a problem.
Next is the end of the drive shaft inside the bearing housing at the wheel end. This is renowned for being a bit tricky. I used an extension bar on the ratchet, and tied up the free end of the drive shaft with string out of the way so that I could get to all the bolts. They all came off bar one,, which was starting to round off as I tried to get it off. In the end I hammered a 10mm (If I remember correctly) onto it with the extension bar, which was a tight enough fit that when I put the ratchet on it, it started to turn. At this point, I order a set of bolts from the Bay of Fleas to replace some of the dodgier looking ones I'd taken off!!
When you've got the driveshaft off, stick a plastic bag over each end to save any muck or grime getting on the joints, or any of the grease coming off them and all over the family cat or the baby, and pop it somewhere safe for the duration of the job.
Next job is to remove the split pin, and get the castle nut off. It's a 46mm socket - I had to buy one especially, just over £20 from a local tool specialist. Ouch. Once the split pin is out, you'll almost certainly need to put the wheel back on, drop the van back to the ground, and then loosen the castle nut.
With the van back in the air, and the nut off, it's time to remove the drum. It'll be full of brake dust so be as gentle as you can be. Remove the two retaining bolts first, then simply pull the drum off. Mine needed a few persuasive taps around the edge with a hammer to remove it.
Undo the brake line at the rear. I clamped the rubber part of the brake pipe to minimise fluid loss before doing this. You will still need to bleed the system afterwards though.
The wheel mounting plate should now pull off, although you may need to offer some "gentle persuasion". Once it's off, you'll have all the gubbins inside the brake drum on view. I'd advise taking a photo or two at this point if you're not familiar with how everything goes together, so that you can put it all back together again properly when you've finished
Once everything is out, you can remove the backplate, and then undo the four bolts that hold the wheelbearing housing in place. If you have a hairy-arshed biker with a breaker bar hanging about the place, you'll find him very useful for undoing these bolts, which will likely have not been disturbed for years, and will have been done up very tightly originally
Once the bearing housing is off, I recommend following the instructions in the Haynes manual. I did, they're very clear and accurate, and so long as you follow them exactly, you wont go wrong. I wont reproduce the process here, but a couple of photos may help
Lifting out the oil seal at the inner end of the bearing: -
And the circlip underneath it: -
Drive out the old bearings with a drift, available for no more than a couple of quid at your local tool specialist. Don't use a screwdriver or anything else big and hard!! An undersized bearing placer would also work. I used a combination of the drift and a small placer.
When putting in the new bearing parts, follow the Haynes, and pack *everything* in as much grease as you can. I already had some wheel bearing grease for the collection of motorcycles I have, but Halfords do pots of temperature-tolerant grease especially for wheelbearings for just a few quid. The bearings I bought from Brickwerks had a sachet of grease supplied, but I'd buy a pot anyway. You just know that sachet will end up in the (a) dog, (b) mug of tea, or (c) the baby.
Driving in the outer bearing with a bearing placer: -
Popping in the outer seal. As you can see, I used a block of wood rather than a placer for this, and tapped GENTLY and squarely to ensure it went in evenly: -
The finished job, before putting everything back on the van: -
Putting everything back together is simply a reverse of taking it all off. Follow the instructions in the Haynes for adjusting the rear brake shoes once you've got the brake assembly back together. Doing it properly the first time will save a lot of frustration later, I promise you. Putting the drive shaft back on can sometimes be a nightmare, although mine went back very easily. Do the wheel end first, and them have a friend rotate the hub to match up the holes at the gearbox end of the shaft. Again, I tied up the driveshaft with some string to make this job a lot easier. When you are ready to put the castlenut back on, use a length of scaffolding pole over your torque wrench to get the necessary leverage, as per this photograph. Please note though, that this photo is for effect only - your wheel must be on and ON THE GROUND before tightening up.
Once completed, award yourself a night on the lash at a beer festival with friends
"There are many paths to redemption.
Not all of them are peaceful...."
Click here for some Visionary 'Nauts.....
For more unchartered heights of disgrace just ring 07872 069462
Not all of them are peaceful...."
Click here for some Visionary 'Nauts.....
For more unchartered heights of disgrace just ring 07872 069462
-
CovKid

- Trader
- Posts: 8413
- Joined: 30 Apr 2006, 13:19
- 80-90 Mem No: 3529
- Location: Ralph - Coventry (Retired)
- Contact:
Re: Rear Wheel Bearing Problems
Big fella, big scaffold pole. Love that photo. Illustrates very well how tight that axle nut is.
One thing I will add here is that increasingly the bearing housings can be found to be worn and even with a new bearing, play can be substantial. On top of that, some MOT testers seem to rate a normal degree of play on rear hubs as a complete failure which can result in a bit of a tug-of-war between owner and tester in trying to get it the damned thing passed.
One thing I will add here is that increasingly the bearing housings can be found to be worn and even with a new bearing, play can be substantial. On top of that, some MOT testers seem to rate a normal degree of play on rear hubs as a complete failure which can result in a bit of a tug-of-war between owner and tester in trying to get it the damned thing passed.
Roller paint your camper at home: http://roller.epizy.com/55554/" onclick="window.open(this.href);return false; for MP4 download.
-
psychonaut
- Registered user
- Posts: 883
- Joined: 07 May 2009, 09:17
- 80-90 Mem No: 6751
- Location: Cardiff
- Contact:
Re: Rear Wheel Bearing Problems
Good point Covkid. My housing was fine, but as a precaution I priced up the cost of new bearing housings before I started the job. It was frightening 
Big fella? I'm an ex-loosehead prop and Sergeant-at-Arms for a sidepatch club, big just comes as part of the package
Big fella? I'm an ex-loosehead prop and Sergeant-at-Arms for a sidepatch club, big just comes as part of the package
"There are many paths to redemption.
Not all of them are peaceful...."
Click here for some Visionary 'Nauts.....
For more unchartered heights of disgrace just ring 07872 069462
Not all of them are peaceful...."
Click here for some Visionary 'Nauts.....
For more unchartered heights of disgrace just ring 07872 069462
-
kevtherev

- Registered user
- Posts: 18831
- Joined: 23 Oct 2005, 20:13
- 80-90 Mem No: 2264
- Location: Country estate Wolverhampton Actually
Re: Rear Wheel Bearing Problems
That's top shelf quality bearing porn right there..
fantastic mate.. worthy of a Wiki or at least a nomination
fantastic mate.. worthy of a Wiki or at least a nomination
AGG 2.0L 8V. (Golf GTi MkIII)
-
psychonaut
- Registered user
- Posts: 883
- Joined: 07 May 2009, 09:17
- 80-90 Mem No: 6751
- Location: Cardiff
- Contact:
Re: Rear Wheel Bearing Problems
Exactly what I said to Mrs P when the bearing turned up from Brickwerks and she caught me fondling it at the kitchen tablekevtherev wrote:That's top shelf quality bearing porn right there..
"There are many paths to redemption.
Not all of them are peaceful...."
Click here for some Visionary 'Nauts.....
For more unchartered heights of disgrace just ring 07872 069462
Not all of them are peaceful...."
Click here for some Visionary 'Nauts.....
For more unchartered heights of disgrace just ring 07872 069462
-
kevtherev
- Registered user
- Posts: 18831
- Joined: 23 Oct 2005, 20:13
- 80-90 Mem No: 2264
- Location: Country estate Wolverhampton Actually
Re: Rear Wheel Bearing Problems
Thank god someone else gets excited fondling new parts...
I was beginning to thing I was some kinda weirdo
seriously.. great stuff mate, and everyone should have a old motor bike, it's like basic training for DIY spanner monkeying
I was beginning to thing I was some kinda weirdo
seriously.. great stuff mate, and everyone should have a old motor bike, it's like basic training for DIY spanner monkeying
AGG 2.0L 8V. (Golf GTi MkIII)
-
psychonaut
- Registered user
- Posts: 883
- Joined: 07 May 2009, 09:17
- 80-90 Mem No: 6751
- Location: Cardiff
- Contact:
Re: Rear Wheel Bearing Problems
Nope, I'm weird with yakevtherev wrote:Thank god someone else gets excited fondling new parts...
I was beginning to thing I was some kinda weirdo
seriously.. great stuff mate, and everyone should have a old motor bike, it's like basic training for DIY spanner monkeying
I had a collection of old bikes, but with the advent of a family, etc., I've whittled it down. Time and money, you knows the score lol
"There are many paths to redemption.
Not all of them are peaceful...."
Click here for some Visionary 'Nauts.....
For more unchartered heights of disgrace just ring 07872 069462
Not all of them are peaceful...."
Click here for some Visionary 'Nauts.....
For more unchartered heights of disgrace just ring 07872 069462
-
kevtherev
- Registered user
- Posts: 18831
- Joined: 23 Oct 2005, 20:13
- 80-90 Mem No: 2264
- Location: Country estate Wolverhampton Actually
Re: Rear Wheel Bearing Problems
Yes fixing a bike is like watch making compared to the industrial tools needed to split a van open.
I started with Husvarna, CZ eastern European crap.. Beezers then Jap bikes... last one being a TS2 650 Parallel twin, which is an American market XS 650.
Skill transfer is not so difficult.. once the rust dimension shock is overcome.
I'm convinced I should have had an Aircooled van as the VW air cooled technology was very similar to our own engines in the wind thing.
Look me up next time our paths cross, seems we have a lot to ...er... discuss
AGG 2.0L 8V. (Golf GTi MkIII)