The project begins... welding worries

Thin bits of metal and bright blue light.

Moderators: User administrators, Moderators

User avatar
Donald360
Registered user
Posts: 154
Joined: 08 Mar 2008, 11:07
80-90 Mem No: 5170
Location: Fife

Re: The project begins... welding worries

Post by Donald360 »

Progress!
Image
Image
Image

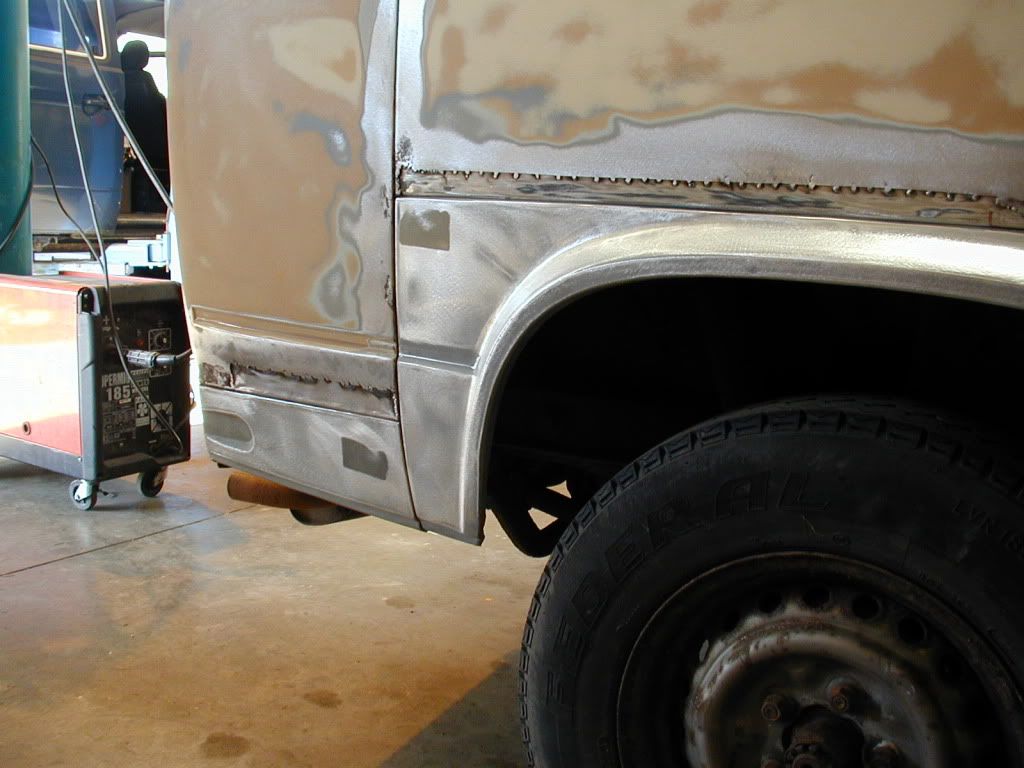
Going over today to take more photos, welding now finished and refinishing started.
Getting excited,
Donald.

gaz f
Registered user
Posts: 515
Joined: 27 Apr 2009, 13:06
80-90 Mem No: 6697

Re: The project begins... welding worries

Post by gaz f »

That's looking a lot more solid! :ok

User avatar
Nicola&Tony
Registered user
Posts: 2674
Joined: 01 Nov 2006, 18:18
80-90 Mem No: 3095
Location: Wallsend, Tyne & Wear

Re: The project begins... welding worries

Post by Nicola&Tony »

Nice one, looks great that does!!

Tony
Looking for: window apertures for side windows, at the back of the van

T25; 1985; RHD; 1.9DG petrol / LPG; white Autosleeper high-top; Looking rusty again!

LT31; 1993; RHD; 2.4L petrol; high-top; diy camper project.

User avatar
New Kentish Campers
Registered user
Posts: 1739
Joined: 12 Oct 2010, 06:16
80-90 Mem No: 8994
Location: Near Linton, Kent.
Contact:

Re: The project begins... welding worries

Post by New Kentish Campers »

Looking good, and I like the way they have made that small fillet to join upto the arche's flange, rather than attempting to weld directly to it [would never look 100%] but what are your repair people going to do with the existing rust on the seams that is still visible, are they going to lead-load it or what?

Plasticman
Trader
Posts: 8076
Joined: 12 Oct 2005, 20:55
80-90 Mem No: 1948
Location: lincolnshire

Re: The project begins... welding worries

Post by Plasticman »

Dont forget newkentish that leading is not to cure rust ( though it may cover it for a time) it is done for another reason entirely.
mike

User avatar
Donald360
Registered user
Posts: 154
Joined: 08 Mar 2008, 11:07
80-90 Mem No: 5170
Location: Fife

Re: The project begins... welding worries

Post by Donald360 »

As for the remaining seams, such as the vertical ones above the petrol filler cap. I've been told that these will be sand blasted to remove as much of the rust as possible. Then they will be treated with a rust converting treatment before being filled. I don't think they will use lead. I was warned that rust may still bubble through in time (6 months - 3 years?), but should be fairly easy to treat as soon as it appears. Not sure just what will be used to fill the seams but I am popping down to Shotts soon so I will ask for more details and pass them on.

Cheers
Donald.

Plasticman
Trader
Posts: 8076
Joined: 12 Oct 2005, 20:55
80-90 Mem No: 1948
Location: lincolnshire

Re: The project begins... welding worries

Post by Plasticman »

Sand blasting and digging out will be good, no there will be no need for leading and nothing to gain should they try, yep seam sealers are used , some are applied after painting as per transhyte, whereas on ours its prior,
very good and honest of them to state 6months to 3 yrs.it can be done right but for the price paid it would be a deceptive fool that stated otherwise, so dont go having any silly worries
mike

User avatar
dugcati
Registered user
Posts: 2004
Joined: 15 Aug 2007, 18:23
80-90 Mem No: 3825
Location: Debris
Contact:

Re: The project begins... welding worries

Post by dugcati »

getting the rot behind the filler cap area is a must - clean it from the front only and it WILL bit you
It is by will alone that I set my 'van' in motion!

User avatar
New Kentish Campers
Registered user
Posts: 1739
Joined: 12 Oct 2010, 06:16
80-90 Mem No: 8994
Location: Near Linton, Kent.
Contact:

Re: The project begins... welding worries

Post by New Kentish Campers »

metalmick8y wrote:Dont forget newkentish that leading is not to cure rust ( though it may cover it for a time) it is done for another reason entirely.
mike
If you want to cure a rust area permanently, then it has to be cut out and replaced with new metal. If you shot- blast the rust away and treat it with an xyz product, it cannot ever guarantee rust from returning, and, if the panel has been shot blasted and worked upon quite hard, the actual metal thickness will be much reduced. If you want proof of this, ask any bodyshop for a written guarantee that the rust wont return, and I strongly doubt if any shop worth its salt would dare do that.

My point was, that to lead-load the rusted area/s will stop it from reoccuring, simply because lead cannot rust. Traditionally, lead was used to repair motor bodies etc, where a dent,for example, could not be removed so needed to be repaired. Indeed, my first days in the bodyshop as a trainee panel beater had me repairing wings on MG TA type cars with those long sweeping front wings where lead was the only material that you could use for panels that flexed, like a front wing, whereas P38, which was then new to the market, would crack; no doubt it is more flexible today with the advent of more modern additives in the stuff.

With the advent of P38 type plastic fillers, lead went into retirement and is only used for 'correct' restoration techniques. This is why any body filler on the market is seen as a boon because anybody can use it whereas lead is not the easiest thing in the world to apply, and of course, is expensive. And, the base metal [steel] has to be thoroughly taken back to clean, bright steel so that the flux paste will 'tin' the surface and provide a good adhesion surface for the lead to stick onto.

So, to simply use a plastic bodyfiller, is, in my humble opinion, a waste of time and money, not to mention also that it is porous so will absorb moisture then begin to rot the formerly good metal that it is laying on and particularly if it is refinished in a 2 pack material, it cannot ever dry out again so will just fall out or 'blow' in time.

I should add that I replied more of concern toward this chap and more importantly, his wallet, because I cant see the point of spending a considerable sum of cash on a vehicle and then have to fork out yet again in the future. I should further add that I have seen many, many vehicles that have all been 'restored' with filler and where the rust has returned, much to the dismay of the owner!

boatbuilder
Registered user
Posts: 804
Joined: 09 Aug 2009, 21:53
80-90 Mem No: 8265
Location: County Monaghan, Ireland

Re: The project begins... welding worries

Post by boatbuilder »

On mine, I'm grit blasting, then treat the metal with phosphoric acid, then rinsing with water and drying well immaediately, then epoxy primer, then body filler on top of the epoxy, then another coat of epoxy, then topcoat.
1984 1.9D (AEF Code) T25 tintop

Plasticman
Trader
Posts: 8076
Joined: 12 Oct 2005, 20:55
80-90 Mem No: 1948
Location: lincolnshire

Re: The project begins... welding worries

Post by Plasticman »

Gosh new kentics camper, you know your stuff, I never knew all those facts about lead and body filler, can You put lead on, is it easy and can you put p38 onto the top of lead and is this worth doing, is it wrong to get back to clean metal to 'lead' or is this p38 better
mike

User avatar
New Kentish Campers
Registered user
Posts: 1739
Joined: 12 Oct 2010, 06:16
80-90 Mem No: 8994
Location: Near Linton, Kent.
Contact:

Re: The project begins... welding worries

Post by New Kentish Campers »

metalmick8y wrote:Gosh new kentics camper, you know your stuff, I never knew all those facts about lead and body filler, can You put lead on, is it easy and can you put p38 onto the top of lead and is this worth doing, is it wrong to get back to clean metal to 'lead' or is this p38 better
mike

I used the term P38 because that brand at the time was main one in use, along with Holts Cataloy.

You can put whatever you like onto lead because its a base metal, once of course its been suitably degreased.

Its realitively easy to apply, using oxy-acetylene with say a no3 jet fitted and not too much oxygen so you have a large white flame [not too hot as lead, or plumbers metal as it's also called, has a low melting point]. The trick is to have the surface throughly tinned or the lead cannot stick to it. Apply just like bodyfiller with some hand made hardwood formers and tallow or a similar lube so the lead wont stick to the formers and put enough on to allow for final finishing with a body file and various grit papers. Obviously, lead is toxic so use the correct PPE to protect yourself.

Personally, I've never been a fan of any bodyfiller, preferring to hammer and file a dent rather than fill it; that removes the possibility of filler shrinkage and of course speeds booth time because, once suitably prepared, the job can be 'wet on wetted' and topcoated in one session which save a lot of time and fuel.

Plasticman
Trader
Posts: 8076
Joined: 12 Oct 2005, 20:55
80-90 Mem No: 1948
Location: lincolnshire

Re: The project begins... welding worries

Post by Plasticman »

Ok, But whats the degreasing about like where does the grease come from and also what is 'booth time'?, wet on wet? surely paint has to be dry before the next coat goes on if not wont it all sort of like run off
mike

User avatar
New Kentish Campers
Registered user
Posts: 1739
Joined: 12 Oct 2010, 06:16
80-90 Mem No: 8994
Location: Near Linton, Kent.
Contact:

Re: The project begins... welding worries

Post by New Kentish Campers »

metalmick8y wrote:Ok, But whats the degreasing about like where does the grease come from and also what is 'booth time'?, wet on wet? surely paint has to be dry before the next coat goes on if not wont it all sort of like run off
mike


The grease can come from the tallow, or even your hands.

Booth time, I meant was time inside the spray-booth. Wet on wet primers are used on bare metal panels. If a panel has any sort of plastic filler on it, then that would have to be spot primed first & then prepared for the next coat of paint, be it wet on wet or whatever.

So, it would go like this: Body repairs done and spot primed, flatted, etc. The the job would be de-greased [in fact, this should be done before using a DA, otherwise you are sanding any surface contaminant straight back into the paint film] Then mask the job, degrease any hand or finger marks, tac-rag the job,wet on wet applied, leave to flash-off, and then apply the top coat colour. Because everything was prepared, the wet on wet primer simply adheres to the base and the top coat applies to the still slightly wet film of the surfacer. And as it usually an acid wash type primer, everything is sealed.

If you are seam filling, then I would always use an etch primer on any seam, let it cure, then apply the seam filler,then re-prime; I dont personally like the thought of anything joing into an unpainted seam because it can harbour moisture and begin to rust again.

Plasticman
Trader
Posts: 8076
Joined: 12 Oct 2005, 20:55
80-90 Mem No: 1948
Location: lincolnshire

Re: The project begins... welding worries

Post by Plasticman »

Ah and the colour paint doesnt sort of stop the primer paint setting or anything. I have heard that paint is now made thinner with water as in tap water is this for real and is this the paint that you are talking about,
sorry for the dum questions
mike

Locked