Paint Your Wagon - with a roller!
Moderators: User administrators, Moderators
-
CovKid

- Trader
- Posts: 8413
- Joined: 30 Apr 2006, 13:19
- 80-90 Mem No: 3529
- Location: Ralph - Coventry (Retired)
- Contact:
Re: Paint Your Wagon - with a roller!
Well summed up Tom. I think if I really had to touch up small areas, I'd just go to an accessory shop and chance my luck on a few rattle cans that look close.
Roller paint your camper at home: http://roller.epizy.com/55554/" onclick="window.open(this.href);return false; for MP4 download.
-
Gal
Re: Paint Your Wagon - with a roller!
simony wrote:cov kid have you seen any results from anyone spraying rustoleoum ?
I part sprayed my old polo with it. Came out ok ( in the end )
Some people roller it and just give the final coat a thin spray
-
Gal
Re: Paint Your Wagon - with a roller!
That I don't know. Try going to halfrauds and matching a base colour to their spray paints5rise wrote:Yep metallic
Would be hard to roller. You could roller a similar blue and then find a metallic to spray the final coat then clear coat but thats a different ball game altogether
Thanks for the reply - any idea what particular blue would approximate?
That or find the colour code and go to a paint manufacturer
Try this also
http://www.glasurit.com/COLOR/new-color ... language=1" onclick="window.open(this.href);return false;
http://www.e-paint.co.uk/RAL_Colourchart.asp" onclick="window.open(this.href);return false;
-
5rise
- Registered user
- Posts: 6
- Joined: 03 Mar 2008, 19:58
- 80-90 Mem No: 4962
- Location: West Yorkshire
Re: Paint Your Wagon - with a roller!
Cheers for that, that glasurit link is brilliant!
-
onc onc
- Registered user
- Posts: 115
- Joined: 18 Aug 2008, 17:21
- 80-90 Mem No: 9709
- Location: Bishop,s Stortford
Re: Paint Your Wagon - with a roller!
Well folks the paint has turned up and i have put a coat on the old mini bonnet which i am using as ma practice project before i start slopping it all over me van, now the only problem i seem to have is quite a few little bubbles, now i,m not sure if this is down to me pressing to hard with the roller to start with, but after a little practice i got used to just rollering with just the weight of the roller and this seemed to remove any roller marks but i still seem to be left with bubbles, any ideas? thanks
Onkers
Onkers
1.9 DG WasserBoxer 1987 Tintop.
-
Llamapup

- Registered user
- Posts: 142
- Joined: 20 Aug 2008, 12:39
- 80-90 Mem No: 8366
- Location: Leeds, West Yorkshire
Re: Re:
chuckle-bus-tom wrote:Llamapup wrote:
This is my first go at roller painting and I want to get the colour to match VW Pastel White as best as I can as I am only doing the bits where I have fixed the rust for now. Later on when I get a bit more confident with the approach I may get more adventerous with the colour
Llamapup, for the effort of mixing up a pastel White mix and blending it in with you existing paint it would actually be less work to just paint the whole van! The rustoleum White is pretty bright, but looks great IMO.
I've always said with this to just get stuck in! I made a couple of mistakes on my first coats, but it all flats out. To get good coverage you'll probably need 2-3 coats, and I'd recommend a good 14 days of hardening off between coats, so your vans gonna look a bit dodge for a month anyhow.
Good luck!
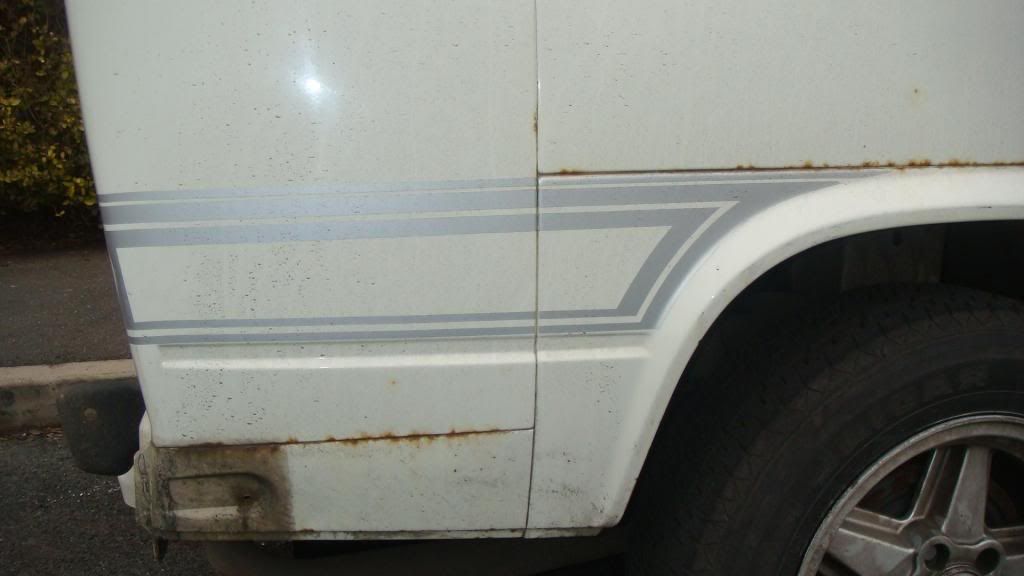
Thats good advice Tom. I probably will have to paint the whole van, but seeing as though I bought the white and yellow paint and only have a few areas of rust that need adressing I have decided to have a go at matching the colour today. Basically I wanted to sort some rusty seams out on the rear quarter panel before it gets any worse. I'm going camping with some friends in April and I didn't want to have ugly patches of primer.
I have applied my first coat of home made Pastel White using the rollers as advised. Basically I mixed 5 ml of yellow to 400 ml of white that was already thinned with the white spirits. To help get an accurate measure I used my kids left over baby bottles and syringe style medicine giver. Both of these have handy measuring lines on the side so I can be really precise about the amount of paint I'm mixing. The bottles even seal shut so I can save the paint for the next coat. After the 1st coat I think its clear that I will need to add a bit less white to the next coat. Its ever so slightly too yellow. So for the next batch I'll be adding 4 ml of yellow to 400 ml of white.
After this first experience with mixing paint, I do agree with Tom that it's probably just as easy to paint the whole van or even the whole side of the van wih a close match to the original colour. The benefit of matching a small section for me is that I have not had to remove anything but the bumper and a Westy sticker. The two rear quarter panels are the only areas with any rust on the seams. So I'm keen to see if I can limit my painting adventures to these areas for now.
Before
After 1st Coat
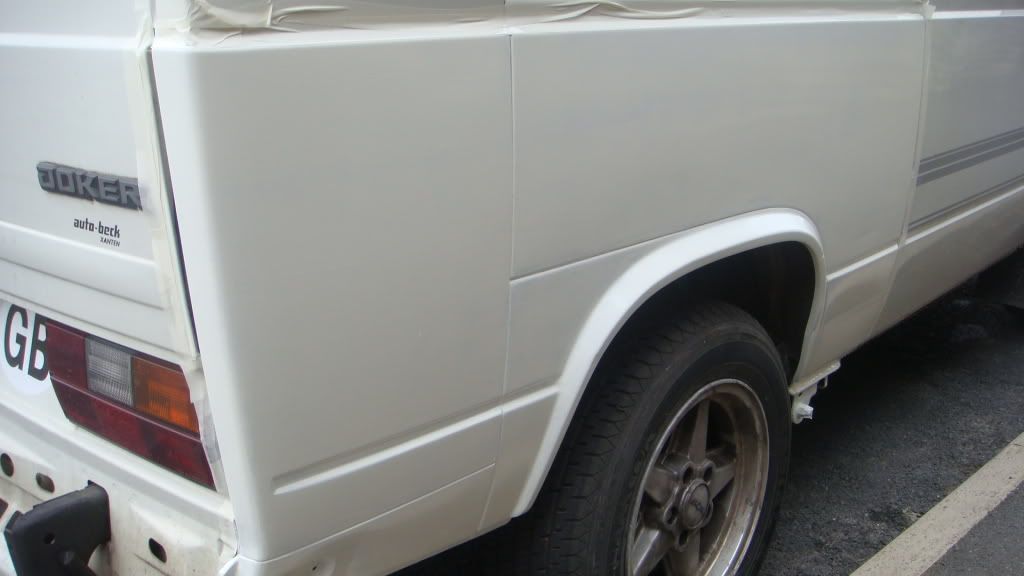

The match to the surrounding area is better than it looks in this picture as the van is a little dirty and the new paint has yet to be flatted so has a diferent sheen. The top half of the van is unpainted and gives an indication of the match. The bottom half has the first coat. I don't think its too bad really. For my first go ever doing any car painting ever, I'm quite pleased with myself.
I actually have a spare set of Westy side stripes that I got on Ebay for £10. two are slightly damaged. But not the ones I need. So once I get a few more coats of paint on I may put the stickers on to help finnish the job. Given that I seem to have had a degree of success in my first small attempt at roller painting, I intend to paint the whole van using this clever roller proces next year when I should have a better place to work. I'm pleased that this process has given me the confidence to make a start at fixing the rusty seams before they get any worse.
I managed to get the paint on the van at 2.PM its now 5.30 PM and the paint is obviously a bit tacky. Its predicted to rain this evening. The van is parked outside. Is it worth trying to keep the paint dry with a tarp or will I just be doing more harm by getting it stuck to the paint? In other words how long after you have painted would you chance letting the paint get rain on it.
Thanks
Chris
Last edited by Llamapup on 19 Mar 2010, 18:41, edited 6 times in total.
1988 LHD Volkswagen Westfalia Camper
-
terryvanman
- Registered user
- Posts: 1541
- Joined: 11 Oct 2005, 19:13
- 80-90 Mem No: 737
- Location: MALTA
Re: Paint Your Wagon - with a roller!
http://www.youtube.com/watch?v=E3UCEbGZ ... re=related" onclick="window.open(this.href);return false; 
suck squeeze bang blow, the cycle of a 4 stroke
-
eatcustard

- Registered user
- Posts: 1817
- Joined: 27 Oct 2008, 07:26
- 80-90 Mem No: 6062
- Contact:
Re: Paint Your Wagon - with a roller!
Llamapup
About 2 hours, subject to air temp
but dont worry, you will need to give it another coat anyway
About 2 hours, subject to air temp
but dont worry, you will need to give it another coat anyway
https://www.penguinjones.co.uk" onclick="window.open(this.href);return false; PM me for your 10% discount
-
CovKid
- Trader
- Posts: 8413
- Joined: 30 Apr 2006, 13:19
- 80-90 Mem No: 3529
- Location: Ralph - Coventry (Retired)
- Contact:
Re: Paint Your Wagon - with a roller!
Once its gone past the 'flash' point, rain won't affect it. Just let it dry now. Easier than you thought? Figured you might want to do whole vehicle once you got into it. 
And Terry, that video explains rather well how to lose any lines. Work fast and theres no prob. The dry brush is a great idea. I've added it to WIKI - thanks.
And Terry, that video explains rather well how to lose any lines. Work fast and theres no prob. The dry brush is a great idea. I've added it to WIKI - thanks.
Roller paint your camper at home: http://roller.epizy.com/55554/" onclick="window.open(this.href);return false; for MP4 download.
-
Llamapup
- Registered user
- Posts: 142
- Joined: 20 Aug 2008, 12:39
- 80-90 Mem No: 8366
- Location: Leeds, West Yorkshire
Re: Paint Your Wagon - with a roller!
CovKid wrote:Once its gone past the 'flash' point, rain won't affect it. Just let it dry now. Easier than you thought? Figured you might want to do whole vehicle once you got into it.
And Terry, that video explains rather well how to lose any lines. Work fast and theres no prob.
Okay, I've convinced myself that was so easy that I might as well paint the whole van. Frankly trying to match the paint is possible, but for all the trouble of removing a few bits more trim I can get the whole van sorted. You were right all along......
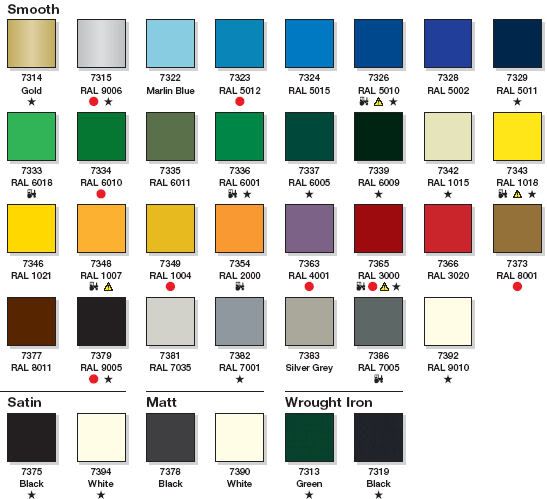
I'm sitting here now on my sofa trying to compare paint codes. I intend to paint only below the centre line as I really like the two tone look. The Mrs wants a nice smurf blue (RAL 5015) . I'm thinking more orange (RAL 2000).
I hope we get some good weather over the next few weekends.
I'm going to be busy!
Llamapup
1988 LHD Volkswagen Westfalia Camper
-
CovKid
- Trader
- Posts: 8413
- Joined: 30 Apr 2006, 13:19
- 80-90 Mem No: 3529
- Location: Ralph - Coventry (Retired)
- Contact:
Re: Paint Your Wagon - with a roller!
Added one of your pics to WIKI too Llamapup!
Roller paint your camper at home: http://roller.epizy.com/55554/" onclick="window.open(this.href);return false; for MP4 download.
-
ajp

- Registered user
- Posts: 95
- Joined: 28 Oct 2008, 21:54
- 80-90 Mem No: 6144
- Location: Near the Beach, Dorset
Re: Paint Your Wagon - with a roller!
Well here goes nothing... Medium Blue to RAL3000 (Fire extinguisher red!). Starting on the internal bulkhead to see how the coverage goes.
-
CovKid
- Trader
- Posts: 8413
- Joined: 30 Apr 2006, 13:19
- 80-90 Mem No: 3529
- Location: Ralph - Coventry (Retired)
- Contact:
Re: Paint Your Wagon - with a roller!
Rustoleum is dense but you might need an intermediate grey to go from blue to red. Keep us posted.
Roller paint your camper at home: http://roller.epizy.com/55554/" onclick="window.open(this.href);return false; for MP4 download.
-
ajp
- Registered user
- Posts: 95
- Joined: 28 Oct 2008, 21:54
- 80-90 Mem No: 6144
- Location: Near the Beach, Dorset
Re: Paint Your Wagon - with a roller!
Seems to cover pretty well, one coat and it just looks like red oxide primer. I reckon two coats should be the death of blue... Find out next week. As a place to start if the bulkhead is the place to go! Nowhere else is going to have that many awkward nooks and crannys but a 2" roller did the job. Couple of little run issues but nothing to worry about. All in all very happy with first attempt.
E D I T: 17 hours after painting its still a little tacky? Is this due to to much thinning (I used a pretty exact 10%) or temp? Or could it be humidity (Not sure if this can be a factor but it could be inside the van)?
E D I T: 17 hours after painting its still a little tacky? Is this due to to much thinning (I used a pretty exact 10%) or temp? Or could it be humidity (Not sure if this can be a factor but it could be inside the van)?
-
Llamapup
- Registered user
- Posts: 142
- Joined: 20 Aug 2008, 12:39
- 80-90 Mem No: 8366
- Location: Leeds, West Yorkshire
Re: Paint Your Wagon - with a roller!
Okay, I've made the decision to paint the whole bottom half orange rather than try and match any more of the Pastel White and faff about with stickers. I'm about to order my RAL 2000 Orange paint. The Mrs has just taken the kids out. I have 3 hours to do some prep work today.
Although my paint mixing has produced a decent colour match to the original Pastel White, it will just leave some parts of the van with Westy stickers and some without. I'm going to spend the rest of the day stripping all the Westfailia stickers off all around the van. Does anyone have any top tips for removing the decals. I used my wife's hair dryer and a plastic scraper to get them off the rear quarter panel, but that took ages! It would be great to be able to get the job done a bit more efficiently. Any tips for sticker removal guys? I don't have access to a heat gun but I do have a wire brush attachment for my drill and a random orbital sander. Would either of these be any use or will I just making things harder for myself by potentially leaving a scouring mark in the paint that will need loads of prep to get out.
As I only intend on doing the bottom half of the van in orage (top in original pastel) for the two-tone look. I need to decide which bit of the crease to take the orange up to and what to do with the front of the van. I see that most two-tone T25s have the entire front end of the van painted in the darker tone, but how far up the sides should I paint my orange. Is there one part of the crease that is easier to mask than other parts? Any suggestions or pics for the two-tone look would be great?
Also do I need to remove the badges, boot locks, door handles etc, or should I just mask around them? I will need to be able to drive the van on a regular basiis, so I'm reluctant to remove trim if its unnessecary. And is it leagal to drive the van without bumpers? It would be easier to take them off at the beginning of the pain job and put them back on once its all done rather than having to take them on and off repeatedly.
Thanks
Llamapup
1988 LHD Volkswagen Westfalia Camper