carpeting around seat bases
Moderators: User administrators, Moderators
-
kathyshack
- Registered user
- Posts: 1804
- Joined: 12 Oct 2005, 09:39
- 80-90 Mem No: 1242
- Location: north west
- Contact:
carpeting around seat bases
i need to carpet around the seat bases in the van following the bulkhead removal. just been and got some cheap carpet from a local carpet warehouse place to do it with. sounds simple but i tend to overcomplicte things in my mind sometimes. who has done this? do you cut each bit out seperatley or try and make one big piece fold around the corners etc. Gonna make some battery lid covers too. i'm thinking a little bit of ply covered in this carpet should do the trick. does it matter if the wood is touching the battery? is this a fire risk? Also the roll or carpet is bigger than i need, so wondered whether i should try and carpet the cab floor area whilst i'm at it... anyone else done this? any pics?
-
Nickblue
- Registered user
- Posts: 21
- Joined: 20 Jun 2007, 18:24
- 80-90 Mem No: 3269
- Location: Blackpool Lancs
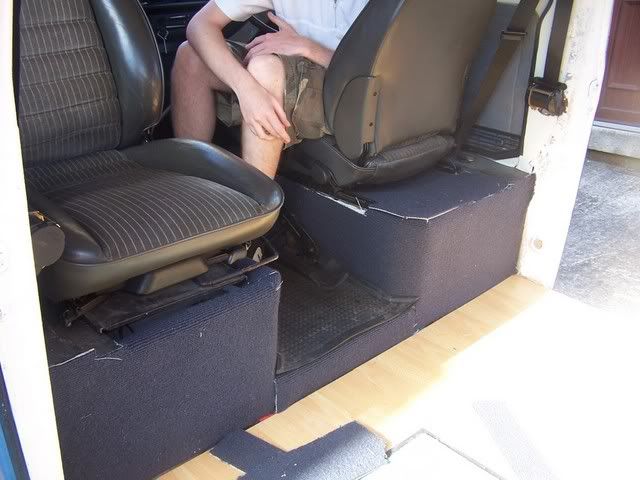
Re-carpeted the camper last Sunday. A £5 off-cut and some contact adhesive and a lot of patience.
I did the cab area in two pieces. The footwells and gearlever area as one piece, and the walk through as a seperate piece. I allowed an extra inch round all the edges, glued the edges and then folded them under to give a cleaner edge.
For the seat bases I made some templates from cardboard and then cut the carpet to shape. I didn't make any joints, I just made them in one piece.
I had enough left over to cover the main floor area and the front of the main seat.
[img][IMG:640:480]http://i128.photobucket.com/albums/p187 ... et2005.jpg[/img][/img]
[img][IMG:640:480]http://i128.photobucket.com/albums/p187 ... et2001.jpg[/img][/img]
[/img][IMG:640:480]http://i128.photobucket.com/albums/p187 ... et2002.jpg[/img]
[img][IMG:640:480]http://i128.photobucket.com/albums/p187 ... et2003.jpg[/img][/img]
[img][IMG:640:480]http://i128.photobucket.com/albums/p187 ... et2006.jpg[/img][/img]
Peter
-
kathyshack
- Registered user
- Posts: 1804
- Joined: 12 Oct 2005, 09:39
- 80-90 Mem No: 1242
- Location: north west
- Contact:
-
Nicola&Tony

- Registered user
- Posts: 2674
- Joined: 01 Nov 2006, 18:18
- 80-90 Mem No: 3095
- Location: Wallsend, Tyne & Wear
Hats off to you Nickblue, that looks bliddy great!!! I really like your footrest / leisure battery box as well! 

Cheers
Tony
Cheers
Tony
Looking for: window apertures for side windows, at the back of the van
T25; 1985; RHD; 1.9DG petrol / LPG; white Autosleeper high-top; Looking rusty again!
LT31; 1993; RHD; 2.4L petrol; high-top; diy camper project.
T25; 1985; RHD; 1.9DG petrol / LPG; white Autosleeper high-top; Looking rusty again!
LT31; 1993; RHD; 2.4L petrol; high-top; diy camper project.
-
Nickblue
- Registered user
- Posts: 21
- Joined: 20 Jun 2007, 18:24
- 80-90 Mem No: 3269
- Location: Blackpool Lancs
I glued the pieces around the seat bases, plus the little vertical ledge at the back of the walkthrough where it meets the main camper floor area, and the two small slopes where the cab floor dips down into the two footwells just to make it hold its shape. I also glued the piece that is fitted to the area under the main camper seat.
For the past few days when the weather depressed me I just went into the van for a while and took a few deep breaths. That glue is quite potent!
For the past few days when the weather depressed me I just went into the van for a while and took a few deep breaths. That glue is quite potent!
Peter
-
kathyshack
- Registered user
- Posts: 1804
- Joined: 12 Oct 2005, 09:39
- 80-90 Mem No: 1242
- Location: north west
- Contact:
ha ha...want to get high?... he he
how long did it take you to do all that? I've arranged a babysitter for sat afternoon, but not sure how much of it i will get done...
did you actually stick carpet to the walls of the footwell? not quite sure where to stop...have you carpeted the seatbelt posts? Has anyone on here?
how long did it take you to do all that? I've arranged a babysitter for sat afternoon, but not sure how much of it i will get done...
did you actually stick carpet to the walls of the footwell? not quite sure where to stop...have you carpeted the seatbelt posts? Has anyone on here?
-
Ian Hulley

- Registered user
- Posts: 12660
- Joined: 11 Oct 2005, 08:08
- 80-90 Mem No: 1323
- Location: Wirksworth, Derbyshire ... or at t'mill
That's a beautiful job you've done there Nick ..... not the camper of a family with two young children though me thinks ? We had lovely silver/grey carpet in ours to start with .... then we went to Billing and now we have lino
Ian.
Ian.
The Hulley's Bus
1989 2.1DJ Trampspotter
LPG courtesy of Steve @ Gasure
1989 2.1DJ Trampspotter
LPG courtesy of Steve @ Gasure
-
Nickblue
- Registered user
- Posts: 21
- Joined: 20 Jun 2007, 18:24
- 80-90 Mem No: 3269
- Location: Blackpool Lancs
I cut all the carpet to shape and laid it in position dry, and pushed it into all the contours of the cab floor. Where it wouldn't stay in position I daubed a bit of adhesive. How much adhesive you will need to use will depend on the thickness and the backing of the carpet. A bit of trial an error I suppose.
I unbolted the part of the seatbelts that are in the walkthrough area and glued the carpet in one piece along and round the corner. Then with a sharp craft knife I cut a hole in the carpet and bolted the seat belt back in position.
I didn't carpet the area on the wheelarch nearest the cab doors so it didn't involve the mounting area of the seat belt anchor point.
It took me a few hours and a couple of beers to complete.
Ian,
I know what you mean. We've been through that stage. Just two young old age pensioners in occupation now. Although we do have a piece of cushionfloor vinyl to put down on wet days. I've cut this to size so that it sits under the engine bay cushion when not required.
Peter
-
kathyshack
- Registered user
- Posts: 1804
- Joined: 12 Oct 2005, 09:39
- 80-90 Mem No: 1242
- Location: north west
- Contact:
did yours have the rubber mats down before you started? mine has. (see pic below) would you put carpet overtop or instead of?
[img:640:480]http://i48.photobucket.com/albums/f206/ ... 0_0366.jpg[/img]
also i've got wires running between the two seat bases... think these might have to be left showing a bit as they're quite thick coming out of the side of the passenger base
[img:640:480]http://i48.photobucket.com/albums/f206/ ... 0_0366.jpg[/img]
also i've got wires running between the two seat bases... think these might have to be left showing a bit as they're quite thick coming out of the side of the passenger base
-
Nickblue
- Registered user
- Posts: 21
- Joined: 20 Jun 2007, 18:24
- 80-90 Mem No: 3269
- Location: Blackpool Lancs
Yes, mine has rubber mats, which I have left in situ under the new carpet. Mine also had carpeting which I used as a template, but maybe you could use the rubber mat as a template?
The rubber matting under the carpet should help as a sound deadening agent.
Would it be possible for you to re-route the wiring by drilling a hole lower down and further back by that canted corner and then dropping the wiring down and across the floor where the little step down from the walkthrough meets the main camper floor? Then the carpet joint would be able to cover it and there would be no danger of tripping or damaging it........Just a thought.
Peter
kathy just use glue to stick the carpet glue (DIY shops) to the metal seat boxes.
Kathy can you not also knock up a little wooden box to protect your battery? You can also push the wires down so they run in the gap between the seat bases, walk through step and your laminate flooring. Then cover them with a laminate floring border strip?.
The battery wires coming out of my seat bases have been fixed in position on the seat base sides and then carpeted over by leisuredrive in my van
Surely though you don't want to carpet the cab area? After all rubber mats are still best up front as carpets won't stay clean for long. Well not with me and my muddy walking boots/work boots/general everyday shoes/rain/mud/food/wear and tear. Seems a bit self defeating covering up the mats with smell and muck retaining carpet?
Kathy can you not also knock up a little wooden box to protect your battery? You can also push the wires down so they run in the gap between the seat bases, walk through step and your laminate flooring. Then cover them with a laminate floring border strip?.
The battery wires coming out of my seat bases have been fixed in position on the seat base sides and then carpeted over by leisuredrive in my van
Surely though you don't want to carpet the cab area? After all rubber mats are still best up front as carpets won't stay clean for long. Well not with me and my muddy walking boots/work boots/general everyday shoes/rain/mud/food/wear and tear.
-
kathyshack
- Registered user
- Posts: 1804
- Joined: 12 Oct 2005, 09:39
- 80-90 Mem No: 1242
- Location: north west
- Contact:
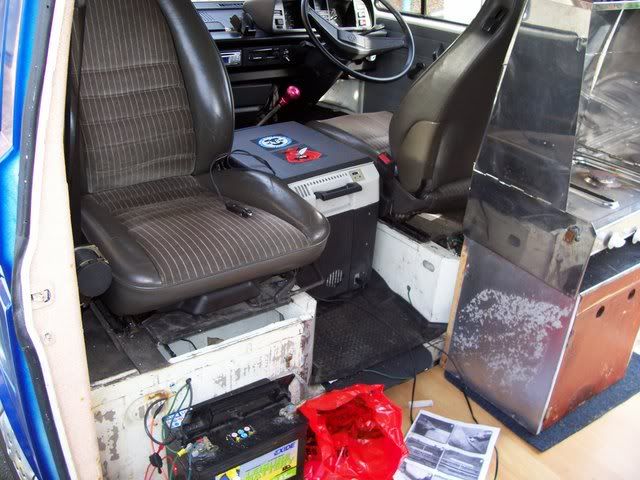
hiya, thanks for all your advice on this.
Today was mostly spent..... going from this:-
[img:640:480]http://i48.photobucket.com/albums/f206/ ... ork040.jpg[/img]
to this
[img:640:480]http://i48.photobucket.com/albums/f206/ ... ork042.jpg[/img]
not as good a job as Nickblues but I'm quite happy with it for now. needs a bit of finishing off. the white bits are from the carpet used to cover the top of the box. Not quite sure how to finish this off. might just try colouring it with a marker so its less obvious. The carpet i used was pretty think really, so folding it back on itself wasn't really an option.
It isn't a fire hazard is it, having carpet over the battery terminals?
-
Ian Hulley
- Registered user
- Posts: 12660
- Joined: 11 Oct 2005, 08:08
- 80-90 Mem No: 1323
- Location: Wirksworth, Derbyshire ... or at t'mill
-
kathyshack
- Registered user
- Posts: 1804
- Joined: 12 Oct 2005, 09:39
- 80-90 Mem No: 1242
- Location: north west
- Contact: