Westy Battery Charging
Moderators: User administrators, Moderators
-
Dubstar
- Registered user
- Posts: 466
- Joined: 25 Jul 2006, 11:53
- 80-90 Mem No: 3009
- Location: Marlborough, Wiltshire
Westy Battery Charging
Does anyone know if when you plug in the electric hook up, it charges the van battery as well as the leisure battery?So that I can charge the battery without taking it off and losing all the radio presets and getting dirty hands! 
-
irish.david
- Registered user
- Posts: 54
- Joined: 31 Jul 2006, 04:14
- 80-90 Mem No: 3347
- Location: Belfast
-
simoncummins
- Registered user
- Posts: 59
- Joined: 14 Jan 2006, 22:25
- 80-90 Mem No: 1468
- Location: kidderminster
-
irish.david
- Registered user
- Posts: 54
- Joined: 31 Jul 2006, 04:14
- 80-90 Mem No: 3347
- Location: Belfast
-
Westy.Club.Joker

- Registered user
- Posts: 484
- Joined: 18 Sep 2006, 19:37
- 80-90 Mem No: 2863
- Location: Sunny Lancs. 1988 1.6TD Westfalia Club Joker pop-top
The Westy manual says it charges both batteries when you hook-up. Not had the meter on it to check this when hooked-up, so just going off what the OE manual says. 
Irish Dave is usually spot-on with electrical, and I know he`s rewired his Westy charging system, so the above info may be duff
Irish Dave is usually spot-on with electrical, and I know he`s rewired his Westy charging system, so the above info may be duff
Keep it real.
Search first - ask second ;>}
Search first - ask second ;>}
-
irish.david
- Registered user
- Posts: 54
- Joined: 31 Jul 2006, 04:14
- 80-90 Mem No: 3347
- Location: Belfast
Putting pressure on me now  . The split charge relay should prevent the mains hookup charger from charging the main battery..... unless the mains hookup charger also suplies the split charge relay with 12v. I've checked the wiring diagrams in the Bentley manual and it seems to suggest that the mains hookup only charges the leisure battery but it's sometimes not completely accurate. I kinda want to know myself now so tomorrow i'll check my wiring with a meter and let you know...
Dave
Dave
-
Westy.Club.Joker
- Registered user
- Posts: 484
- Joined: 18 Sep 2006, 19:37
- 80-90 Mem No: 2863
- Location: Sunny Lancs. 1988 1.6TD Westfalia Club Joker pop-top
Had the `van hooked up today, the Black Buzzin Box under the seat was hummin`. Got the meter out and checked all the batts. The MAIN battery does indeed get charged when hooked up, as well as the leisure batts. UNLESS I have a faulty split-charge relay as you point out. The OE Westy manual does say that it should charge ALL batts though
Not sure how good a charger the OE Westfalia BBB one is, I`m hoping it`s a decent type one that shuts down to trickle when all batts are fully charged. I`ve left it hooked up overnight to see! Been monitering the batterys, and the leisure one seems to have stabilsed at around 14V (no load of coure) If the `van hasn`t burnt to the ground in the morning I`ll check all batts again to see.
Not sure how good a charger the OE Westfalia BBB one is, I`m hoping it`s a decent type one that shuts down to trickle when all batts are fully charged. I`ve left it hooked up overnight to see! Been monitering the batterys, and the leisure one seems to have stabilsed at around 14V (no load of coure) If the `van hasn`t burnt to the ground in the morning I`ll check all batts again to see.
Keep it real.
Search first - ask second ;>}
Search first - ask second ;>}
-
irish.david
- Registered user
- Posts: 54
- Joined: 31 Jul 2006, 04:14
- 80-90 Mem No: 3347
- Location: Belfast
-
Westy.Club.Joker
- Registered user
- Posts: 484
- Joined: 18 Sep 2006, 19:37
- 80-90 Mem No: 2863
- Location: Sunny Lancs. 1988 1.6TD Westfalia Club Joker pop-top
Any idea on what type of charger the BBB actually is Dave? I assume because of its age it is a pretty standard 3 stage type and isn`t particularly sophisticated? Just bought a C-Tek 3600 charger (which seem to come well recommended) and are supposed to boost the batteries up to their FULL potential, which can be quite a lot more than a normal charger will put in `em. Something that the Eber etc should appreciate due to the low voltage cut-out, it does`nt take a big drop before the heating cuts out.
Any idea of anything sensibly priced out there that boosts the alternator charging Dave? Seems that the standard alty regulator cut-out point isn`t letting the batts get to their fully charged potential? Seen some expensive regs, aimed at boats I think, but loadsa money.
Any idea of anything sensibly priced out there that boosts the alternator charging Dave? Seems that the standard alty regulator cut-out point isn`t letting the batts get to their fully charged potential? Seen some expensive regs, aimed at boats I think, but loadsa money.
Keep it real.
Search first - ask second ;>}
Search first - ask second ;>}
-
irish.david
- Registered user
- Posts: 54
- Joined: 31 Jul 2006, 04:14
- 80-90 Mem No: 3347
- Location: Belfast
In case anyone still cares i've just finished ripping the BBB and wiring apart and i know a bit more about it now. I'm afraid that it appears to just be a 14VDC regulated output from a 240VAC. It doesn't seem to have any sort of staged charging at all. I guess that when it was designed 30 or so years ago staged charging was a bit too space age.
Also i was wrong in the assumption I made above about the wiring to each battery. On the 3 pronged DC plug there is an brown chassis earth (black on BBB cable), a red/yellow direct feed to the leisure battery (red on BBB cable) and a red/black direct feed to the main battery (blue on BBB cable).
Dave
-
Westy.Club.Joker
- Registered user
- Posts: 484
- Joined: 18 Sep 2006, 19:37
- 80-90 Mem No: 2863
- Location: Sunny Lancs. 1988 1.6TD Westfalia Club Joker pop-top
Hi
Has anyone fitted one of these to their van?
http://www.maplin.co.uk/Module.aspx?Mod ... 7&doy=30m3
Jason
Has anyone fitted one of these to their van?
http://www.maplin.co.uk/Module.aspx?Mod ... 7&doy=30m3
Jason
-
irish.david
- Registered user
- Posts: 54
- Joined: 31 Jul 2006, 04:14
- 80-90 Mem No: 3347
- Location: Belfast
Success!
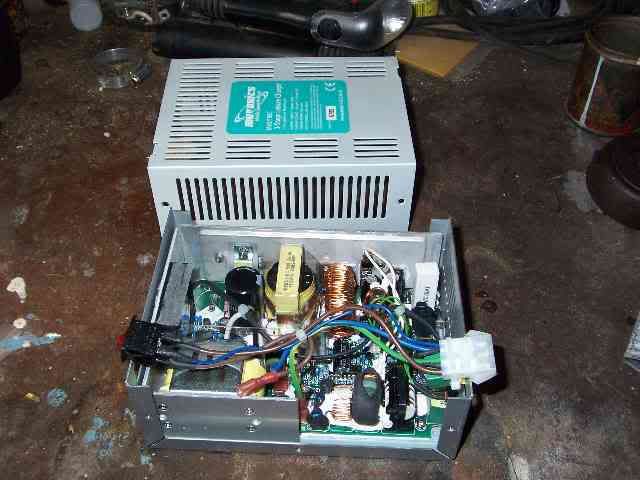
To summarise, i was installing a Muvonics 3 stage charger in place of the faulty BBB in my Westy. The problem was that there were direct feeds to both the main battery and the leisure battery in the OEM wiring and the muvonics charger only had one output. I wanted to charge both batteries from the charger but couldn't just wire them both to the output terminal because then both batteries would be hardwired together meaning that the split charge system was bypassed. The solution was to use a 30A 240V relay from Maplins to only connect the batteries together if there was 240V present at the charger AND the charger was switched on.
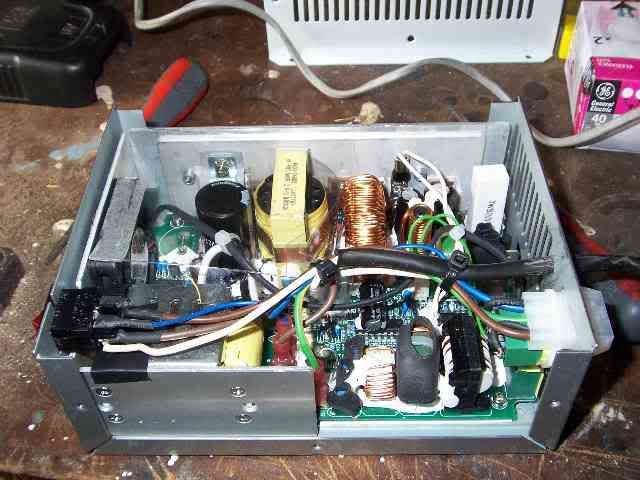
First thing i had too do was remove the cover and check the wiring.
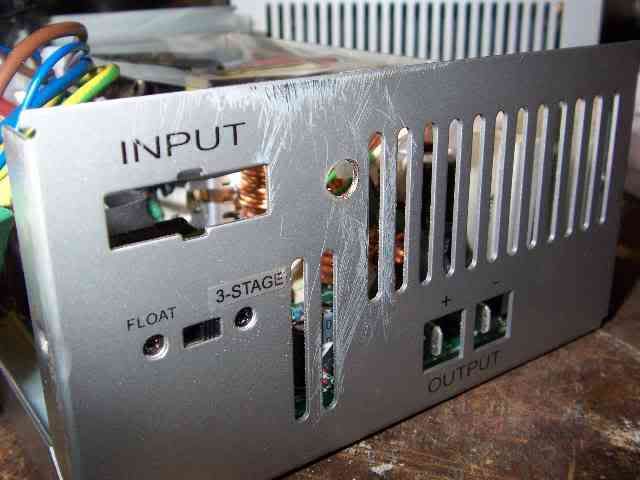
The connections for the coil of the 240v relay would have to be taken from inside the charger so I drilled a hole above the 12v output to enable the cable for the relay coil could exit.
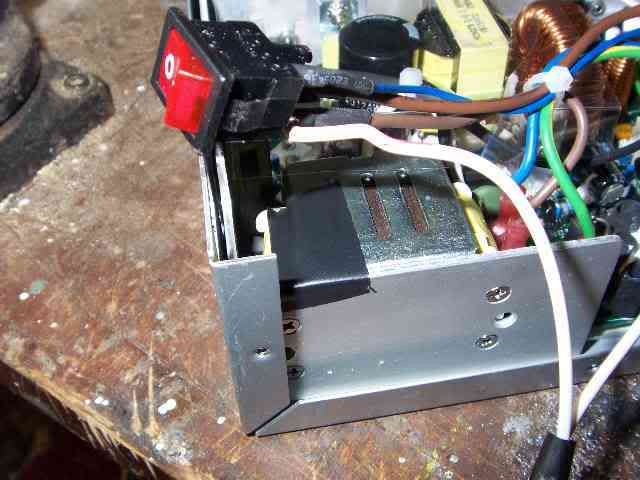
Next i removed the wiring loom from the charger and soldered wires onto the neutral (blue) side of the 240 input and another wire onto the live output of the switch (brown). The cable i used was the 240V input cable to the BBB. It was the right length and already had a black outer sleeve for protection.
Probably a good idea to add some insulating tape to the top of the transformer as shown in the next picture. I had to remove some of the heatshrink on the wire on the switch so the tape is a sensible precaution.
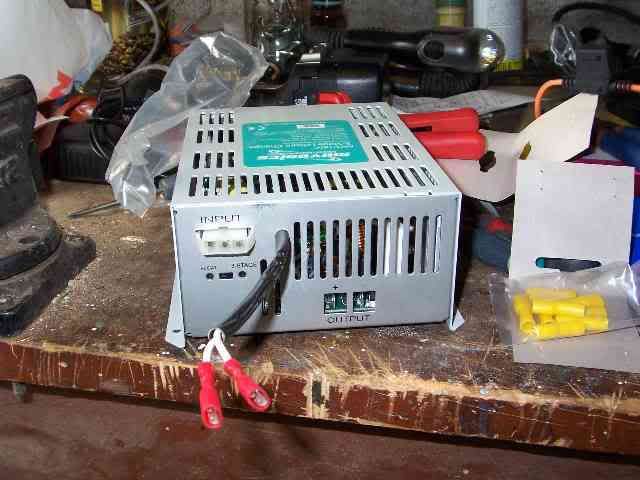
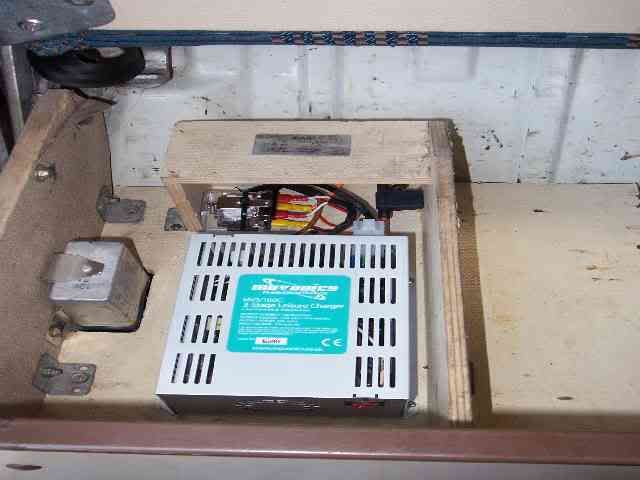
The next 2 pictures show the finished assembly of the charger. The top can go back on after this.
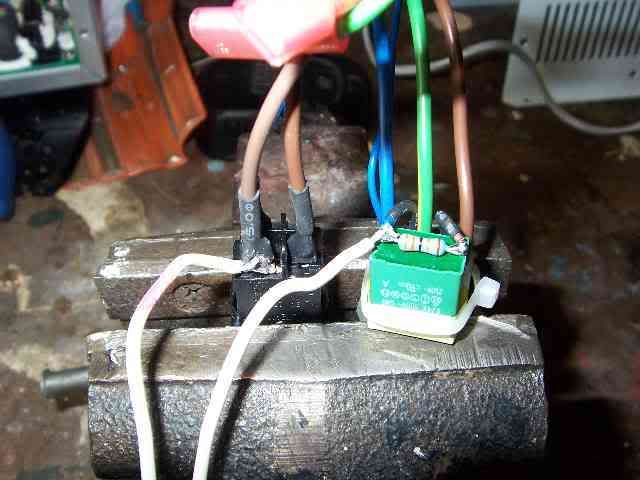
The next picture shows the OEM wiring loom. Both connectors should be removed and replaced by.......
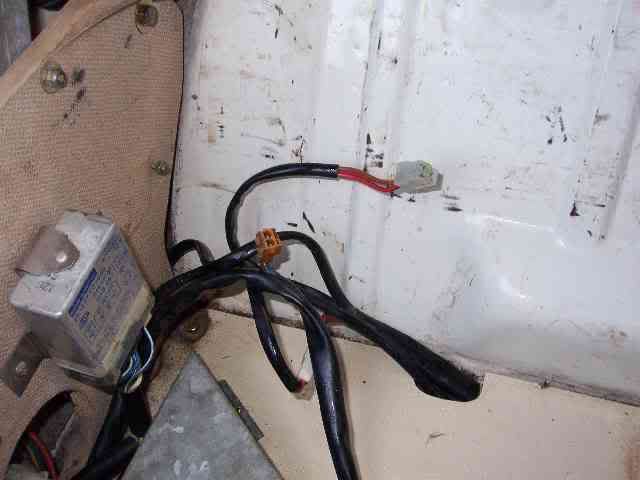
The 3 wire connector has the following connections:
Brown - Vehicle earth; Can go straight onto the -ve connection (female spade) on the charger
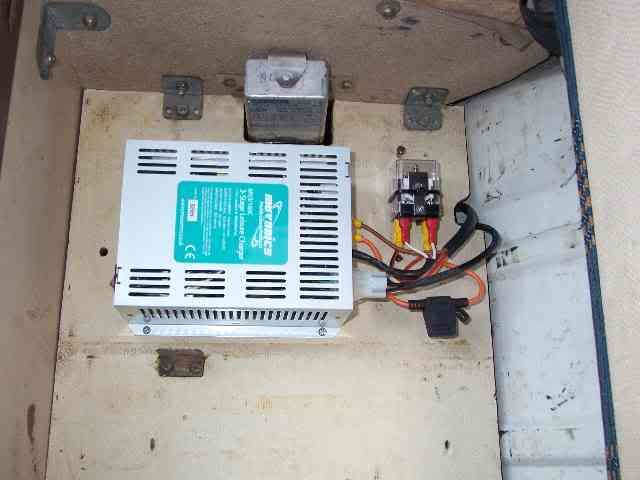
Red/Yellow - Leisure battery feed; Crimped together (female spade) with the output of the inline fuse holder. The other side of the fuse holder goes to the +ve side of the charger.
Red/Black - Main battery feed; Single female spade crimp added.
The OEM mains connection can be connected directly to the cable that came with the charger. NB; The earth must be connected due to the metal chassis of the charger.
This is all shown in the picture below.
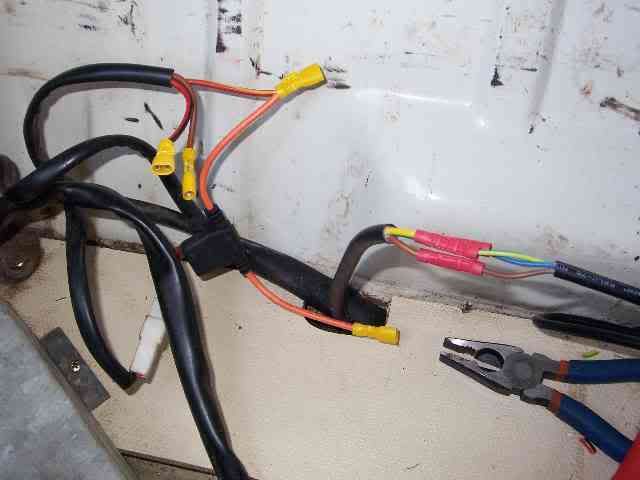
The charger can then be wired in. The switching output from the charger that was added earlier is connected to the coil of the relay. The feed to the main battery and the fused output from the charger/feed to leisure battery are connected to the terminals in such a way so that when the relay is switched they are connected. Be careful with this as the relay i got from maplins switched in a way i haven't seen before.....
All thats left now is to test it. Heres a photo of the voltage on the main battery with the charger running and a shot of the final install.
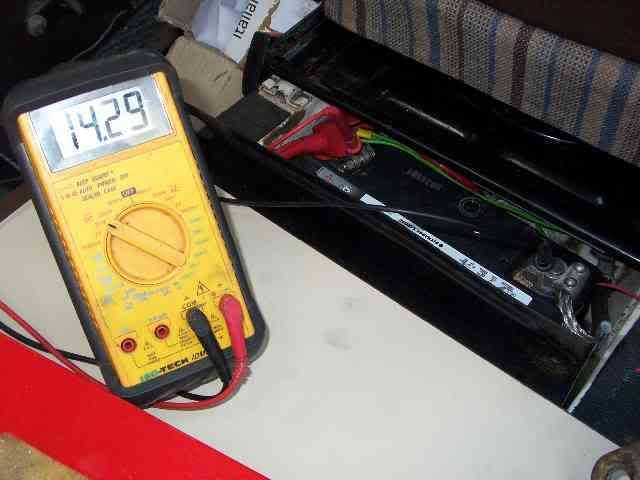
I've checked a number of ways with my installation and both batteries are seperate unless there is both 240V present at the charger AND the charger is switched on.
Dave
To summarise, i was installing a Muvonics 3 stage charger in place of the faulty BBB in my Westy. The problem was that there were direct feeds to both the main battery and the leisure battery in the OEM wiring and the muvonics charger only had one output. I wanted to charge both batteries from the charger but couldn't just wire them both to the output terminal because then both batteries would be hardwired together meaning that the split charge system was bypassed. The solution was to use a 30A 240V relay from Maplins to only connect the batteries together if there was 240V present at the charger AND the charger was switched on.
First thing i had too do was remove the cover and check the wiring.
The connections for the coil of the 240v relay would have to be taken from inside the charger so I drilled a hole above the 12v output to enable the cable for the relay coil could exit.
Next i removed the wiring loom from the charger and soldered wires onto the neutral (blue) side of the 240 input and another wire onto the live output of the switch (brown). The cable i used was the 240V input cable to the BBB. It was the right length and already had a black outer sleeve for protection.
Probably a good idea to add some insulating tape to the top of the transformer as shown in the next picture. I had to remove some of the heatshrink on the wire on the switch so the tape is a sensible precaution.
The next 2 pictures show the finished assembly of the charger. The top can go back on after this.
The next picture shows the OEM wiring loom. Both connectors should be removed and replaced by.......
The 3 wire connector has the following connections:
Brown - Vehicle earth; Can go straight onto the -ve connection (female spade) on the charger
Red/Yellow - Leisure battery feed; Crimped together (female spade) with the output of the inline fuse holder. The other side of the fuse holder goes to the +ve side of the charger.
Red/Black - Main battery feed; Single female spade crimp added.
The OEM mains connection can be connected directly to the cable that came with the charger. NB; The earth must be connected due to the metal chassis of the charger.
This is all shown in the picture below.
The charger can then be wired in. The switching output from the charger that was added earlier is connected to the coil of the relay. The feed to the main battery and the fused output from the charger/feed to leisure battery are connected to the terminals in such a way so that when the relay is switched they are connected. Be careful with this as the relay i got from maplins switched in a way i haven't seen before.....
All thats left now is to test it. Heres a photo of the voltage on the main battery with the charger running and a shot of the final install.
I've checked a number of ways with my installation and both batteries are seperate unless there is both 240V present at the charger AND the charger is switched on.
Dave
-
geordie skydiver

- Registered user
- Posts: 141
- Joined: 10 May 2006, 07:51
- 80-90 Mem No: 2988
- Location: Durham
- Contact: