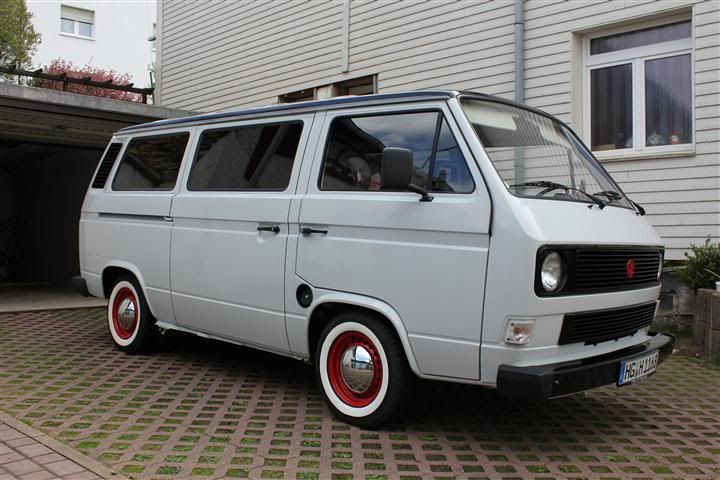
My project bus. 18/04/11 finally updated.
Moderators: User administrators, Moderators
-
riffboy
- Registered user
- Posts: 75
- Joined: 01 Jun 2010, 21:17
- 80-90 Mem No: 0
- Location: Stoke On Trent
- Contact:
Re: My project bus. 24/10/10 On to the Interior!
Defo my fave bus on here! Loving the colours and the stance. Good work mate 
When the last ounce of truth has fled, nought is left but the sum of lies.............
-
Cyrus

- Registered user
- Posts: 616
- Joined: 22 Jan 2011, 09:26
- 80-90 Mem No: 9165
- Location: Hastings, E/Sussex
Re: My project bus. 24/10/10 On to the Interior!
Great thread, your bus is looking good. One day I hope to be at the finished stage too.
Like the whitewalls and paint. Rustolem is the way to go, prep work seems like hard work tho
Well done.
Like the whitewalls and paint. Rustolem is the way to go, prep work seems like hard work tho
Well done.
-
miggs
- Registered user
- Posts: 83
- Joined: 03 Apr 2011, 07:53
- 80-90 Mem No: 9631
- Location: norfolk
- Contact:
Re: My project bus. 24/10/10 On to the Interior!
this is my fave t25 i have seen so simple but bloody spot on well done fella
Ray if someone asks you if youre a god you say YES
Re: My project bus. 24/10/10 On to the Interior!
Thanks for the comments guys!
It's been a while since I updated this but lately I have been doing more work on the interior after to be honest not doing much to it over the winter except driving it.
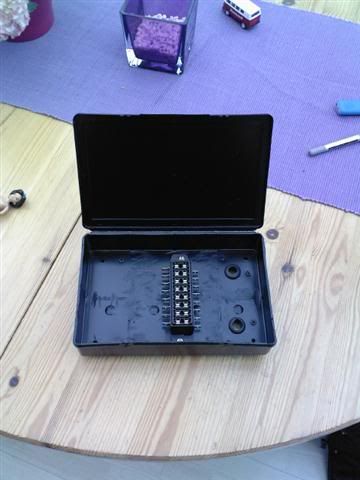
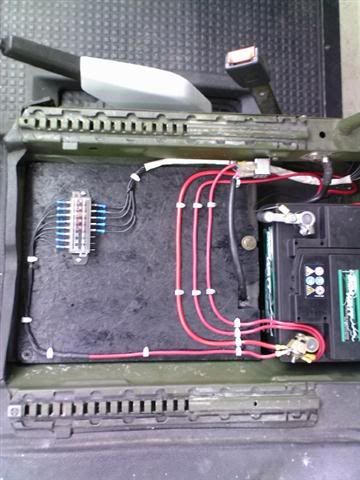
I made a 'fusebox' to sit under the rear seat to house the fuses for the rear interior lights and power sockets so that the wiring under the drivers seat at the leisure battery wasn't too congested. I made the fusebox out of an old plastic box that originally had screws in it, cut out the sections from the inside, stuck 3 strips of wood underneath it so it has room underneath for the wires to come in and out of the grommeted holes I cut in it... all very Blue Peter but cost nothing to make.
Home made fusebox.
Wiring under the drivers seat.
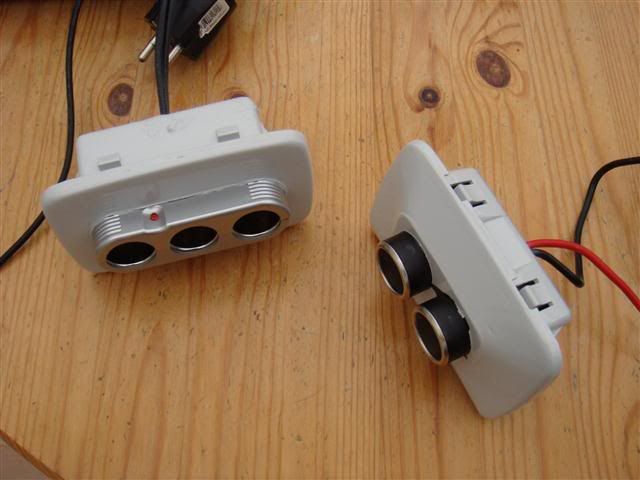
As no-one would ever use them I decided to mess about with the 3 ashtrays in the rear for the multivan panels I have installed and after a lot of messing about they now all house 12v power sockets. If anyone decides to do the same be sure the power socket housings don't stick out the back further than the original rear of the ashtray as if they do they don't fit. Just like mine didn't after the first attempt to make them!
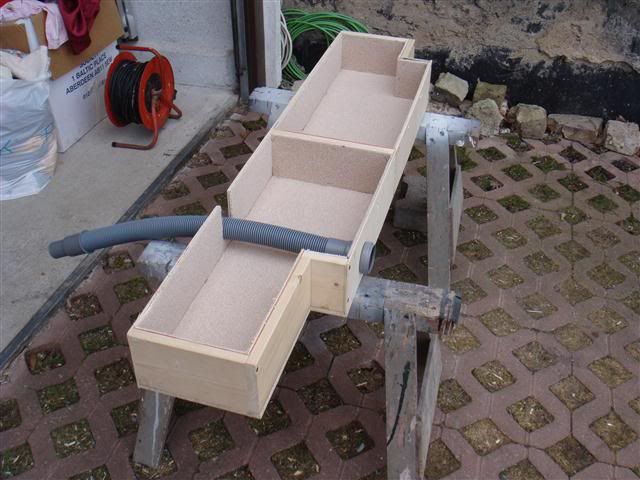
I have also made a box that is fitted under the rear seat to try and keep it a bit tidier, the plumbing is for the air intake for my eber which sucks in the air under the rear seat (van originally didn't have a rear seat) don't know how effective it will be but will be better than nothing I suppose.
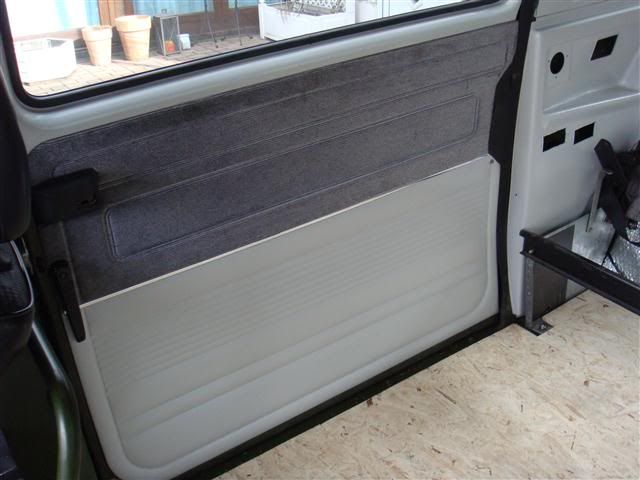
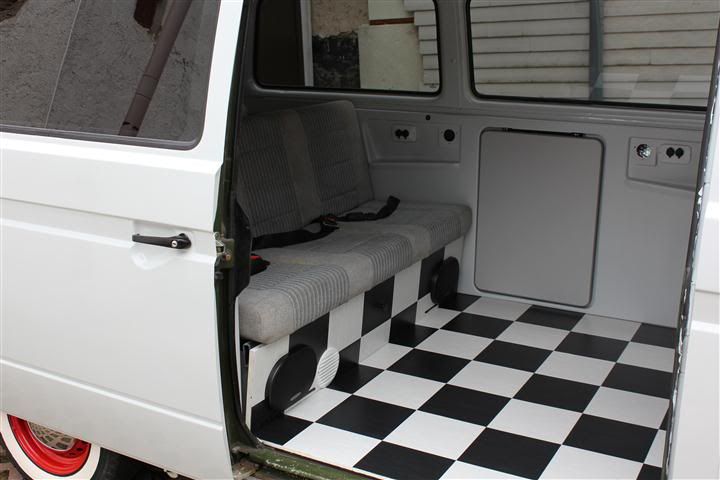
I've painted a sliding door cover to match the rest of the interior panels and fitted mad matz 9" tiles into the rear after laying insulation and 10mm board that was gloss painted to seal it.
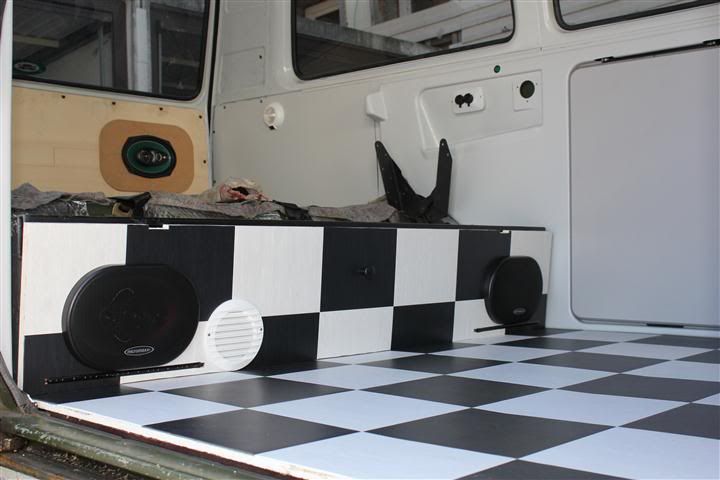
In the above pic you'll notice the led strips fitted below the speakers, they don't produce much light and are more for a soft glow that looks pretty good at night.
The dash bulbs have been swapped for blue led ones and neon strips have been fitted below the dash, the pics not the best and the neons are no where near as bright as the picture makes out.

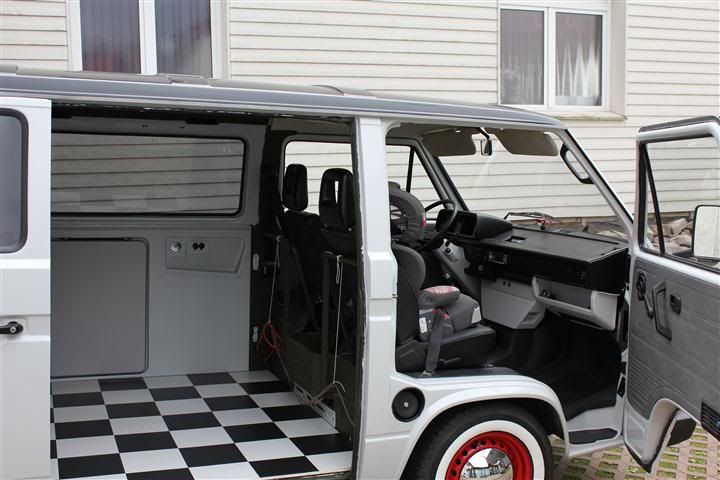
Interior is now nearly complete, I need to do a little more painting to cover the last of the army green and I'm going to fit a buddy seat behind the drivers seat and maybe a devon box behind the passengers seat.
The colourcoded lower parts on the dash now 'work' I think although I did change the dash pod back to black again as it didn't look right at all.
Next, second set of whitewalls!
It's been a while since I updated this but lately I have been doing more work on the interior after to be honest not doing much to it over the winter except driving it.
I made a 'fusebox' to sit under the rear seat to house the fuses for the rear interior lights and power sockets so that the wiring under the drivers seat at the leisure battery wasn't too congested. I made the fusebox out of an old plastic box that originally had screws in it, cut out the sections from the inside, stuck 3 strips of wood underneath it so it has room underneath for the wires to come in and out of the grommeted holes I cut in it... all very Blue Peter but cost nothing to make.
Home made fusebox.
Wiring under the drivers seat.
As no-one would ever use them I decided to mess about with the 3 ashtrays in the rear for the multivan panels I have installed and after a lot of messing about they now all house 12v power sockets. If anyone decides to do the same be sure the power socket housings don't stick out the back further than the original rear of the ashtray as if they do they don't fit. Just like mine didn't after the first attempt to make them!
I have also made a box that is fitted under the rear seat to try and keep it a bit tidier, the plumbing is for the air intake for my eber which sucks in the air under the rear seat (van originally didn't have a rear seat) don't know how effective it will be but will be better than nothing I suppose.
I've painted a sliding door cover to match the rest of the interior panels and fitted mad matz 9" tiles into the rear after laying insulation and 10mm board that was gloss painted to seal it.
In the above pic you'll notice the led strips fitted below the speakers, they don't produce much light and are more for a soft glow that looks pretty good at night.
The dash bulbs have been swapped for blue led ones and neon strips have been fitted below the dash, the pics not the best and the neons are no where near as bright as the picture makes out.
Interior is now nearly complete, I need to do a little more painting to cover the last of the army green and I'm going to fit a buddy seat behind the drivers seat and maybe a devon box behind the passengers seat.
The colourcoded lower parts on the dash now 'work' I think although I did change the dash pod back to black again as it didn't look right at all.
Next, second set of whitewalls!
Re: My project bus. 24/10/10 On to the Interior!
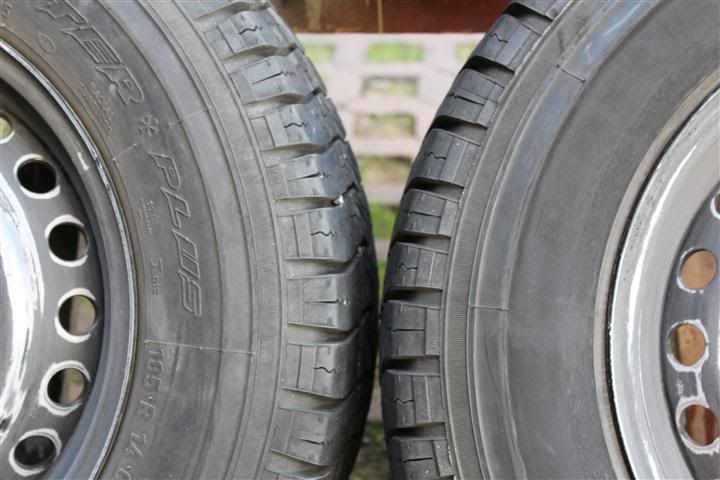
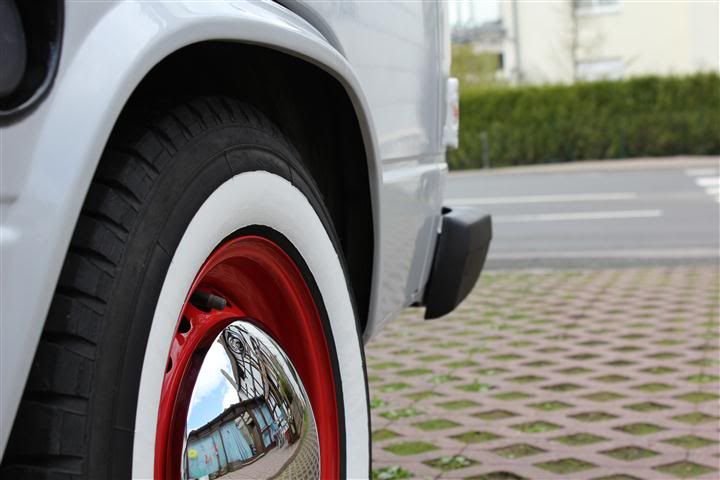
Whitewalls...
I originally had the JK whitewall flaps on it and to be honest I'm not that impressed after having them on for a few months, you need to lubricate them at least once a week and I've twice had to re-seat them as they had developed small bulges through normal driving.
I have done a fair bit of research into getting real whitewalls but unless your happy to pay 180 euros per tyre for Barum Vanis 185R14's that have been chemically treated to give a 1" white band then your out of luck over here in Germany! After some thought I decided to give the whitewall paint a go. The only problem with this option is to achieve the correct look you really need to sand off all the lettering. Now I'm not an idiot and I wasn't 100% keen on doing this as it may affect the sidewall. I did it by hand, very slowly (read 5 hours to do 4 tyres!) and didn't completely remove the lettering, think more ghosting the letters as you can still read them if you look closely. I then followed the instructions and cleaned them a lot before painting.
Here is the tyre sanded.
It's not actually paint you put on, more a liquid rubber. Not easy to apply as it's fairly thick stuff and dries quite quickly although you do need to leave it 24hrs between coats.
1st coat:
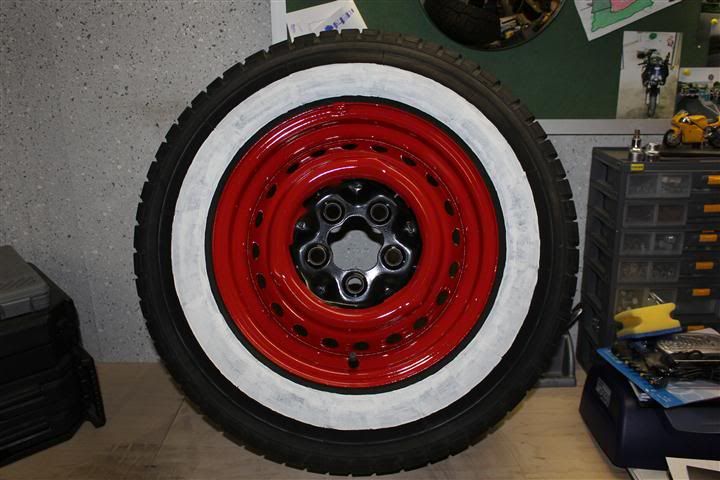
After 2 more coats again 24 hrs apart, you then need to leave them for a further 24hrs before putting them back on. I think they look a hell of a lot better than the flaps and hopefully they won't need as much looking after!
Next, I really should get my finger out and get that 1Y and DK box fitted.
I originally had the JK whitewall flaps on it and to be honest I'm not that impressed after having them on for a few months, you need to lubricate them at least once a week and I've twice had to re-seat them as they had developed small bulges through normal driving.
I have done a fair bit of research into getting real whitewalls but unless your happy to pay 180 euros per tyre
Here is the tyre sanded.
It's not actually paint you put on, more a liquid rubber. Not easy to apply as it's fairly thick stuff and dries quite quickly although you do need to leave it 24hrs between coats.
1st coat:
After 2 more coats again 24 hrs apart, you then need to leave them for a further 24hrs before putting them back on. I think they look a hell of a lot better than the flaps and hopefully they won't need as much looking after!
Next, I really should get my finger out and get that 1Y and DK box fitted.


-
Cyrus
- Registered user
- Posts: 616
- Joined: 22 Jan 2011, 09:26
- 80-90 Mem No: 9165
- Location: Hastings, E/Sussex
Re: My project bus. 18/04/11 finally updated.
I love this van.
The interior is great with the keeping of the outside. Your wiring is a work of art, I wish all sparkies would wire like this and not them horrible red/blue/yellow cramps and scotch blocks.
The interior is great with the keeping of the outside. Your wiring is a work of art, I wish all sparkies would wire like this and not them horrible red/blue/yellow cramps and scotch blocks.
-
Plasticman
- Trader
- Posts: 8085
- Joined: 12 Oct 2005, 20:55
- 80-90 Mem No: 1948
- Location: lincolnshire
Re: My project bus. 18/04/11 finally updated.
Looking the biz there, some of that wiring style looks familiar  nice van
mike
mike
-
scottbott
- Registered user
- Posts: 2497
- Joined: 07 Jan 2009, 20:36
- 80-90 Mem No: 6085
- Location: Old Somerby,Grantham
Re: My project bus. 18/04/11 finally updated.
looks great,like the whitewalls
Nil carborundum illegitimi
-
Novice in need
- Registered user
- Posts: 87
- Joined: 26 Nov 2010, 11:22
- 80-90 Mem No: 9010
- Location: Bedfordshire
Re: My project bus. 18/04/11 finally updated.
Hi the rubber paint that was applied for the white walls, is it available in different colours?
Really nice looking van keep up the good work
Really nice looking van keep up the good work
I have a 1.9 DG Petrol Watercooled Panel Van 1990 ... that im starting to believe has issues!!!!
-
jamesc76

- Registered user
- Posts: 6241
- Joined: 14 Oct 2005, 14:42
- 80-90 Mem No: 1186
- Location: Nottingham
- Contact:
Re: My project bus. 18/04/11 finally updated.
used to sand the letters off a lot of motor bike tyres all ways used a grinder with a sanding disc in it never had a problem!
DJ at Dubdayz Summerfest
Now cutting about in an LT35 MWB
Now cutting about in an LT35 MWB
-
Plasticman
- Trader
- Posts: 8085
- Joined: 12 Oct 2005, 20:55
- 80-90 Mem No: 1948
- Location: lincolnshire
Re: My project bus. 18/04/11 finally updated.
Funny remembering that james, did the same with bike tyres and never ever had any issues, the raised letters are cosmetic, folk do more damage kerbing them
mike
mike
Re: My project bus. 18/04/11 finally updated.
Novice in need... sorry but I think it's only available in white.
James/Mike. I agree the lettering is only cosmetic but still didn't want to take a disc to the sidewalls as it just seemed wrong.

Also another reason for 'ghosting' the letters is that I thought as technically they are still there and can be read (just!) there would be less chance of getting grief from the police for having no details on the outside of the tyre. As I have no idea if it's a legal requirement to have details on both sides or if one side is ok!
James/Mike. I agree the lettering is only cosmetic but still didn't want to take a disc to the sidewalls as it just seemed wrong.
Also another reason for 'ghosting' the letters is that I thought as technically they are still there and can be read (just!) there would be less chance of getting grief from the police for having no details on the outside of the tyre.
-
jamesc76
- Registered user
- Posts: 6241
- Joined: 14 Oct 2005, 14:42
- 80-90 Mem No: 1186
- Location: Nottingham
- Contact:
Re: My project bus. 18/04/11 finally updated.
never heard of probs only having writing on inside, plus the flaps you can get cover all the writing any way!
DJ at Dubdayz Summerfest
Now cutting about in an LT35 MWB
Now cutting about in an LT35 MWB
-
hicksy
- Registered user
- Posts: 223
- Joined: 28 Apr 2009, 08:49
- 80-90 Mem No: 9372
- Location: Bexhill on Sea, East Sussex
Re: My project bus. 18/04/11 finally updated.
Saw this bus in the 'what did you do to your t25 today' thread, and I have to say, man I am impressed. This thing looks the nuts.
I too have a T25 tin top (caravell) and I have done a similar thing to you; one simple colour, lowered and a bit custom. I too tried the whitewalls, and after 2000 miles and a second set unsuccesfully fitted I binned them. I now prefer my van without them.
Tour van looks great mate, well done
I too have a T25 tin top (caravell) and I have done a similar thing to you; one simple colour, lowered and a bit custom. I too tried the whitewalls, and after 2000 miles and a second set unsuccesfully fitted I binned them. I now prefer my van without them.
Tour van looks great mate, well done
See the resto of Frank, my bug, here: http://www.volkszone.com/VZi/showthread.php?t=666711" onclick="window.open(this.href);return false;
See My Caravelle to Camper self build here: http://forum.club8090.co.uk/viewtopic.php?f=40&t=85063" onclick="window.open(this.href);return false;
See My Caravelle to Camper self build here: http://forum.club8090.co.uk/viewtopic.php?f=40&t=85063" onclick="window.open(this.href);return false;