Page 3 of 3

Re: 1991 Trooper Units removed at last! PICS UPDATED

Posted: 26 Jul 2010, 18:08
by PeteIOM
HarryMann wrote:
Shame about that rust behind kitchen units and along the floor to wall seam - how the hell was the water getting in?

Condensation mainly I expect?

You need insulated exterior panels and good ventilation

Yup exactly that... when camping would often wake up with condensation running down inside windows... Im like a radiator in bed!

Re: 1991 Trooper Units removed at last! PICS UPDATED

Posted: 26 Jul 2010, 18:35
by PeteIOM
Oldjets

Mike (Metalmickey) lead me in the right direction... you got to work from the back if you want to make life easier.

FIG 1.
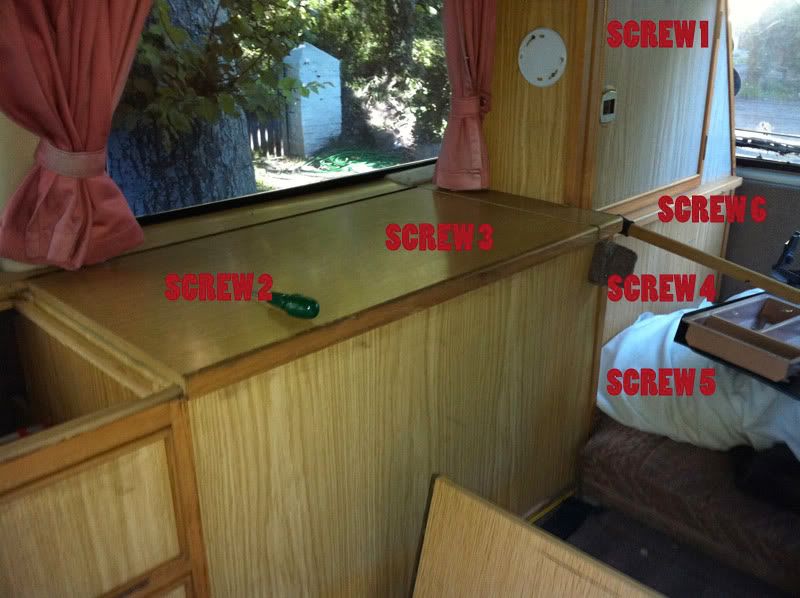
Screw 1 - Open Cupboard door and above the hanging railing there is a screw that goes into the overheard cupboard.
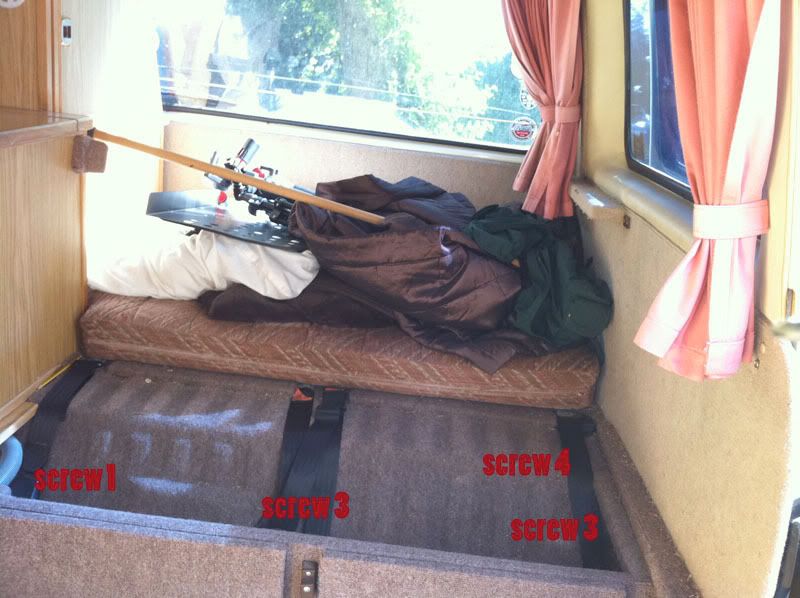
Screw 2 and 3. Tricky buggers to find if your like me and not used to removing camper interiors. Lift lid and remove trays (if yours has trays) Fixed to each side of the cupboard are runners for the tray to sit on, remove runner on van panel side and you will see 2 screws holding cupboard to van panel.
Screw 4 and 5. Back inside the wardrobe unit and there are a couple of screws fixing wardrobe to long unit.
Screw 6. Inside wardrobe at back (tailgate end) and on the base there is a bracket fixed to the floor.
Image

Once you have moved these the majority of the pain in the a*** hidden screws are done.

I'll post another pic shortly of the other units and screws.

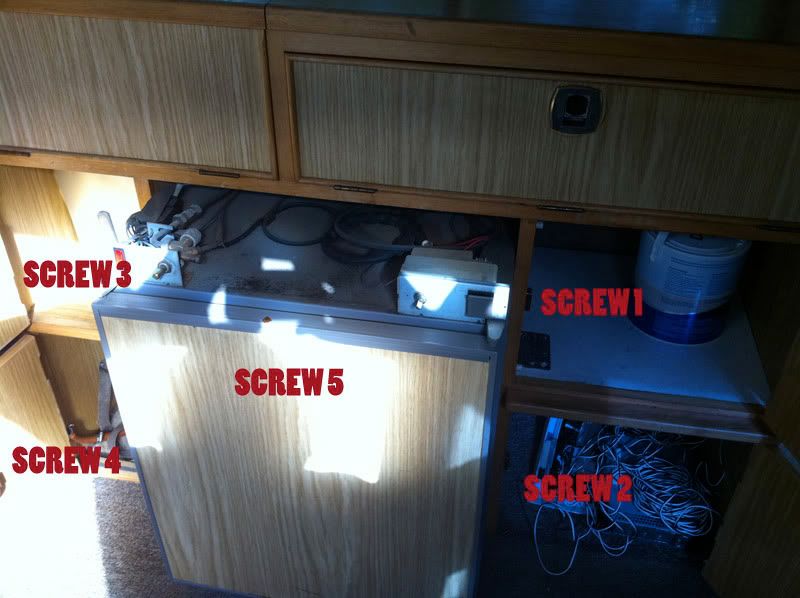
Before other units I removed fridge. Certainly seemed easier working without fridge in place.

Screw 1,2,3 and 4. These are in the adjacent cupboards (or atleast on mine they were) near the front.
Screws 5. Two screws either end of panel, undo both and pull control knobs off (This makes it easier to disconnect wires).

Image

Once the fridge is out you need to disconnect any sink pipes, heater pipes etc ( i found it easier to disconnect the gas pipes to the heater than unscrew the heater and try and move that along with cupboards).
The other screws that hold the units in place are in the cupboard behind the drivers seat.. a small L shape bracket screwed into panel covering. Possibly another L type bracket at the front corner of that cupboard going into floor.
Something to bare in mind when you think you have all the screws out but still nothings really moving much is that it may not have been moved for 20 years so a little levering here and there should get it moving.

Re: 1991 Trooper Units removed at last! PICS UPDATED

Posted: 26 Jul 2010, 21:11
by Plasticman
Thats real good work there Pete wants wiki'ing , what about the r&r bed did that not come out first or have I missed it. .
mike (you got the welder ordered yet)

Re: 1991 Trooper Units removed at last! PICS UPDATED

Posted: 26 Jul 2010, 21:27
by PeteIOM
Huzzah.. yes... Bed...

Screw 1,2 and 3. These are located at the bottom of the board screwed into the floor (note the electrics box to the left needs to be unscrewed from the board to)
Once you've done the screws holding the board in your thinking "there's no more screws.. I can't see anymore screws!!" but it wont budge.
Screw 4. This little bugger (or atleast in my van) was hidden by the carpeting pile. It goes through the wood slate, down and into the wheel hump.. have a good feel about with ya finger and you soon find it!

Image

Re: 1991 Trooper Units removed at last! PICS UPDATED

Posted: 26 Jul 2010, 23:05
by HarryMann
Wants Wiki'ing....

OK, will have a go at that, agree, superb step-by-step photo journalism

Re: 1991 Trooper Units removed at last! PICS UPDATED

Posted: 26 Jul 2010, 23:29
by HarryMann
Phew! done...

https://club8090.co.uk/wiki/Ca ... ving_units

Please check, happy to add/E D I T if required
Many thanks all...

Re: 1991 Trooper Units removed at last! PICS UPDATED

Posted: 27 Jul 2010, 10:32
by Oldjets
Good photos and great info. That's definitely going to come in handy in the future, so thanks for that.
And keep us posted on how it all goes back together. Will be worth all the agro once its done.

Good luck with the rebuild. My own Trooper is pretty original, and I'm keeping it that way, so if you need reference photos of anything let me know.

Oldjets

Re: 1991 Trooper Units removed at last! PICS UPDATED

Posted: 27 Jul 2010, 18:14
by Nicola&Tony
Very useful pics and info, thanks. Good to see it added to the wiki as well.

Tony

Re: 1991 Trooper Units removed at last! PICS UPDATED

Posted: 10 Jan 2011, 13:41
by Oldjets
Pete
Any progress with the rust repairs and refitting units to your Autosleeper? Would be very interested to see an update.

Cheers,
Oldjets