My project bus. 18/04/11 finally updated.
Moderators: User administrators, Moderators
-
choplee

- Registered user
- Posts: 178
- Joined: 25 Mar 2010, 20:07
- 80-90 Mem No: 8091
- Location: Swale,Kent
Re: My project bus. 11/8/10 New Pics.
Just checked out your project bus and it's looking good fella 
-
Fin
- Registered user
- Posts: 314
- Joined: 21 Jan 2010, 19:40
- 80-90 Mem No: 8714
- Location: Bradford On Avon
- Contact:
Re: My project bus. 11/8/10 New Pics.
Man that looks so sweet with the wheels all sorted.
Single cab pickup, running 1996 Subaru WRX STI engine, Aiden talbot gearbox.
Re: My project bus. 11/8/10 New Pics.
Thanks guys.
I am rather pleased with how it's looking now.
I am rather pleased with how it's looking now.
-
choplee
- Registered user
- Posts: 178
- Joined: 25 Mar 2010, 20:07
- 80-90 Mem No: 8091
- Location: Swale,Kent
Re: My project bus. 11/8/10 New Pics.
Shame your not local ...Would love to see it in the flesh ,as they say ...lol
-
Plasticman
- Trader
- Posts: 8085
- Joined: 12 Oct 2005, 20:55
- 80-90 Mem No: 1948
- Location: lincolnshire
Re: My project bus. 11/8/10 New Pics.
Looking very good, I like the rear view and the wheel combo looks excellent and works very well, shows you dont need allys every time. would it have worked with a satin black smoke blending the side windows in, maybe make it look lower? or too much with the roof black as well, have to photoshop it
mike
mike
Re: My project bus. 11/8/10 New Pics.
Mike, you obviously have the same thoughts as myself. 
My original plan was to blend in the side windows but then after the first coats went on the roof and the sides I decided against it. I might still do a photoshop for a comparison though.
My original plan was to blend in the side windows but then after the first coats went on the roof and the sides I decided against it. I might still do a photoshop for a comparison though.
Re: My project bus. 11/8/10 New Pics.
That is one fine looking van! The retro look really works well and the wheels really set it off.
Good to see something a little different. Congratulations!!
Good to see something a little different. Congratulations!!
-
Plasticman
- Trader
- Posts: 8085
- Joined: 12 Oct 2005, 20:55
- 80-90 Mem No: 1948
- Location: lincolnshire
Re: My project bus. 11/8/10 New Pics.
I will be turning out some interesting side/nurf bars soon reckon a pair would work well on yours and make it seem lower, will pm you when it happens
mike
mike
Re: My project bus. 11/8/10 New Pics.
Please do Mike.

Re: My project bus. 11/8/10 New Pics.
Looks very cool
Re: My project bus. 11/8/10 New Pics.
get a flag in the holder.. skull and cross bones 
-
Stubfin
- Registered user
- Posts: 56
- Joined: 11 Sep 2010, 11:16
- 80-90 Mem No: 8864
- Location: Merseyside
Re: My project bus. 11/8/10 New Pics.
Lovely job and very interesting too>
Re: My project bus. 11/8/10 New Pics.
Time for an update again, after all the bodywork I've just been using it and slowly putting in the interior. It's no where near finished but it's starting to come together. I don't need a camping interior and had decided from the start what I wanted was multivan interior but a personalised one. The same but different if you like, as it had no interior when I bought it I have been slowly buying bits off ebay for it and making stuff as I go along. Lots of pics again and its far from finished yet!
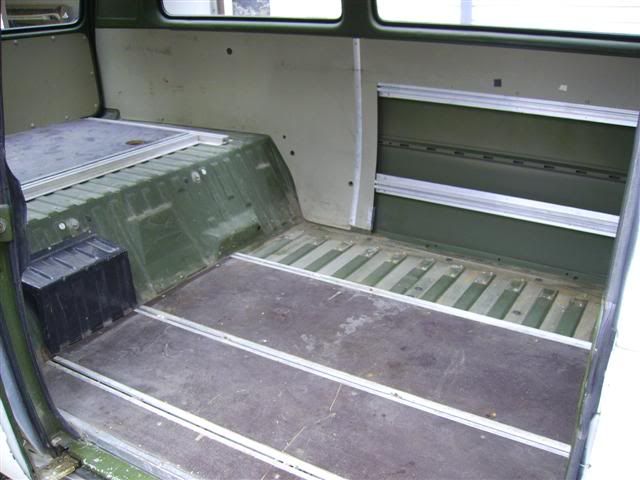
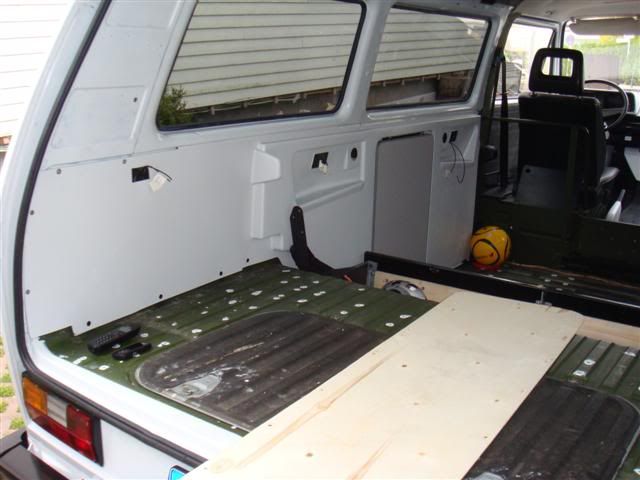
Here is what the interior looked like, just basic panels.
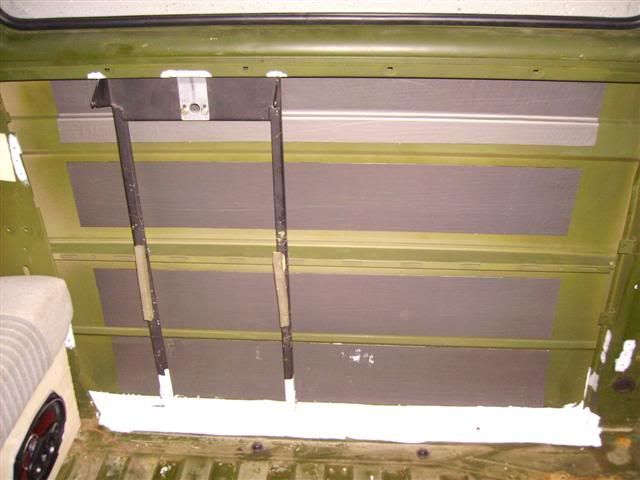
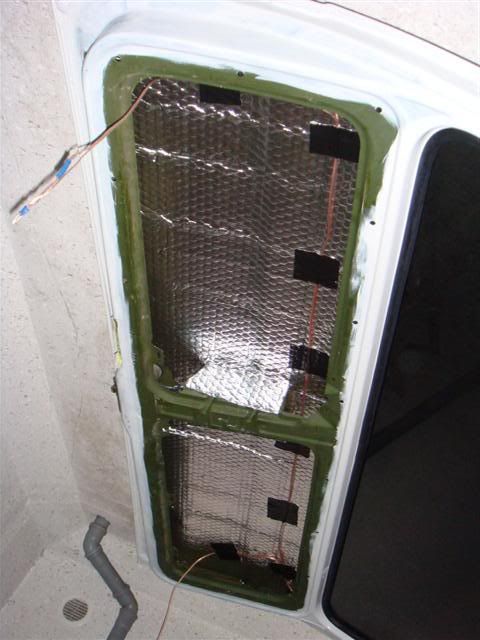
Stripped it all out and started by putting in flash banding to dull down the drumming a little and fitted some of the parts for the multivan panels.
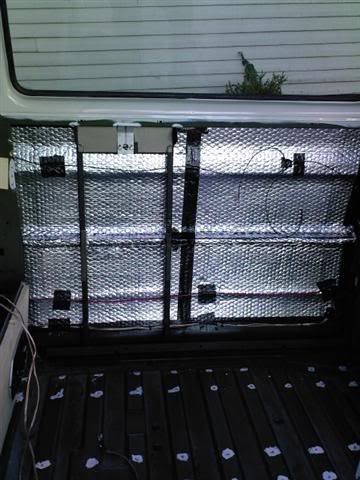
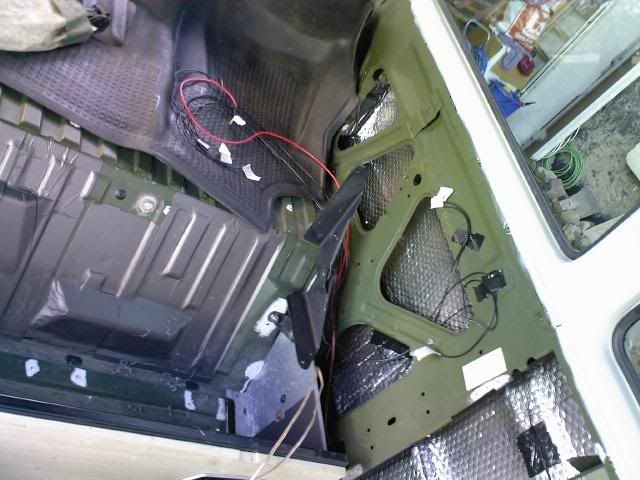
Then put in the insulation and the wiring for the stereo and sockets etc Iam going to fit.
Here is a pic of the multivan panels as I got them, not in very good condition but they were cheap! I got pretty much the entire multivan interior except for the buddy seat (still have to get one) for 100 euros.
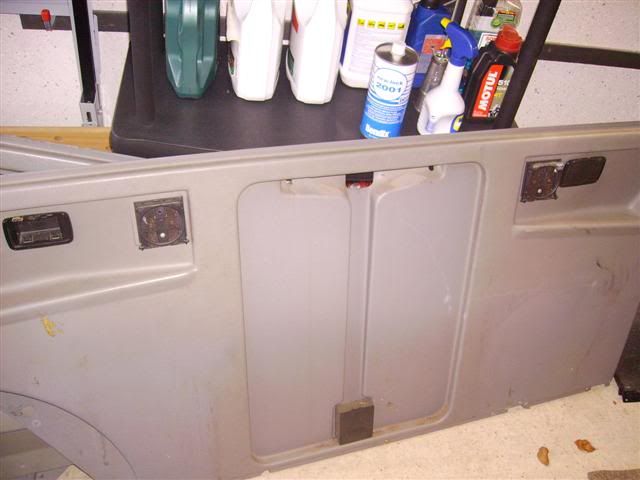
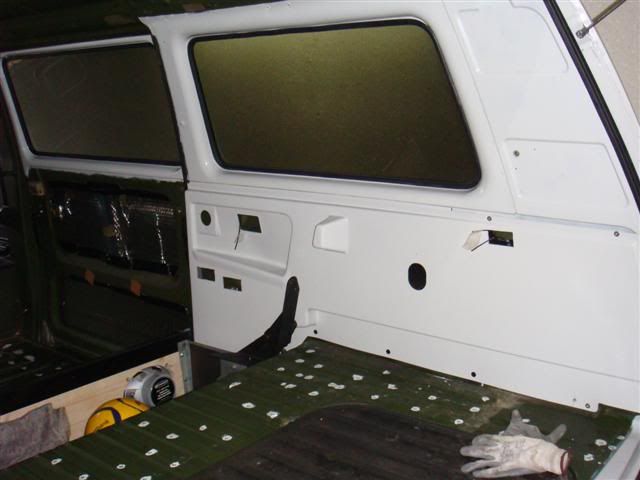
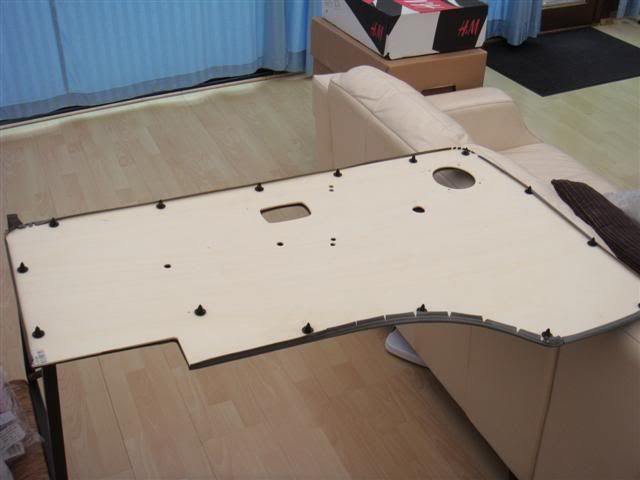
The panels have been cleaned up, and painted the same colour as the exterior (RAL 7035) as I want the interior to be quite bright looking. Here is pics of the side panels now fitted.
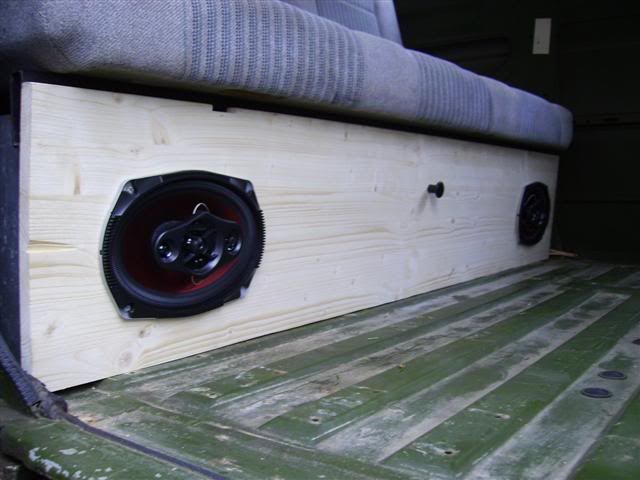
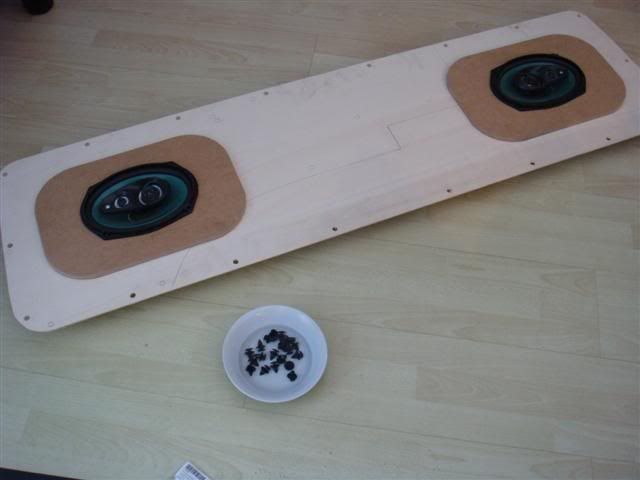
I have also made panels for under the rock n roll seat, the tailgate and I got another set of door trims, again in poor condition but I carefully removed the covers and made up new boards with 4mm ply and stuck the original covers back on them, the reason for this is I decided I wanted only one speaker in the door in the original position and I had pretty much destroyed my original door trims attempting a seperates install in the doors. It looked horrible and didn't sound that good either... never mind.

I had a problem with the JK sourced new door trim clips, trying to put them in I broke 3 on the trot as they are fairly brittle so I had an idea to put then in boiling water to soften them a little... works a treat! Fitted them all after that without breaking a single one!
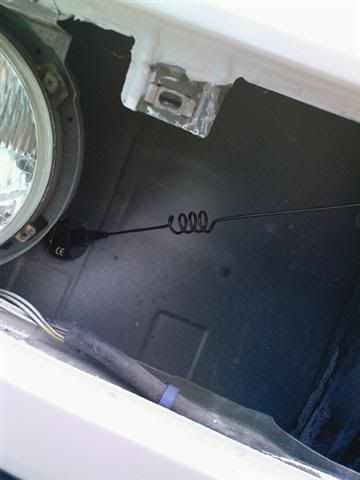
I have hidden the ariel for the radio behind the grill as I didn't want to drill a hole in the bodywork. It works fine positioned there. I have put the amps etc under the passenger seat, this is just a rough version and will be made tidy.
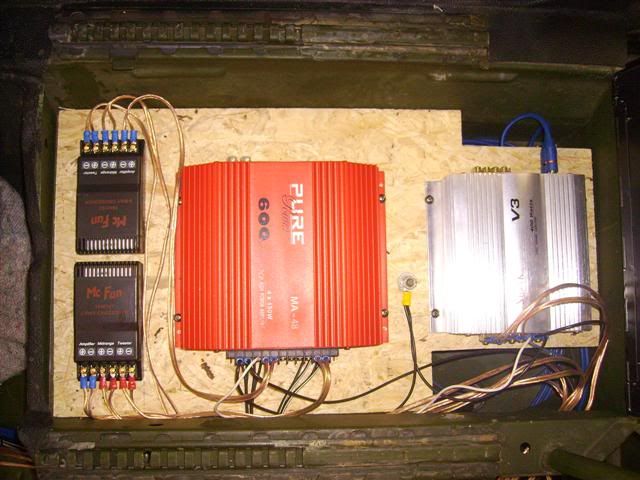
I have also colour coded some of the dash, not too sure if I like this yet and the instrument binicle now reflects into the windscreen so I think this will be repainted black again. The entire stereo system works off the red switch you can see on the center panel coming from the leisure battery, the other switch is a secret

That's it for now, the plan is where the original multivan panels had ashtrays I am going to fit usb and normal 12v sockets, light switches etc. Wiring wise the whole of the rear of the van will be from a fusebox under the rock n roll seat and have a main switch on the panel beside the table that shuts the lot off. Again all of this is from the leisure battery, there is already another fusebox beside the leisure battery that has all the stereo and front power sockets coming off of it.
Still lots to do!
Here is what the interior looked like, just basic panels.
Stripped it all out and started by putting in flash banding to dull down the drumming a little and fitted some of the parts for the multivan panels.
Then put in the insulation and the wiring for the stereo and sockets etc Iam going to fit.
Here is a pic of the multivan panels as I got them, not in very good condition but they were cheap! I got pretty much the entire multivan interior except for the buddy seat (still have to get one) for 100 euros.
The panels have been cleaned up, and painted the same colour as the exterior (RAL 7035) as I want the interior to be quite bright looking. Here is pics of the side panels now fitted.
I have also made panels for under the rock n roll seat, the tailgate and I got another set of door trims, again in poor condition but I carefully removed the covers and made up new boards with 4mm ply and stuck the original covers back on them, the reason for this is I decided I wanted only one speaker in the door in the original position and I had pretty much destroyed my original door trims attempting a seperates install in the doors. It looked horrible and didn't sound that good either... never mind.
I had a problem with the JK sourced new door trim clips, trying to put them in I broke 3 on the trot as they are fairly brittle so I had an idea to put then in boiling water to soften them a little... works a treat! Fitted them all after that without breaking a single one!
I have hidden the ariel for the radio behind the grill as I didn't want to drill a hole in the bodywork. It works fine positioned there. I have put the amps etc under the passenger seat, this is just a rough version and will be made tidy.
I have also colour coded some of the dash, not too sure if I like this yet and the instrument binicle now reflects into the windscreen so I think this will be repainted black again. The entire stereo system works off the red switch you can see on the center panel coming from the leisure battery, the other switch is a secret
That's it for now, the plan is where the original multivan panels had ashtrays I am going to fit usb and normal 12v sockets, light switches etc. Wiring wise the whole of the rear of the van will be from a fusebox under the rock n roll seat and have a main switch on the panel beside the table that shuts the lot off. Again all of this is from the leisure battery, there is already another fusebox beside the leisure battery that has all the stereo and front power sockets coming off of it.
Still lots to do!
-
Plasticman
- Trader
- Posts: 8085
- Joined: 12 Oct 2005, 20:55
- 80-90 Mem No: 1948
- Location: lincolnshire
Re: My project bus. 24/10/10 On to the Interior!
Thats looking nice, its good that you know what you want the van for )ie not full camping) so can tailor it accordingly. I notice the amps etc , if they are staying under the seat are you going to cover them, I ask cos Ive had them there on anaother van and the dust and crud that found its way in ,,,,,,,,,,,,,,,,,.
Agree with your thoughts on the colour coding stuff, the idea is good and I see where your coming from but it dont sort of work for me, at least with the pickies as seen , secret switch is really good important to have it too.....
 ,whats your head unit,and what are you covering the floor with
mike
Agree with your thoughts on the colour coding stuff, the idea is good and I see where your coming from but it dont sort of work for me, at least with the pickies as seen , secret switch is really good
mike
Re: My project bus. 24/10/10 On to the Interior!
Yeah the colour coding hasn't worked like I thought it would.  I'm now thinking it might be due to the fact there is no carpets/seat base coverings on it yet and the stark black/light grey difference is too much. It might actually look ok once light grey carpeting is in and with the fusebox cover and shelf also colour coded to blend the whole bottom half of the dash. Either way the binnicle will be going black again and if it still doesn't look right then a couple of cans of satin black will sort it all out.
The stereo is an Aiwa thing that we had installed in my wifes old car and when we sold the car it was removed and chucked in a box. It's good spec though and will do for now. Also the amps will be covered as my daughters child seat sits on the passengers side with the seat as far back as it goes so you can see in where the amps are. The whole idea is to have everything hidden or not that noticable at a glance. Flooring wise, I'm thinking vinyl tiles but my wife says it should be carpeted.... vinyl tiles with a nice rug then.
The stereo is an Aiwa thing that we had installed in my wifes old car and when we sold the car it was removed and chucked in a box. It's good spec though and will do for now. Also the amps will be covered as my daughters child seat sits on the passengers side with the seat as far back as it goes so you can see in where the amps are. The whole idea is to have everything hidden or not that noticable at a glance. Flooring wise, I'm thinking vinyl tiles but my wife says it should be carpeted.... vinyl tiles with a nice rug then.