Page 3 of 4

Posted: 04 Aug 2008, 17:19
by Rozzo
Nicola&Tony wrote:
Rozzo wrote:i'm not nit picking tone . . .

It was an important point you made Rozzo, and all help and info is gratefully accepted m8. I'm still trying to get me head round how all this stuff works! I'm a self-confessed, time-served novice! :lol:

Tony :D
on the contrary tony, you're a fully fledged get off your ar#e and have a go at it,, accepting advice along the way bloke,, which in my book is sp[ot on m8 :lol:
if the liesure battery is directly connected to the main battery it would probs be a good idea to disconnect it also just to be double safe.
keep avin a go m8,,, love to you and nick from us 4 :wink:

Posted: 04 Aug 2008, 18:03
by skell
tip for getting the starter bush out if it won't shift with a tap, get a mirror, an extra arm and a narrow chisel, get point of chisel between bush of housing, tap chisel a bit and fold in bush, a few rounds of this and the bush will fall apart. tricky thing is finding a third arm, I gaffered the mirror to something.

Posted: 04 Aug 2008, 18:55
by Nicola&Tony
ermie571 wrote:I have just reported this post...

You had me worried for a minute then! :shock: :lol:

Tony

Posted: 08 Aug 2008, 06:07
by Nicola&Tony
3rd stage: changing the starter motor bush.

There's already some info in the wiki about this . . .

https://club8090.co.uk/wiki/Al ... rter_motor" onclick="window.open(this.href);return false;

https://club8090.co.uk/wiki/Pe ... sh_removal" onclick="window.open(this.href);return false;

. . . so I'm just gonna add some photos that I took and a couple of brief comments.

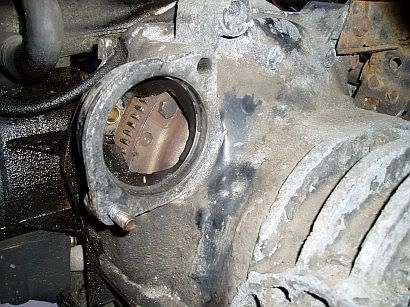
This photo shows the hole in the bellhousing (I think that's what it's called?) after the starter motor has been removed. The teeth on the flywheel are visible, as is the oilite bush (small brass-coloured cylinder in the middle of the hole, just beyond the flywheel). This isn't what the bush looked like when I first removed the starter motor, this photo was taking after I'd put the new bush in:

Image

Having read the info in the wiki, I knew i was gonna use a 12mm tap to remove the old bush. With the drive shaft still in place, access to the bush was a bit tricky, but I managed to get the tap biting inside the old bush just by turning the tap with my fingers. When I couldn't turn it anymore it took me a little while to work out that the only way to get enough leverage to continue turning it was to use a pair of mole grips, or large pliers, in-line with the tap, like this (photo taken after the bush was out, obviously! :wink: ):

Image

Once you've got a few good turns of the tap inside the bush, it's a case of "wiggle and pull" the end of the tap, and hopefully the bush comes out. Once it's out, clean-up inside the hole to remove any small pieces of the bush that might still be in there. Here's a close-up of the old bush on the tap:

Image

The importance of soaking the new oilite bush overnight in engine oil is covered in the wiki. I had a right bliddy job getting the new bush into the hole! :oops: After coming back and checking on 80-90 again, I read somewhere that the ideal tool for the job is the 120mm long bolt that holds the starter motor in place. Wind the nut down the thread a few turns and then put the bush on the end of the bolt like this and then gently hit the head of the bolt with a hammer, to get the bush started in the hole:

Image

Once the end of the bush is firmly located into the hole use a narrow piece of wood (e.g. large dowel, or cut a short piece off a mop handle / yard brush handle) and a hammer to tap the bush the rest of the way into the hole. Be careful not to get the piece of wood on the flywheel teeth and be hammering on those instead! :oops:

With the new bush in place the starter motor can then be put back on, connect the wires onto the end of it again and connect the negative lead back onto the battery and turn the key!

Unfortunately when I turned the key nowt happened so I bounced my head off the steering wheel a few times and shared a few choice words with the neighbourhood! :cry: :x

Have been tinkering with connections since then but still no joy, so today I'm having a trip over to gsf to buy a shiny new starter motor! :D

Tony

Posted: 08 Aug 2008, 12:45
by Nicola&Tony
Much to my relief it was a case of, on-with-the-shiny-new-starter-motor and we're back in business! £90 from gsf (with 80-90 discount).

Image

Thank fooooooook for that!!! :D :D :D :D

Tony

Posted: 08 Aug 2008, 18:14
by edoh
thanks so much again for the photos and comments -
pleased you got it sorted -
was replacing straightforward? - new bush? wires noted? everything done up tight? smear of vaseline?
:)

Posted: 08 Aug 2008, 18:57
by Nicola&Tony
Putting the new starter on was a very simple job edoh. I didn't need to put a new bush in because I'd already done that last weekend. Can't go wrong with the wiring connections really.

Tony

Posted: 08 Aug 2008, 19:45
by hightower
So is it starting up ok now then?

I was going to tackle mine tomorrow but looking at the weather i doubt it now.

Do you have to renew the bush in the bell housing?

When i looked at my starter last weekend it seemed to only be about 3 years old (stamped with some date in 2005) with little use too (mileage wise) no rust so i hope it doesnt need replacing.

Posted: 08 Aug 2008, 19:57
by Nicola&Tony
Starts really well now (still keeping me fingers crossed though!) When we bought the van (Oct. 2006) it came with a pile of receipts and I recently noticed that one receipt was from JK for a starter motor in Nov. 2005! :shock: :x

Going by some of the info I've read on 80-90 / wiki, if you're putting a new starter on, it's a good idea to put a new bush in as well . . . may as well whilst you've got the starter off I suppose, especially if you don't know when it was last done.

For those of us with no garage / car port, it doesn't look like we'll be getting much work done on the van this weekend. :x :cry:

Tony

Posted: 08 Aug 2008, 20:07
by hightower
Thanks Tony.

Yeah i think i will be fitting the new speakers and stereo instead. Glad i redid the seals on the roof a few weeks back now.

Re: Long journeys; starter problem (more photos added!)

Posted: 08 May 2009, 08:23
by justicewhittle
Excellent postings dudes this just helped me out with my hot start issues

Re: Long journeys; starter problem (more photos added!)

Posted: 08 May 2009, 21:06
by Nicola&Tony
Nice one, hope you got your problem fixed? :ok

Tony

Re: Long journeys; starter problem (more photos added!)

Posted: 29 Mar 2011, 11:41
by tabbytiger23
what a great post

im commenting so that it will stay in my post's, good to refer back to in the future!

Re:

Posted: 06 Aug 2011, 04:36
by Nicola&Tony
Bit of an update for this thread. Recently we started getting exactly the same intermittent starting problems (but after short journeys just running around the local area), 3 years after fitting the new starter motor. Checked the battery voltage, removed the starter again and took it to a local auto electrics place who tested it and said it was fine, so I came back and read this thread again.

Ian Hulley wrote:Clean up all connections onto the starter and the braided earth one from the chassis onto the gearbox nose mount . . .

Followed Ian's advice and cleaned-up all the electrical connections. The braided earth was particularly manky so removed it and cleaned it all up and removed surface rust where it meets the chassis and gearbox mount. Seems to be starting ok again at the moment, touch wood!!

Tony

Re: Long journeys; starting problem (with photos)

Posted: 16 Aug 2011, 19:42
by danveall
great post, with great pics. Have had same starting symptoms so posting so i can find again! :D