Page 2 of 4
Posted: 27 Jul 2008, 21:39
by kevtherev
is this sticky solenoid syndrome?
I took mine apart and greased the bore.. not had a bother since
Posted: 28 Jul 2008, 01:36
by Nicola&Tony
I'm liking the sound of this Kev . . . is it difficult to get apart (and back together again!

)
Tony
Posted: 28 Jul 2008, 17:13
by kevtherev
not really... three M6 bolts... and it's apart.
Posted: 28 Jul 2008, 17:30
by Grun
kevtherev wrote:not really... three M6 bolts... and it's apart.
Don't tell us Kev..... let us guess.......... 'refitting is the reverse sequence to removal'.
Hows the
gout (in the right foot) by the way

Mike
Posted: 28 Jul 2008, 18:01
by kevtherev

snot gout..twas a ninja biting fly, I tell thee!
it's getting betterer thanks
the solly is attached to the starter by these bolts
Once apart and you have collected up all the little springs and stuff

a bit of grease in the bore of the windings, and on the rod of the T bar
Posted: 02 Aug 2008, 22:56
by Nicola&Tony
Had a busy afternoon working on Kev's solution to this today. I decided to replace the starter bush whilst I was at it. I'll post some pics and a bit of a write-up when the job's finished.
Tony
Posted: 03 Aug 2008, 08:49
by Nicola&Tony
1st stage: finding and removing the starter motor.
There's already some info about this in the wiki:
https://club8090.co.uk/wiki/Al ... rter_motor" onclick="window.open(this.href);return false;
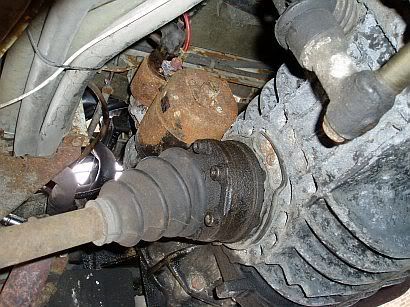
On a rhd van (ours has an early DG engine), you can see the starter motor by looking under the driver-side rear wheel arch, or by getting under the van near that wheel. Removing the wheel gives you more space to work. Removing the drive shaft that comes from the gearbox would make the task even easier, but I didn't feel confident about doing this (self-confessed novice!)
Location of the starter motor (rear wheel removed):
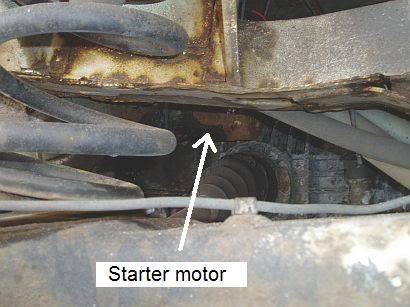
Lying under the van and looking upwards to see the starter motor:
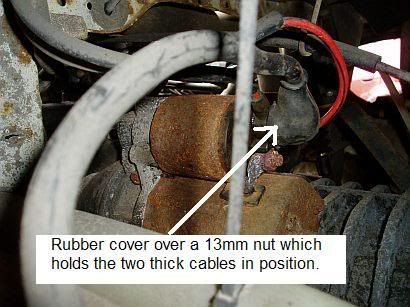
Having disconnected the negative lead from the battery, disconnect the wires from the starter motor. The thin red and black wire fastens onto a spade terminal by a plastic push-on / pull-off connector. The two thicker cables are removed by sliding the black rubber cover out of the way and then removing a 13mm nut with a ring spanner.
The starter motor is held in place by two nuts and bolts / studs; one in a lower position and one in an upper position
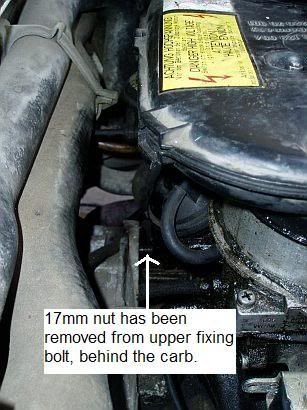
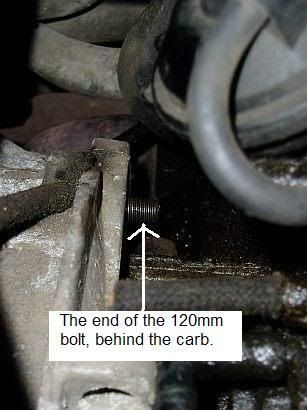
Upper fixing: a nut behind the carburetor, which is accessed from the engine bay, rather than lying under the van. 17mm ring spanner needed. This nut is on the end of a 120mm long bolt which you'll need to hold in position by using a 8mm allen key or hex key socket. Access to this end of the bolt is tricky.
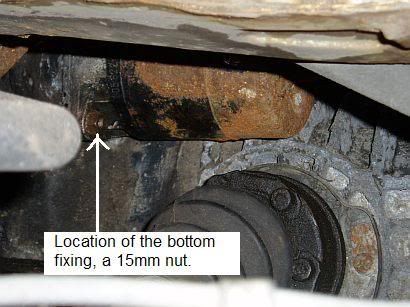
Lower fixing: a nut which is removed from the stud by using a 15mm ring spanner:
With these two nuts removed, the starter motor can then be removed and as you take it off, the 120mm bolt (the upper fixing) will come away with it.
To be continued!
N.B. when I'm talking about nuts being 13mm, 15mm etc, what I'm really referring to is the size of the spanner that I used to remove the nut! 
Posted: 03 Aug 2008, 17:15
by edoh
keep continuing!
really helpful information - plus photos! a gift - makes instant sense to fellow novices if you can see what your saying - thanks again for putting this information and visuals on the site -
Posted: 03 Aug 2008, 20:29
by hightower
Will be keeping my eye on this posting as started to do the same thing today to my van but only went as far as cleaning the electrical connections up before the heavens opened so never got as far as attempting to remove the starter. Will have a crack at checking the ground cable tomorrow after work if its not raining as doing the other cables has done nothing to sort out the problem, took 15 mins of patience before it finally turned over.
One question though, you say to disconnect the negative cable from the battery, should i also disconnect the negative from the leisure battery as this is grounded to the chassis too?
Posted: 03 Aug 2008, 20:48
by Nicola&Tony
hightower wrote: . . . should i also disconnect the negative from the leisure battery as this is grounded to the chassis too?
I can only answer this based on my own experience (because I really don't know much about electrics!
). I've been working on the starter motor etc most of this weekend and I didn't disconnect any leads from the leisure battery (just the -ve off the starter battery) and I haven't had any electric shocks. Also, there's no reference in the wiki to removing a lead off the leisure battery. Hopefully somebody who knows more about these things can provide a more technical answer?!
Tony
Posted: 03 Aug 2008, 21:52
by Nicola&Tony
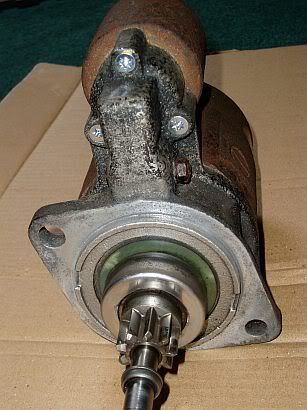
2nd stage: opening the solenoid.
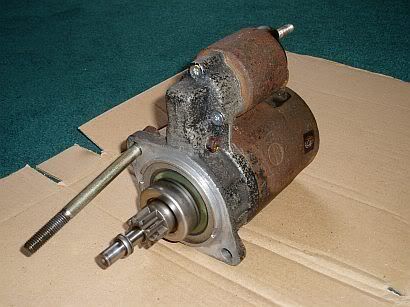
When the starter motor is removed, it looks like this (the 120mm top bolt is still in its position in the first photo):
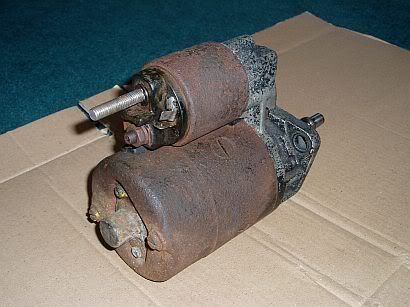
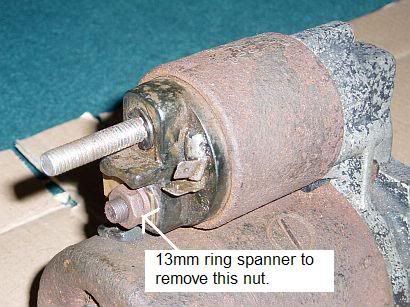
The top cylinder is the solenoid. There is a short metal strap
(E D I T: the positive lead that drives the starter motor - thanks Rozzo!) which is bolted onto one end of the solenoid. To remove the solenoid you first need to release one end of this lead, by removing the nut (13mm ring spanner) on the end of the solenoid and carefully easing the lead along the stud:
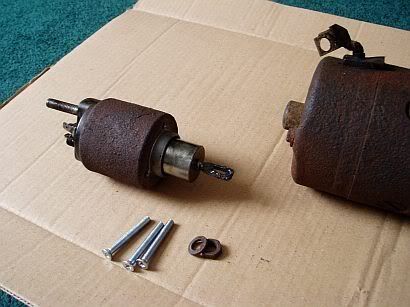
Moving to the opposite end of the solenoid, I found three bolts to remove and these were countersunk into the casing. This photo is taken after the event when the bolts had been replaced with new ones (M5 x 40mm) because the original ones were rusted in place and weren't going to move, despite the repeated use of Plusgas. I had to carefully drill into the head of each bolt and then use an "easyout" (stud extractor) to remove the bolts:
For more info on using easyouts:
https://club8090.co.uk/wiki/Te ... extractors" onclick="window.open(this.href);return false;
Once the positive lead is removed and the bolts are out, the solenoid will come apart:
Inside the solenoid is a plunger and a spring:
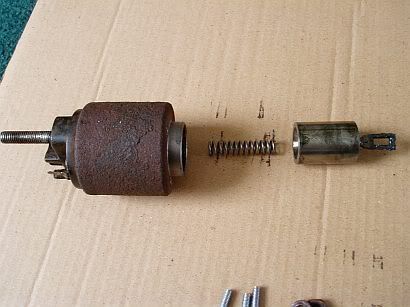
The plunger hooks onto this bar which is inside the end part where I'd just removed the three M5 bolts:
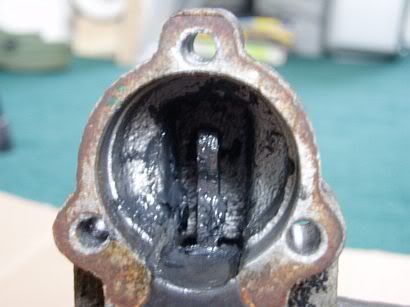
I greased the sides of the plunger, put the solenoid back together (hopefully having done what kevtherev was suggesting?) and fixed the positive lead back on again.
I'll try to post the final part of this tomorrow.
Tony
Posted: 03 Aug 2008, 22:28
by Rozzo
hi tone
great write up so far,, keep up the good work m8
one small error tho. it's not an earth strap but is in fact the positive lead that drives the starter motor. the battery lead goes directly to the other one on the solenoid, then the small wire on the spade connection supplies 12v to a coil(electro magnet) which pulls the solenoid internal parts over to short out the two connections on the solenoid,,,, which means the battery lead is then directly joined to the starter motor to turn the engine via the strap you mention.
i'm not nit picking tone but wanted to make that clear since if anyone decided to use that terminal as an earth for anything they would have a fire the very first time they tried to start the van

cheers m8 see you at rtth if you're going? if not see you at crabfest.
Posted: 04 Aug 2008, 06:22
by Nicola&Tony
Hi Rozzo, thanks for the info, that's a big help. Btw, do you know the answer to the question from hightower, about whether to disconnect a lead from the leisure battery as well before working on the starter motor
We'll not be at rtth but we'll be at v-b-t-o and crabfest (if the date falls right for us), it'll be great to see you again.
Tony

Posted: 04 Aug 2008, 06:36
by Nicola&Tony
Rozzo wrote:i'm not nit picking tone . . .
It was an important point you made Rozzo, and all help and info is gratefully accepted m8. I'm still trying to get me head round how all this stuff works! I'm a self-confessed, time-served novice!
Tony
Posted: 04 Aug 2008, 08:00
by ermie571
I have just reported this post...
Chaps....this needs wiki'ing....just the write up and phots?
its really good, with excellent photos!
Em
x
Thanks for taking the time to do piccies and explanations