Headlight relay upgrade info needed
Moderators: User administrators, Moderators
-
youthy giblets
- Registered user
- Posts: 129
- Joined: 21 Feb 2010, 21:15
- 80-90 Mem No: 0
Headlight relay upgrade info needed
Hi read on some old posts about modding wiring and relay to improve headlights and just wondering if anyone can give me some info on what to do. Currently on right hand drive square lights, great on full beam could be better on dipped. All help appreciated

Re: Headlight relay upgrade info needed
Have you checked the wiki?
2.1 LPG/Petrol Auto Caravelle
"The difference between genius and stupidity is that genius has its limits"
"The difference between genius and stupidity is that genius has its limits"
-
syncroandy

- Trader
- Posts: 1920
- Joined: 18 Oct 2005, 18:15
- 80-90 Mem No: 851
- Location: North Lancs. UK
- Contact:
Re: Headlight relay upgrade info needed
TBH the wiki isn't much help here. There are various opinions in there about how to do the upgrade, and several different diagrams. Most have drawbacks (dim-dip resistor, high-beam indicator). When I looked at doing the upgrade I came to the conclusion there is only one good way to do it, as mentioned by Glen in the wiki.
That is, to insert the relays into the main and high-beam wires between the switch and the relay plate. Only by doing this, do you retain the original fuses, and avoid the other problems. I also added a separate earth wire from each side back to the main earthing point next to the relay plate. 12v came from a spare terminal 30 on the back of the plate. I had the dash out anyway to do a brake servo upgrade to access was easy to do a couple of wiring jobs.

That is, to insert the relays into the main and high-beam wires between the switch and the relay plate. Only by doing this, do you retain the original fuses, and avoid the other problems. I also added a separate earth wire from each side back to the main earthing point next to the relay plate. 12v came from a spare terminal 30 on the back of the plate. I had the dash out anyway to do a brake servo upgrade to access was easy to do a couple of wiring jobs.
Syncrosport (taking a break as of summer 2024)
Volkswagen Transporter, reloaded.
252 GC5 EJ25 AAN L90D
Volkswagen Transporter, reloaded.
252 GC5 EJ25 AAN L90D
-
ghost123uk

- Registered user
- Posts: 6855
- Joined: 10 Mar 2006, 10:15
- 80-90 Mem No: 2585
- Location: John in Malpas, in the very S. W. part of Cheshire.
- Contact:
Re: Headlight relay upgrade info needed
On our 86 WBX I simply ran a heavy wire from the battery (heavy duty fuse holder at the battery @ 25 Amps), via gromets, under the van to a relay mounted behind the grill.
I then cut the main beam wires off the headlights and used one of them to trigger the relay.
I also added heavy wire from the earth spades on the headlights to earth.
This seems to work on our van, though I only bothered with 'relay'ing' the main beams.
I still have main beam indicator and I don't think ours has a dimmer fitted to the low beams, but as said, I did not alter that circuit anyway.
Obviously, other variations on T25 models headlight electrics may result in differing end results.
Got a new van, but it's a 165bhp T4 [shock horror] Accurate LPG Station map here
-
California Dreamin
- Registered user
- Posts: 2673
- Joined: 03 Apr 2007, 12:54
- 80-90 Mem No: 8386
- Location: Nottingham
Re: Headlight relay upgrade info needed
I've spent a little more time on this to include more detail specific to late 4 lamp T25/T3's
Hope it helps.
Main earth and feed wires need rating at 35amps...try to solder joints if you can (better electrical connection) I've redrawn this diagram so there is a seperate earth point both sides. Relays should be waterproofed if possible for longevity (mounted in a box or have a splash guard).
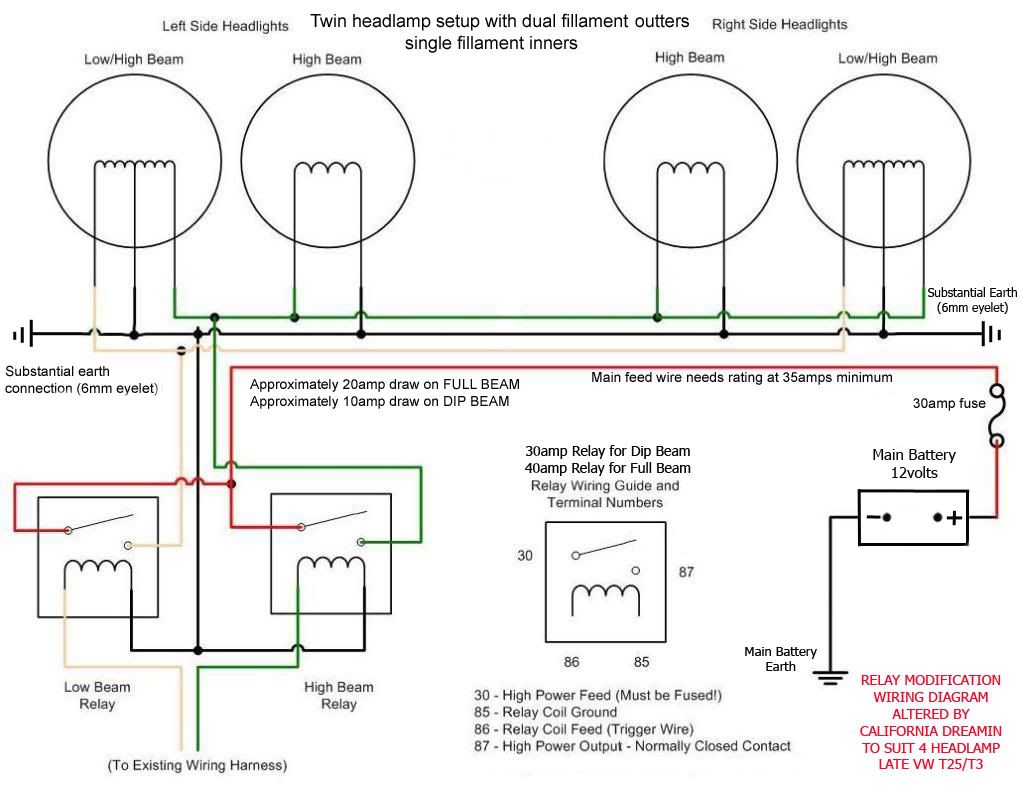
Martin
Hope it helps.
Main earth and feed wires need rating at 35amps...try to solder joints if you can (better electrical connection) I've redrawn this diagram so there is a seperate earth point both sides. Relays should be waterproofed if possible for longevity (mounted in a box or have a splash guard).
Martin
Last edited by California Dreamin on 07 Jan 2012, 10:44, edited 1 time in total.
1989 California 2.1MV
Re: Headlight relay upgrade info needed
syncroandy wrote:TBH the wiki isn't much help here. There are various opinions in there about how to do the upgrade, and several different diagrams. Most have drawbacks (dim-dip resistor, high-beam indicator). When I looked at doing the upgrade I came to the conclusion there is only one good way to do it, as mentioned by Glen in the wiki.
That is, to insert the relays into the main and high-beam wires between the switch and the relay plate. Only by doing this, do you retain the original fuses, and avoid the other problems. I also added a separate earth wire from each side back to the main earthing point next to the relay plate. 12v came from a spare terminal 30 on the back of the plate. I had the dash out anyway to do a brake servo upgrade to access was easy to do a couple of wiring jobs.
When I look at something like this picture it makes me think it's time for a cuppa lol
-
California Dreamin
- Registered user
- Posts: 2673
- Joined: 03 Apr 2007, 12:54
- 80-90 Mem No: 8386
- Location: Nottingham
Re: Headlight relay upgrade info needed
With reference to Syncroandy's comment....Glens/syncroandy's way is very neat and keeps everything dry inside the van, it uses the original fuses etc but it does have drawbacks:
. Use of the original wiring to the lamps (widely accepted as being just adequate) and the cause of some of the voltage drop.
. Taking the earth points back to the main earth crown (already old and loaded with other consumers as a sigle earthing point) much better to ignore this and have seperate short earth leads behind the lamps.
I accept that this simpler mod does address the main issue with a 'relay-less' circuit and voltage drop through the main stork switch but doesn't improve on the actual wiring to the lamps themselves.
On the other hand, the mod I recommend uses the original wiring only to 'switch' the NEW relays, so as long as the wiring to and from those relays is 'adequately rated' voltage drop is gauranteed to be kept to an absolute minimum...which is the whole point of the mod in the first place.
Both methods combined with better bulbs (Philips X-treme or Osram Nightbreaker Plus) will improve the lighting.
Martin
1989 California 2.1MV
-
scottbott
- Registered user
- Posts: 2497
- Joined: 07 Jan 2009, 20:36
- 80-90 Mem No: 6085
- Location: Old Somerby,Grantham
Re: Headlight relay upgrade info needed
their is a good posting on samba.com about this with a good description and photo's of how he did it
Nil carborundum illegitimi
-
Plasticman
- Trader
- Posts: 8085
- Joined: 12 Oct 2005, 20:55
- 80-90 Mem No: 1948
- Location: lincolnshire
Re: Headlight relay upgrade info needed
then put a linky to the samba one, some of us are very busy you know no time you know 
As califonia says the original is fit for switching the relays and thats all its good for, Im welding a pair of earth studs on mine and will do on the revs as it just makes total sense
mm
As califonia says the original is fit for switching the relays and thats all its good for, Im welding a pair of earth studs on mine and will do on the revs as it just makes total sense
mm
-
syncroandy
- Trader
- Posts: 1920
- Joined: 18 Oct 2005, 18:15
- 80-90 Mem No: 851
- Location: North Lancs. UK
- Contact:
Re: Headlight relay upgrade info needed
I think the std. earth crowns are fine if in good order. TBH if they're not, that should be sorted before anything else as the rest of the dash electrics relys on them ! Seems a bit odd to me to go overboard on the headlights and ignore the main electrics functioning well.
The std. harness, each bulb (main/high) has a 1.5mm wire which is is good for 15amps, and a 10amp fuse. I really can't see the point in fitting with super heavy guage wire far exceeding the capacity of the fuses. We're only talking about a few feet of wire and the voltage drop is going to be tiny..
The std. harness, each bulb (main/high) has a 1.5mm wire which is is good for 15amps, and a 10amp fuse. I really can't see the point in fitting with super heavy guage wire far exceeding the capacity of the fuses. We're only talking about a few feet of wire and the voltage drop is going to be tiny..
Syncrosport (taking a break as of summer 2024)
Volkswagen Transporter, reloaded.
252 GC5 EJ25 AAN L90D
Volkswagen Transporter, reloaded.
252 GC5 EJ25 AAN L90D
-
bigherb

- Registered user
- Posts: 2582
- Joined: 27 Mar 2008, 13:50
- 80-90 Mem No: 5789
- Location: West Kent
Re: Headlight relay upgrade info needed
Like sycroandy says nothing wrong with the original wiring it's quite capable of taking the current with negligable measured voltage drop. The voltage drop is through the light and dip switches and the fuse box although the earlier fuse box as long as the fuse connections are clean is better in this respect. My method is to fit three relays after the fusebox one for each dip beam and one for main beam with three seperate fused feeds so you don't lose all of your headlights if a fuse or relay fails (if you are on main beam then you can drop to dip beam and still have light)
1982 Camper 1970 1500 Beetle Various Skoda's, Ariel Arrow
-
California Dreamin
- Registered user
- Posts: 2673
- Joined: 03 Apr 2007, 12:54
- 80-90 Mem No: 8386
- Location: Nottingham
Re: Headlight relay upgrade info needed
Your modification sounds good but without seeing the details it's dificult to recommend it to others:
You say this method retains the original fuses but what exactly is being fused...the switching side of the relay or feed side? without the headlamp load the switching side only takes a fraction of an amp so should be fused accordingly and if the fuses are only protecting the switching side of the relay what is protecting the high current feed side to the lamps?.
insert the relays into the main and high-beam wires between the switch and the relay plate. Only by doing this, do you retain the original fuses
Also
Where is terminal 30 coming from, what is it feeding, is it being used by anything else, is it fused, what is the rating of the wire? rating of the fuse if it has one?.
12v came from a spare terminal 30 on the back of the plate
I'm sure this is not the case but taking an feed from a spare terminal and using it to power a circuit, one that is drawing 20amps, could create other problems if it is shared or not rated high enough. I not trying to trip you up here honest, just wondering if this is a better mod.
Martin
1989 California 2.1MV
-
syncroandy
- Trader
- Posts: 1920
- Joined: 18 Oct 2005, 18:15
- 80-90 Mem No: 851
- Location: North Lancs. UK
- Contact:
Re: Headlight relay upgrade info needed
Hi Martin, sorry maybe I should have been more explicit with details. I think what I've been saying makes more sense if the wiring diagram is referred to. I can upload a scan to my webspace if you like. (I used diagram no. 38 'Town driving lights (Great Britain only), from September 1986'.)
I used two 'number 53' 40A relays (one for main, one for high), together with mounting plates (161 937 501 B). The mounting plates use std. 1/4" barbed uninsulated brass crimp terminals. My van is base-spec, so a number of the single 1/4" terminals ('P') normally used for high-current accessories (aux. heaters and the like) are still available. These are on the back of the relay plate and commoned together onto the heavy terminal 30 bus-bar inside the plate, which has a 6mm connection to the battery, so should be good for a few amps !
I cut into the main and high beam wires (2.5mm yellow and white) coming from stalks about 4" from the relay plate, and soldered an additional 6" onto the end coming from the stalks, the join was insulated with heat-shrink tubing. This was connected to terminal 85 on the relays, and terminal 86 was connected to earth via a 1.5mm brown wire to the earth crown. (I had previously added another crown so had several spare connections.) I made a separate connection using about 6" of 2.5mm red wire from one of the P terminals to terminal 30 on each of the relays. The yellow and white wires going to the relay plate were connected to terminal 87 on each relay. As can be seen from the diagram, they then split into two inside the relay plate and each lamp has its own 10A fuse (no. 9,10,21,22).
This upgrade is intended only for standard spec (ie. legal) headlights, if high-power lamps, or a battery of spot-lamps have been fitted, I think a separate connections to the battery and to the lamps should be used. Also if the van has aux. heaters, aircon, headlight washers etc. then there may be no free 'P' terminals, and so a separate battery connection used.
All I've done is follow the scheme as I understand it used by many others, including some commercial kits. It's a long time since I did my Electronics HND, so it's entirely possible I got it wrong, but it works for me anyway !
HTH
Syncrosport (taking a break as of summer 2024)
Volkswagen Transporter, reloaded.
252 GC5 EJ25 AAN L90D
Volkswagen Transporter, reloaded.
252 GC5 EJ25 AAN L90D
-
axeman

- Registered user
- Posts: 1261
- Joined: 07 Feb 2009, 19:50
- 80-90 Mem No: 6410
- Location: Smeeth kent country side
Re: Headlight relay upgrade info needed
i have done my upgrade in a simular way to andy, but i used a separate relay for each main beam unit (one left and one right) and mounted them on the top of the fuse board using part no 135 937 501A, it's a small plastic relay mounting. i then cut the cut the out put wires (post fuse board) which feed the main beam and used these as my trigger for the relay. my reason fro this was that the whole circuit is still fused as per the factory spec. then i ran new looms in flexible conduit with 20amp wire, one for dip and one for main beam to the lights and replaced the crimps that fit in to the bulb holder, i then replaced my earth wires with the same grade of cable with a 6inch section of cable and secured this to the body with a pop rivit. as per any i have a basic spec van and there were several unused terminals on the rear of the board. one for each of the 4 relays which have there own fuse located on the side of them for the main incoming power (30 terminal). all terminals were soldered and were insulated with heat shrink.
from left to right on above my fuse board
1:left main beam
2:right main beam
3:high bean (both)
4:front fog lights (both)


neil
from left to right on above my fuse board
1:left main beam
2:right main beam
3:high bean (both)
4:front fog lights (both)
neil
1983 westy, 2.0 agg.
1990 single cab syncro 1.9 afn.
1990 single cab syncro 1.9 afn.
-
California Dreamin
- Registered user
- Posts: 2673
- Joined: 03 Apr 2007, 12:54
- 80-90 Mem No: 8386
- Location: Nottingham
Re: Headlight relay upgrade info needed
Syncroandy,  it's obvious you did your research....looks like a good alternative and very neatly done.
Martin
Martin
1989 California 2.1MV