Body Work and Glass Rust
What do peeps suggest would be the best way to stop the rot moving elsewhere?
HarryMann:
Dry everything out thoroughly - i.e. truck on blocks, wheels off and pull out all the plugs, scrape out muck where you can using fencing wire (round off ends with file). Vacuum, brush or blast out thoroughly and after a good few days dry weather, inject Waxoyl into closed sections. Must be dry (hot air gun?) and sections/crevices must not be full of debris/dust/damp crud - be thorough if you intend to keep the van/truck/camper.
But first read on... Anything you can see is a bit rusty or on the way but not yet critical, give a good heavy wire brush to remove dirt, rust and old paint or underseal. Paint Eastwoods Rust Encapsulator or similar on it - it works. £25/US quart or spray can (£16) - try starting with the straight paint, its quite thick, decant some into smaller tin to avoid contaminating original... throw small cheap brushes away (£1 shop type, a few long handled ones useful) - keep well ventilated in enclosed areas - if the smell is too much, get the hell out of it for 5 minutes, the fumes are not good! Can use spray can into enclosed or difficult sections. Can be thinned with lacquer thinners or Hammerite thinners (£4-50/250ml); a degrease spray and wipe is recommended (Pre); can be top-coated for toughness or appearance with Eastwood's Chassis Black or almost any hard finish paint; can be bought in black, silver or red - so there ya go! Read instructions on all tins and cans first - RustEncap is a 100% water, UV light and oxygen barrier.
Eastwoods products (US) from sole UK supplier Frost
Jenolite also make a rust stabiliser paint, like red lead paint that brushes similarly, your choice.
If you can get good access into sills and enclosed sections, do the RustEncap first, then Waxoyl on enclosed sections. I'm impressed with it, but there'll always be others recommending something else (POR15 for instance ;-)... but if it's a quick paint over, even if you can't get all the rust off easily, one thick coat, it's the biz! The main thing is to stop it getting worse, which it does e.g. if the areas around the jacking points look grim but you can't get them done properly for a year or so, attack fiercely, chipping heavy flakes off with a scraper, heavy wire brush, dry again once the area is opened up and can breathe, then on a good day, paint RustEncap on, stippling it in thickly everywhere you can (even the MOT inspector might be fooled?). Don't hesitate to go right through with rotary wire brush where mild/tame looking surface paint bubbles indicate rust underneath - if it can't breathe it will rust from inside out - don't kid yourself it won't get worse...
If it's structural cut it all out back to good metal (a good twistknot wire brush (£10) on a 110mm/4.5" angle grinder (an essential tool, £15~£35) is wicked for this, exposes anything that isn't solid, and to cutout straight sided shapes, those thin, 1mm, metalcutting discs for same grinder are excellent) - then get a similar thickness steel repair plate welded in (.7~ 8mm body or 1mm for thicker structural parts) - butting up is best rather than overlapping on surface body panels. Finish treat it really well, repairs often rust again quickly, so degrease and prime and paint well in good dry conditions and you'll be OK for a good few years!
If there's signs of rust bubbles along the seams, then wire brush to clean initially and then rip out the seam sealer and clean back to where the pitting stops on the panels (maybe 1" away or more) - use specially ground hacksaw blade or screwdriver to chip paint off (3m pad on a drill or shot blaster is better! dremmel can be used with the mini grinder wheel to remove sealant) until you find the extent of surface rust - then RustEncap deep into the seam and surrounds; others prime and use Tigerseal or a good polyurethane seam sealer - it'll come again though, sometime, unless you also attack from behind seams, really cleaning the joins out (twisted knot brush/scraper, remove underseal) and then dry thoroughly (hot air paint stripper on medium) and again, load the whole area up with RustEncap, forcing into gaps in seams.
Also, note what has rusted and why - nearly always it'll be closed sections that can't breathe or water getting in that can't get out, I always like to create a drain hole just in case, but that has to be rustproofed too, so think it through - i.e. stop underbody splashes getting in, but let it drain out.
Certain areas can be protected from splash/grit/stones abrasion and rust using corrugated plastic (those Estate Agent signs) stuck loosely with RTV or similar - they are easy to fabricate (big scissors/stanley knife), jam in and fix, to stop a vulnerable area being hammered by stones/water etc. Always allow a draining vent in case water gets behind - a good area to protect is behind the rear wheel, the snorkel boxes either side, they always seem to go on the front bottom corners, maybe all along the engine flitch panel/chassis rail join, clean and fill that area with sealant to stop water sitting there. Drill the centre of the snorkel boxes to drain (1/4" min) and protect from below with a small plate... if you've got a DJ with electrics in there, vital it's dry and well aired. Ditto plastic above the wheels under the seat, under the front door step treads etc. Angle them a bit so any water ingress can drain, check and clean out occasionally.
... you did say you wanted a project for the winter?
- NB. Never use a grinder or twist knot brush without heavy leather gloves, and for all rust removal under van, you must wear goggles or a full face mask, the latter is essential when grinding metal anyway (acrylic full face masks used for strimming are good, and can be had for about £12) - you can trust me on this, I'm NOT a doctor - you don't want even a mild eye injury, let alone a nasty one, it will destroy your enjoyment of driving, if not much more than that - the eye does not like dirty rusty metal even if it just plops into it gently, which it will under van - if it hits with force, you've had it!
HarryMann
cab step repair
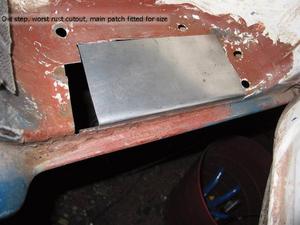
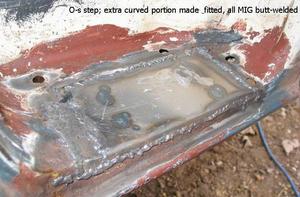
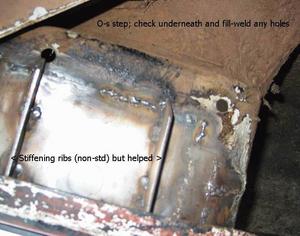
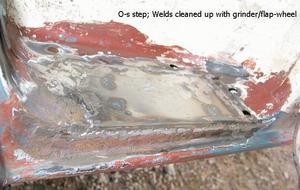
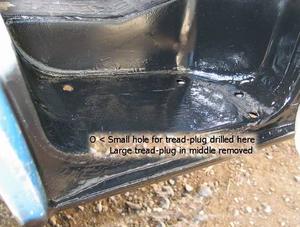
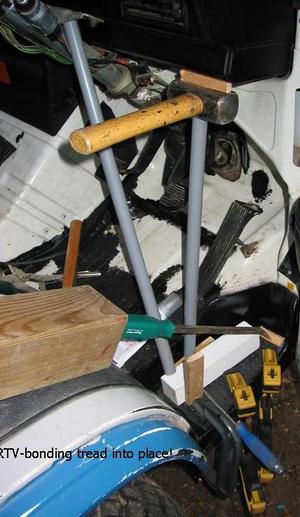
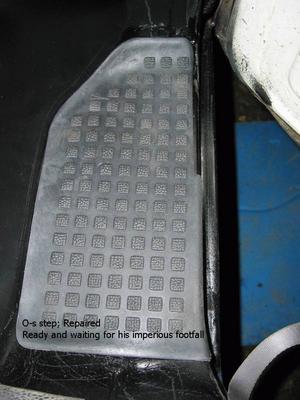
N.B. Proper cab step repair plates are available. Look to protect the underside from water/salt in the future e.g. plastic muck deflector, heavy underseal etc.
.
Internal panels I removed the backs off the units to expose the horrors behind, depends on the conversion but the backs weren't very well attatched on mine, also the trim panels could be unscrewed and bent back to get access. Initialy wire brushed the worst of it off, then possibly dremmel with mini angle grinder, then hoover out the rust dust. I then used clear waxoyl, I Used the aerosol and hand pumped versions depending on the difficulty of access, but I'm sure a compressor would be better. Check behind your fridge esp the vents, the voids bellow the rear vents in the engine bay, and remove the breather tanks in the front wheel arches and check behind, as these are notorious rot points (you may wish you'd never looked!)
Grumpy Midget
First, your never going to be able to eradicate rust, but you can delay its appearance, Mask out the seams your going to prepare with 2" masking tape,to prevent damage to surrounding painted area, keep it local sand blast seam with fine nozzle grit gun(very fine graphite) or a course sanding paper grade 120 wet/dry dust out with a brush, strip off masking tape that will have been damaged with preperation, Re/apply fresh masking tape to seams, apply your rust inhibiting gel, and refer to the instructions that apply to the use of the gel, (myself I would use a automotive rust inhibiting acid it penetrates better into the metal, on contact with rust it turns black in colour, Leave for 30mins and wash off with cold water, some specs on acid say use hot water, therefore always red the label) Blow dry wet area with either compressed air or heat gun ( Hair dryer will suffice). Do not sand or abrade after rust treatment there is a sealed film on the metal substrate after treatment, apply a build up of primer paint, when dry apply an automotive seam sealant down the seam joint, smooth with finger, before sealant dries remove masking tape and gently re/smooth edges of sealant to body panel, leave to cure (dry) Re-mask area to seams again then paint with your likle brush in your desired colour or spray with aerosol, flatten back painted edge with a cutting compound. as I said you cannot cure but can delay its appearance if any Mods wana put this in the wiki then you have my permission, Ex Co Employee Member of the SAAB 100 Club for paint spraying & refinishing