Camping Interior Fitting a split charger
Split charge 1
Split charge 2
Also See2 Link no longer active April 2011
Split charge 3
Wiring a split charge relay is pretty simple, the theory is that as soon as the alternator starts charging the relay links the leisure battery into the charging circuit so that it is charged in parallel with the main battery. When the engine is not running or is cranking the engine (important) then the two batteries are separated. This allows the leisure battery to be discharged while leaving the vehicle battery to start the engine. I have been asked why not just connect the relay to an ignition switched live (one which comes on with the key) and indeed I have done so in a Ford recovery van to charge a second battery for jump starting. The trouble is the T25 (T3) does not have an accessories position on it's key, the Ford did and this was disconnected when the engine was being cranked. If the leisure battery is not disconnected during cranking then a large load will be placed on the linking wires and the fuses (you will use fuses won't you?) will blow.
Enough theory, the wiring ....
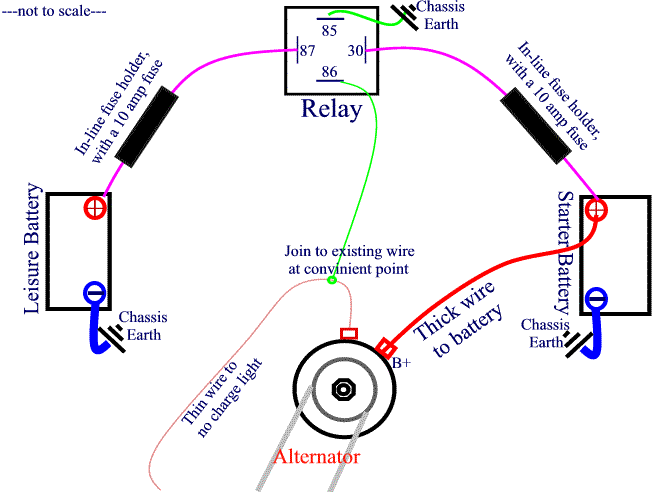
(diagram by Excalibur)
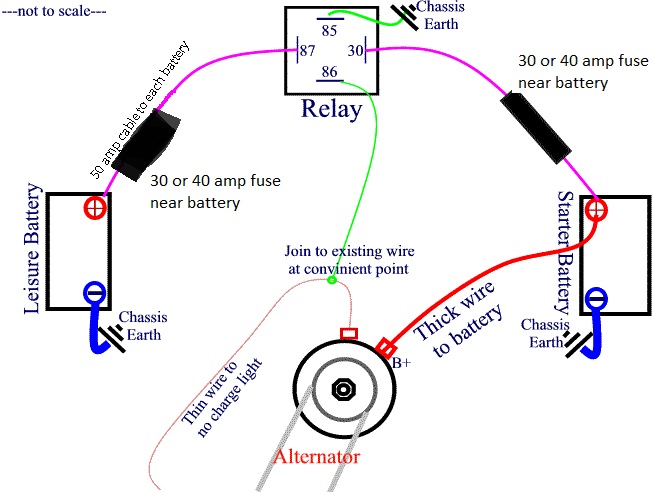
Alternative diagram by CaliforniaDreamin with upgraded wiring
The numbers on the relay are standard and any accessory relay of the type sold for spotlights etc will do, the fuse sizes should work fine (a bigger fuse will be OK but make sure the fuse is rated less than the wire), The 'thin wire to no charge light' on the T25 (T3) is blue and runs from the alternator, behind the fuse box to pin 11 on the multi-pin connector behind the dash. You can connect into it almost anywhere but I would recommend behind the fuse box if going for the front of the van as the multi-pin connector and the thick-film circuit it plugs into are quite delicate and best not disturbed if working OK. If you have a 12v fridge then it probably already has a relay wired like the one above and, if you can locate it, you can simply join to the wire feeding terminal 86 on that relay.
Excalibur:
... but use 35 amp fuses and 35 amp wires instead, and pick up the relay feed from the ignition instead of the warning light, as some alternators can burn out diodes if done the way in the diagram.......and make sure you use a 40amp relay. The 40A relay from Maplin
DiscoDave:
That is the chap! similarly a 30A one from Halfords for a few quid is also fine!
Voltage sensing relays
Horza:
[ Self-Switching_Combination_Relay £12 from towsure] will buy you a relay with some basic intelligence that will avoid an alternator connection for your split charger.
You can get, and I have one somewhere, a charging relay as used in caravan towbar fits. This black magic box takes 12v from any suitable place in the vehicle (big wires and appropriate fusing rcomended) and out puts 12v for battery charging when the engine is running without the need for it switching input from the alternator or the ignition.
I don't know how it works (that would be the magic bit) but I do know it does (I tested it). You might want to have a look next time your at the scrappys. Look for the giveaway twin plugs next to the towbar that marks out caravan tow cars.
The one I have is this:-
Smartcom google search [1]
It shouldn't be that hard for me to spot as it's bright orange. I think it's 30a with 2 outputs that are only live with the engine running (fridge and battery) and one always on output (it's for running your lights and stuff from the car battery while parked up, daft eh?) £10, bargain?
Or also this:-
Split charge relay from Western Towing
You have to scroll down to find it - 3rd from bottom on right - labelled as: Split charge relay (ELSCR1)
It's also a 30A unit, still auto sensing, same outputs but tasteful black. £12.87 and a bit harder to find in the rear light cluster of a crash damaged Carlton due to it's stealth looks.
[2] Durite 140 Amp Voltage sensing relay, very neat around £40
Split charge relays explained
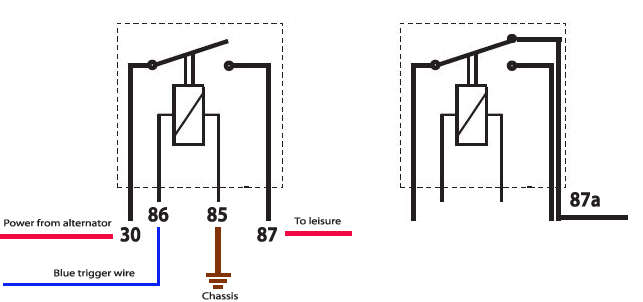
Covkid: Relays can be a bit of a mystery for anyone unfamiliar with electrics but actually, they're very simple. The diagram below shows what the relay does and how it all works. Basically the relay is a small switch (86/85), switching a bigger one (30/87) but the two circuits not electrically connected. Once 86/85 go live with voltage through blue trigger wire, the switch at top pulls down, allowing power to flow through contacts 30/87 - heavy cable from alternator to leisure battery. Turn off engine and relays switch goes off, isolating leisure battery from charging circuit.
Second diagram (5 pin relay) shows an extra terminal - 87a. This is only connected when the alternator is not charging. This is often used to connect something like a small trickle charge solar panel to top up the battery on sunny days.
There are all kinds of relays but essentially this is what it does. Higher rated relays have better contacts for 30/87 - simples.
Headlamp relays? They use the original power cable that goes to bulb to energise 86/85 instead whilst a new heavier gauge wire is used for headlight via 30/87. That means the headlight switch no longer carries heavy current with potential for burnt contacts and headlights get a much better route to the power source. Anyone that does not have the relay upgrade on their own camper should consider it. The T25 is notorious for a voltage drop on headlamps and even without fitting better bulbs, the relays transform the output of even standard headlights. See http://wiki.club8090.co.uk/index.php/VW_Electrics_Upgrading_headlights
The solenoid on the starter is also a relay. Without it you'd need a giant buzz bar on the dash like something from a Frankenstein movie just to start the camper. Modern cars may have many such relays and when you add new accessories (say a powerful horn) you'll need another relay. Its all about current draw.
Fridge
To wire a 12volt fridge use exactly the same circuit but replace the leisure battery with the fridge in the diagram above and check the current drawn by the fridge for wire sizes and fuse ratings. The same 'sense' wire (the blue one) can operate both relays comfortably (mine has been like that for two years at time of writing).
Finally at all costs be safe, although 12v wont give you a shock the current produced by a battery will easily set fire to the wiring if allowed to 'short', make sure all connections are insulated, mount the relay on something solid and make all connections securly, in order of preferance solder, terminal strip or crimp, don't use scotchloks and always fit the fuses.
Tip for finding the "multi-pin connector"
The connector you want is plain white and sits up underneath the dash, close to the steering column and behind the clocks - nowhere near the fusebox. The connector is best found by turning oneself upside down with your head in the footwell and then looking up - it disconnects with a careful pull. The connector has some very small numbers on it - you need to find the blue wire from number 11 and join your relay to this You can test if you have the right wire by disconnecting the blue wire from terminal 11 and then seeing if the red 'no charge' light ( on the dash) still comes on when you first start the engine - with the correct blue wire disconnected the light shouldn't come on at all. Just make sure that you reconnect the wire back into number 11 when you've finished or you'll spend hours wondering why the no charge light has stopped working - don't ask me how I know this!.


