Page 1 of 1
Front spring replacement
Posted: 11 Jun 2019, 19:05
by mbcamper
Just got an unexpected failure point on my MOT test today - a broken front spring!
Just seeking information on how nasty this job is to do. Looking at the Haynes manual it says you need to remove the complete track control arm! Looks like a big job. Any tips on this job?
I own a couple of spring compressors which I've used on other cars.
Re: Front spring replacement
Posted: 11 Jun 2019, 23:04
by crazyhorse
Good little vid here that gives you a small idea of work involved. Doesnt look too bad..... maybe
Good luck
https://vimeo.com/130005538" onclick="window.open(this.href);return false;
Re: Front spring replacement
Posted: 12 Jun 2019, 05:25
by slowcoach
Just be wary of how meaty the spring compressors are. Smaller ones meant for cars can bend a bit !
Re: Front spring replacement
Posted: 12 Jun 2019, 09:29
by T3luestar

Had the same situation myself after last year's MOT, wasn't too bad of a job, didn't have the need for spring compressors. Ended up doing all four!
Re: Front spring replacement
Posted: 12 Jun 2019, 19:00
by mbcamper
Thanks for replies. I've ordered springs from Brickwerks and they advised unbolting the track control arm to extract and refit the springs.
I'll post some pictures of how I end up doing it for future reference.
Re: Front spring replacement
Posted: 13 Jun 2019, 06:04
by silverbullet
Dont use spring compressors, you cant get them in there or properly spaced to be anything like safe.
Raise van, support properly on stands, remove front wheel. Support lower suspension arm and remove inner pivot bolt and then drop the arm using a decent sized trolley jack.
Replace spring.
Sent from my S60 using Tapatalk
Re: Front spring replacement
Posted: 17 Jun 2019, 19:39
by mbcamper
Well I've done it! 2 Springs replaced and it took about a day in total - quite a long day!
Highlights are:
Jacking up and securing on axle stands - well almost, but I think my solution is safer:

The shock absorber needs to be remove first.

With most of the nuts I removed they required a bit of heat to release them:

It was then a case of releasing the drop link from the anti roll bar and I undid the outer nut on the radius arm.
You can then undo the track control arm bolt with a jack underneath and lower the arm down. With a bit of wiggling of the arm slowed the spring to be released safely. I didn't get any pictures of releasing it, but you can see my raising the arm once more having got the new spring in:

I have to confess that I did use spring compressors to get the new springs in, but only a little pressure was needed.
New springs on both sides now installed and MOT ticket issued:
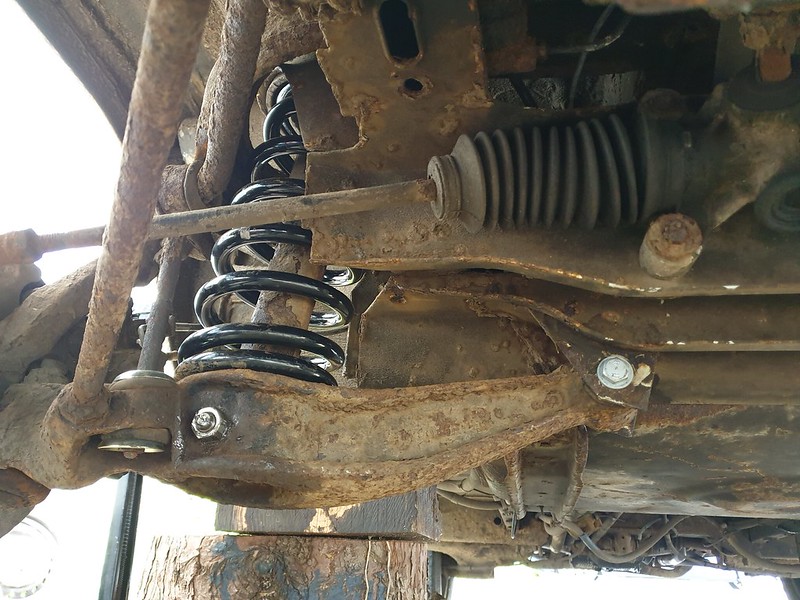
Not an easy task, but with the aid of 2 couple of trolley jacks, breaker bars, a good torque wrench, and a little assistance from a spring compressor (might be able to do it without) I managed it.
Re: Front spring replacement
Posted: 17 Jun 2019, 21:53
by T3luestar
Well done, top work.
(But) Looks like the metal cup washer is upside down on the drop link bush.

Re: Front spring replacement
Posted: 18 Jun 2019, 05:05
by mbcamper
Yes well spotted! It was intentional as the old ones rotted as they filled with water and mud. This way round I thought they would drain and last longer.
Hopefully not a bad modification. Can always correct it.
Re: Front spring replacement
Posted: 18 Jun 2019, 09:43
by RogerT
I think the theory is that with the washer curved away from the rubber, there’s somewhere for the rubber to squidge out of the way on compression, allowing the connection to take advantage of rubber’s flexibility.
Re: Front spring replacement
Posted: 18 Jun 2019, 10:06
by tobydog
As it is, the square/sharp edge of the washer could cut into the rubber bush.
