cleagarr wrote:ghost123uk wrote:
Also note this =
ghost123uk wrote:The instructions that come with that one are not very clear in my opinion. If anyone needs any help with this, just ask, don't guess, or smoke might result

Instructions? I have the box but nothing else...
John could you advise how to connect this? I have two 110ah batteries in parallel.
Hi Chris, Firstly, take care with wiring this. If you are at all not sure, please post back, don't guess !
Here is a link to their webpage =
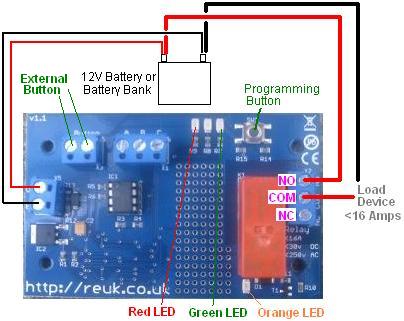
CLICK HERE (I hope that providing that link means I can put up their picture

)
Get your printer switched on and print out the relevant bits from that webpage
OK, so your 2 batteries are in parallel, so just treat them as if they are just one big battery.
1 = The wires that come from the battery to the left hand side in the picture do NOT have to be thick ones. In fact the black earth wire can just be a short bit of wire connected to a nearby clean bit of metalwork on the body, or you can go to the -ve on the battery if it is close.
2 = The wires that comes from the right hand side of the pic need to be thick enough to handle whatever load you have, but they do NOT have to handle the (high) charging currents. So if you have say a TV, Propex, and some lights, then something around 10 amps would be fine. Of course you should always fit a fuse rated at a bit less than the cable, on the red wire that comes from the battery and goes to the terminal marked "NO" (= Normally Open) on the blue box. Put the fuse close to the battery terminal. See note in number "4" below re the black wire.
3 = The wire that comes from the terminal marked "com" (= "common") should be red and the same size as the wire from the battery on the adjacent terminal. This wire is the "feed" to all of your "loads" (TV lights etc). This can be simply spliced into the existing feeds, or often does so via a small, cheap, fused distribution box (Ebay).
4 = Note that the thicker black wire shown coming from the battery to the right hand side of the picture is actually just an earth (to the body). Normally this is a short length of wire from the -ve terminal to "earth" and should be a proper earth strap or similar as this DOES have to conduct the quite high charging currents.
So, your "load's" are earthed to a convenient bit of bodywork near to them (no need to run long earth wires around the van, just find a suitable nearby place to earth them
) Then the wire as in number "3" above feeds the live 12 volts to all your camping accessories.
Take your time with the "programming" using the red push button on the top. The table of "how to" is on that website link above. I suggest a disconnect voltage of 12 volts is a safe option to look after your batteries, and a re-connect voltage of 13.2 volts is about right. I also suggest you double check your settings by going through the procedure but not altering what you previously set, just count the LED flashes and compare them to the table (print it out!
) Also, make a note on a scrap of paper of what settings you chose and put it inside the little blue box for future reference.
One last thing, remember that when you fire up the engine, it takes about 2 minutes before the unit re-connects to the leisure battery (because of a thing called hysteresis, but we won't go into that right now !)
This looks like a long "how to" but it likely took longer to write than to actually do !
Once set up, your leisure battery should last for a good few years

Any questions, just ask on here, don't guess !