Page 4 of 7
Re: Brake Parts
Posted: 13 Feb 2015, 17:11
by CovKid
No needf for VHT paint (although you could). The ALDI stuff being sold for £2.99 a can is excellent. Paint hardens and bakes over time. Does the job. Clean with thinners first as they tend to come waxed.
E D I T: Sprayed mine red (seems popular choice) this evening. Picked them up today - £20 each plus the VAT
Re: Brake Parts
Posted: 14 Feb 2015, 08:43
by California Dreamin
Pictures look good...my only concern is how oily the back plate is at the bottom, you don't want any of this ending up on the new brake shoes.....
Martin
Re: Brake Parts
Posted: 14 Feb 2015, 09:34
by CovKid
Light coating of oil no bad thing in terms of corrosion, as long as the source has been stopped. More likely to be where they've been cleaned down though. I did mine with vactan last time so should be interesting to see how well its held up. I painted the rusty bolt on a gate with vactan and nothing else and it still looks good 6 years later.
Agree with Martin though - make sure its clean and dry beneath brake shoes.
Re: Brake Parts
Posted: 14 Feb 2015, 11:22
by BertieWells
Thanks guys, the rear brakes are back together now i just need to sort out the adjuster as the handbrake comes up very high. Am i right in thinking if i pump the hand brake the adjuster will work automatically? Ill give it another good clean when i do that. The amount of gunk in there was scary! Will get onto the front next week. Whats a good way to get a rounded bleed screw out of the front caliper? Mole Grips?
Regards
Rob
Re: Brake Parts
Posted: 14 Feb 2015, 11:38
by kevtherev
No you need to turn the wheel in the drum
Re: Brake Parts
Posted: 14 Feb 2015, 12:12
by CovKid
Plusgas, followed by molpegrips to start with yes - then 7mm. Unfortunately if you use a 7mm round spanner on them to start with, they nearly always round off. Bleed nipples are a bit of a weak point. One of mine wouldn't budge but I bled from hose last time with no ill-effects.
Re: Brake Parts
Posted: 14 Feb 2015, 12:30
by BertieWells
Thanks kev, what is the point of the little catch on the spring then? Just to stop it of unwinding?
Thanks covKid will give it a go

is
this the stuff?
Re: Brake Parts
Posted: 14 Feb 2015, 12:44
by CovKid
Yep. Forget WD40, its not as good - does a different job entirely.
Worth painting drums if you have the time.
Re: Brake Parts
Posted: 14 Feb 2015, 14:49
by what2do
kevtherev wrote:No you need to turn the wheel in the drum
Would be interesting to see what tools people have adapted to make this job a little easier. Can you still get grommets for blocking the holes where you do the adjustment from?
Re: Brake Parts
Posted: 14 Feb 2015, 16:35
by bigherb
what2d wrote:
Would be interesting to see what tools people have adapted to make this job a little easier. Can you still get grommets for blocking the holes where you do the adjustment from?
Yes you can still get the grommets.
The universal bent screwdriver, like the VW adjusting tool.
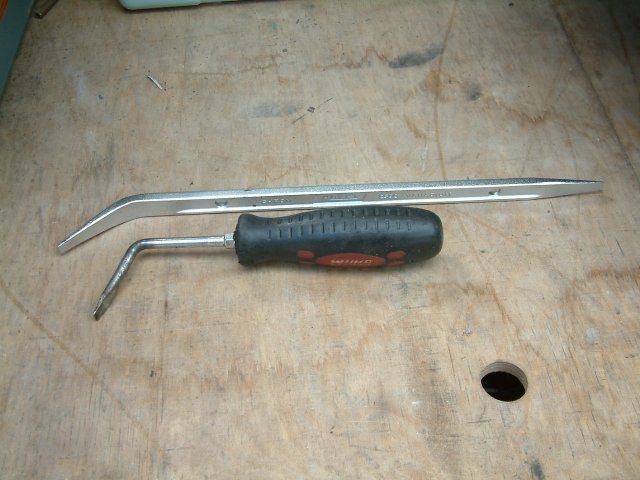
Doubles as the rocker cover removal and installation tool.
Re: Brake Parts
Posted: 14 Feb 2015, 17:08
by CovKid
Bent screwdriver the one. Had the same one for 25 years. Comes in handy. As does a short length of metal tubing that can slip over a spanner.
Drums painted. Visually unimportant unless you have alloys but makes them more pleasant to handle in subsequent years. They start rusting from the word go otherwise:
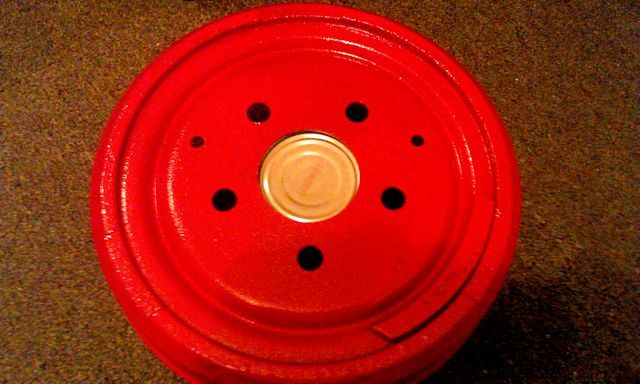
Would never have bothered on a customers brake drum (unless they themselves did it) but always do on my own. Not forgetting groove on the back - helps dispel water to some extent.
Re: Brake Parts
Posted: 14 Feb 2015, 18:13
by BertieWells
Is that just any antirust type paint?
Re: Brake Parts
Posted: 14 Feb 2015, 18:18
by CovKid
Yep. Best as spray (too much messing with a brush, plus it drips). ALDI are doing some at mo for £2.99 a can. Red usually goes fast but should be some black/grey/blue left. Its the can with the wrought iron gate on.
Easiest way to do them is use a carboard box with one side removed, stand the drum on a tin can and rotate to get all the way around using light coats each time, allowing to dry. The box minimises spray going everywhere. Once dry, flip over and do the groove. You can do inside face if you like but avoid shoe contact area.Takes about 24 hours to fully go off. For £3 and a bit of time, it keeps them looking tidy - usually until drums need replacing again..
Re: Brake Parts
Posted: 15 Feb 2015, 23:24
by California Dreamin
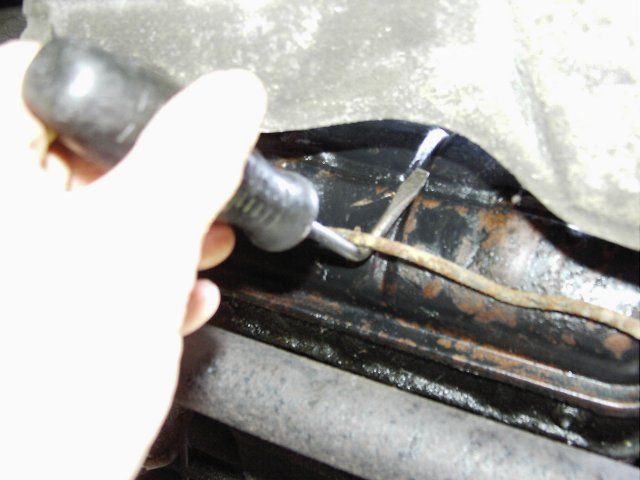
Getting back to adjusting the drums:
Yes they MUST 'initially' be manually adjusted through the 'centre' hole in the back plate.
If you have an old 'shortish' flat blade screwdriver that you can afford to 'modify' in a vice (30 degree bend 2 inches or so from the end)
Adjusting: one way you will hear 'clicking' as the adjuster naturally rides over the one way ratchet paw...as shoes get closer to the drums.
The other direction: you will hear a 'loud bonging' as the paw is forced 'against the natural direction' of the mechanism...de-adjusting for clearance.
So click, click, click...until the drum goes tight.
and then
Bong, bong, bong...until the drum freely rotates.....you need a slight clearance as major binding will cause the brakes to overheat.
Once 'manually adjusted' the ratchet mechanism is designed to adjust the balance bar as the shoes wear....however, in reality I suggest a manual re-adjustment after a thousand miles or so and then every 10K thereafter.
Don't forget...the manual adjustment process must only be done with the handbrake cables 'slack' to ensure the levers on the shoes are all the way back to their 'rest position'.
Martin
Re: Brake Parts
Posted: 15 Feb 2015, 23:29
by CovKid
Best description ever Martin - click, click, click...Bong, bong, bong. I believe its in the official VAG manual. He's right though.

