Page 3 of 4
Re: 1Z Tdi install photo diary
Posted: 13 May 2012, 12:11
by futbus
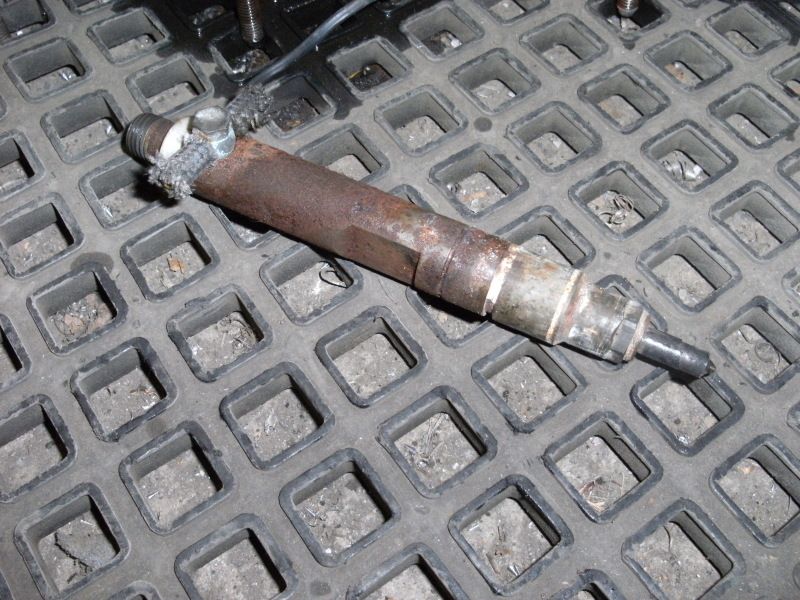
Had another go at the injectors yesterday morning, we had a bloody great big slide hammer,and even with that we only managed to move one injector about 3mm. But this is progress and have sprayed some more magic stuff on them to hopefully loosen the alloy corrosion. If this dont work then the whole head may get a soak in vinegar. Few other options after that as really dont think the misses would be to happy if I bring the head home and cook it in the oven. Dont really want to put too much local heat due to metal expansion. Hope to get these out next week as want to get on with stripping the head and start on the rebuilding with everything clean and new.
Re: 1Z Tdi install photo diary
Posted: 13 May 2012, 14:49
by max and caddy
...its not local heat you need, heat the whole thing up with one of them space heater rocket things, just hot, not melting point as if it was a hot engine maybe 100 degrees, that might just allow the ally to expand and lose its grip on the less expansive (and expensive) steel injectors...i have had some very stuck ones in the past on a cold engine, given up and refitted everthing, blasted up the road and then suceeded with hot head (the car,not me)
The missus would love it, get it nice and smokey in the kithcen then run into the front room and start slide hammering it on rug.. (the head, not the missus!)

Re: 1Z Tdi install photo diary
Posted: 13 May 2012, 21:38
by phil miller
Wow what a thread, great work, can i ask afew questions tho, first up, the flywheel, is it the golf item you mod? if so how much does it cost to have done? Ive just got a diesel T25 (no engine tho

) i wanna fit a 1Z or AHU can you supply all the parts needed for this? sorry to be a pain
Re: 1Z Tdi install photo diary
Posted: 16 May 2012, 19:38
by futbus
Still not alot of spare time to work on this but just before coming home we attacked the injectors again with success

One of the injectors No 3 decided to give up and come quietly, but there are 2 still left in the head, but put some more `stuff` on them, so maybe have another go in a couple of days.
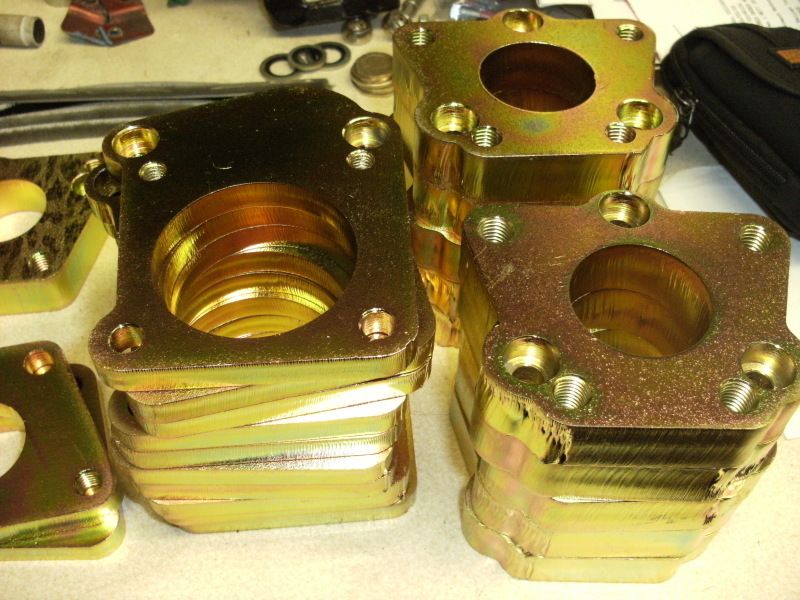
Some parts back from the platers finally today (Alex a set will be off to you this week) for the tdi turbo to fit the JX manifold.
Re: 1Z Tdi install photo diary
Posted: 16 May 2012, 20:34
by jamesc76
Pour some brake fluid (best) or diesel on um works a treat for getting um out!
Re: 1Z Tdi install photo diary
Posted: 16 May 2012, 23:07
by max and caddy
Shiny things!

still not tryed the hot headed approach dave? what is the "stuff" your using? never used plus gas untill the other week but gotta say it does seem to work...but if the corrosion fuzz has built up nowt is going to be able to get past it to free it up..that injector looks dry at the bottom still too...i have had fun with rusty bolts on jet skis in the past and never yet found anything that can get soaked into the white alloy corrosion fully.
Re: 1Z Tdi install photo diary
Posted: 17 May 2012, 00:46
by Iceworx
Are they 4 stud to 3stud adapter plates I spy there?
If so how much are they?
thanks
Chris
Re: 1Z Tdi install photo diary
Posted: 17 May 2012, 06:56
by futbus
Hi Chris, Yes as earlier pics show the adapters from the 3 stud tdi turbo that can be bolted upto the JX exhaust manifold, and the adapter for the exhaust side of the turbo for the exhaust down pipe. The idea is that you can use the tdi turbo from the donor engine and the standard JX parts from the original engine, keeping parts availability standard. We will be putting these onto our webshop soon, see
http://www.vwbuses.co.uk" onclick="window.open(this.href);return false; for more info.
Re: 1Z Tdi install photo diary
Posted: 17 May 2012, 10:05
by mm289
Re siezed components, try a 50:50 mix of acetone (nail varnish remover if you are that way inclined

) and auto trans fluid.
Works wonders as a penetrant/lubricant, slightly better than plus gas.
Cheers,
MM
Re: 1Z Tdi install photo diary
Posted: 17 May 2012, 18:19
by Roving Rich
Hey Dave great thread.
I have a Tdi fitted (badly ? DIY by previous owner) when I bought my bus. I know very little about what makes it tick, so am watching with interest.
Mine seems to breathe oil through the intercooler pipes, hunts on idle, coughs occasionaly on a long run. But is otherwise Fantastic ! Fuel economy is great, way better than my 20 year newer vito.
To add my 2ps worth to the stuck injector problem. (Vitos suffer from it badly)
Have you considered freezing the injectors themselves ? I use a CO2 pipe freezer at work which will take em down to -30C ish ? So shrink them in the bores and hopefully free them off. No danger of warping the head then. Pipe freezer easily hired from a hire shop, worth a shot.
Or just leave the whole lot soaking in a bath of diesel.
Thanks for the thread
Rich
Re: 1Z Tdi install photo diary
Posted: 28 Apr 2016, 22:21
by Bazza41
What happens to the rest of this diary. Did u finish it ?
Re: 1Z Tdi install photo diary
Posted: 28 Apr 2016, 22:30
by R0B
Its a four year old thread mate.And considering its not been updated,i think its fair to say he did not finish it.IIRC the OP fell out with us.
Re: 1Z Tdi install photo diary
Posted: 29 Apr 2016, 04:12
by Titus A Duxass
R0B wrote:.IIRC the OP fell out with us.
IIRC he fell out with everybody.
Re: 1Z Tdi install photo diary
Posted: 01 May 2016, 17:50
by Bigjcc55
That's a shame I was just getting into it

Re: 1Z Tdi install photo diary
Posted: 01 May 2016, 18:03
by silverbullet
You wont see him for dust these days...
Sent from my ZX81 with 16k RAM expansion pack