Page 2 of 3

Re: On the road at last !

Posted: 21 Apr 2012, 20:38
by dirty-syncro-lover
growing up with a syncro is truly FUN, i can tell you, your family will alway's remember that van.

wish i knew where my dad's old one was now and who's got it?

Re: On the road at last !

Posted: 22 Apr 2012, 17:07
by Roving Rich
Yeah Lily loves it already. I'm hoping we will get to see alot more of the world, and have plenty of adventures to remember.

Cheers
Rich

Welding, welding and more welding....

Posted: 10 Jun 2012, 20:42
by Roving Rich
Well improvements have been continuing...
I started at the front steps, cos they bug me every time i get in and out and embarrass me when carrying passengers. Plus I figured its a the least visible place to practice my welding.
So clean em up...

Image

make a plate...

Image

Image

Mark it up an cut it out. No going back now....

Image

Image

Image

then its just a case of welding it in...

Image

Then lots of cleaning it back, finding numerous pinholes, welding, grinding, small holes getting bigger....got there eventually tho.

Re: On the road at last !

Posted: 10 Jun 2012, 22:29
by Roving Rich
Next was the the window, I have pondered over it for a long time, not feeling quite brave enough to tackle it. It was suggested that I replace the whole frame with a genuine caravelle frame and window. But that isnt gonna work for the back two. So after much deliberation I figured I had better do something about before the widow drops out ! I will need to sort it again no doubt when i get an opening window.

Mmmm crusty

Image

Mark a line, so I have something to work once cut out.

Image

I started with the corners, mainly as I didn't have a piece of metal long enough do it all in one go. Turned out to be a cunning plan :D

Image

Image

cleaned up a treat

Image

So doing the corners first allowed me to drop the middle section in. My inability to cut a straight line meant it wasn't a perfect fit. But running the grinder between top and bottom meant they lined up perfectly and i just dropped it all down 1mm.

Image

One little patch where the rust had crept round the corner. Fortunately most of the rust was on the straight section. So I avoided having to make the difficult radius section. Phew.

Now someone said a skim of filler to hide any blemishes and job done. What freakin nightmare ! That took longer than all the welding. Seems filler is complete crap.
Fine for filling dents, or hiding rust holes, but not for finishing off a decent repair. It took ages to sand it back, and I lost patience and attacked it with the sander, making a hole in the metalwork, so back to the welder, hole gets bigger.....doh. I should know better, cut a small plate and weld it in, but no, go round and round filling it up with welding wire. Then grind it back. A shame as i was pleased with the rest of the job.
Watching those hot rod cars on the telly, they cover the whole car in a thin layer of filler and smooth it back.Not with the gloop filler I had. Hours of internet trawling later. I plumped for Upol stopper instead of filler. I thought stopper was to stop pains from reacting to one another. But it arrives in a tin, just like filler. So gave it a go and it goes on smooth. A nice thin even coat and easy to sand. Result. Just what I needed.
Figured I'd finish sorting the seams out, and give the whole side a coat of paint.
So try and get rid of the black mess on the lower quarter. This is where I probably loose all the nice galvanised base layer VW put on :? Still I wanted to know what it was hiding. Just a badly fitted sill as it happened. No filler yay. Just rippled metal boo.

Image

Image

So hours and hours of sanding later I was running out of time and good weather. Needed to get the van back together to venture down to Gloucestershire and deep into the woods to teach Boy Scouts survival and bushcraft for the long weekend.
She who must be obeyed was off to Yoga for the evening, so it was slap a coat of paint on in the fading light. :x Had to be done .
Next evening was Maths night at my daughters school, so quickly stick a window before, then another one after - in the dark with a torch.
Glad I took it to the woods tho :pimp

Technology failure, more to follow.

Cheers
Rich


it all got a bit frantic. As all my work has to take place on the drive so is weather dependent.

Syncro Ambulance ?

Posted: 14 Jun 2012, 21:04
by Roving Rich
So slapped a coat of paint on, stuck the windows back into a headed off in the sunshine down to Gloucestershire to teach the boyscouts how to survive.
We were deep in the woods. It was fun convoying in from the pub in the dark, a motley collection of 4x4s, only they had all arrived in daylight and new what to expect. :o
Err it rained, then it rained some more, about 24 hours later it stopped. Well for a bit, then it rained some more.

Image

Image

Landrovers tried to reach us, but failed. Soggy kids looked on dispondantly as the landrover slipped sideways, time and again, opposite corner wheels spinning.
Would we ever get back out of here ?

Image

Image

Well it turned out we had to. Late Sunday night a bedraggled pair of Scouts came wheezing into camp. They had been a problem all weekend. Badly pitched hammock and tarp, no dry firewood, and failed to keep there fire going. So that had not eaten again. Turns out they had not eaten since friday, nor had they slept much in their shoddy camp. Now one of them was having an Asthma attack (supposedly) but his inhaler was not doing anything to ease it. My Mate Mark is a "first responder" so had all the gear, oxygen, de fib machine the lot. He kept an eye monitering oxygen levels, heart rate blah blah. Eventually He decided that it was time to evacuate him. :shock:
So who did they pick as the designated driver muggins ! So I haven't been out of the woods for days since it started raining, I had seen landrovers try and fail. Now it was dark and an emergency and the inside of my van had more crap in it than the shed. I quick tidy up, hide everything under the RnR bed :D and head off into the storm.
Steady as she goes, rear diff lock engaged (yay instant light) and we trundle carefully the few treacherous miles out of the woods. My eyes were like saucers, windsceen wipers clacking, muscles tense, but actually it was no bother atall. We drove straight out to the emergency services, where we met a whole load of other scouts wrapped up in mylar blankets with hot water bottled being force fed hot soup. Hung around a while handing him over and trundled back in again. No trouble. Landrovers Pah ! :pimp :pimp

Cheers
Rich

The Chamber of Secrets..

Posted: 14 Jun 2012, 21:57
by Roving Rich
So onto the next bit of welding.Well felt more like archaeology actually.
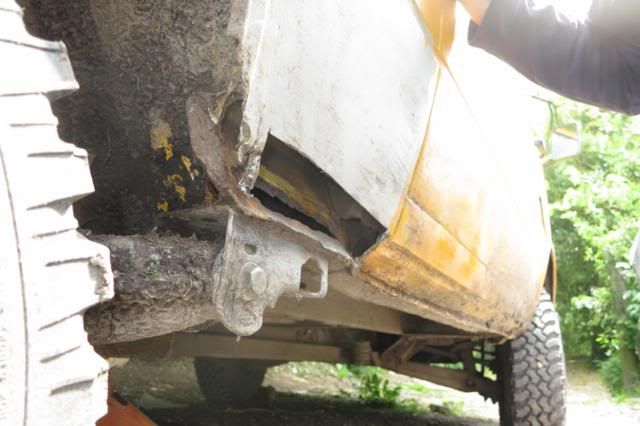
Well there is the gribbly bit on the sill that I didn't like the look of, so I attacked it with a wire brush.
Strangely it opened a portal to another dimension. A Land of filth and rust and decay...oh and pain and welding.

Image

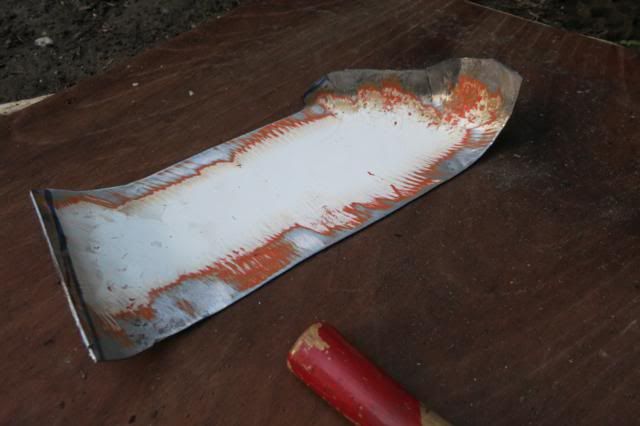
It was so hideously deformed that I had no idea of its original shape. Had to order a panel from Schofields to try and get the shape back.
I started with a small exploratory incision....just remove the rot. Oh :shock: :| :(

Image

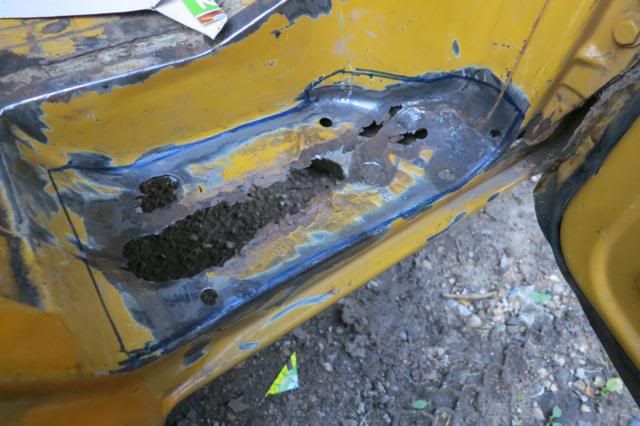
So er thats sposed to be the inner sill then and er is that C post supposed to connect up ?

Image

So open it up a little further..

Image

Cut out the bit I can get to, and guess what our journey continues - deeper into the lost realm of Syncro sills...

Image

So this time a hole into end of the rear chassis arm, and a whole through the patch just outside it, hmmm patch over rust and capillary rusting grrrrrr :evil:
Borrow the good ladies vacuum cleaner and hoover out all the missing matter from the universe ? Maybe this is why our roads need resurfacing, its all in my sill.
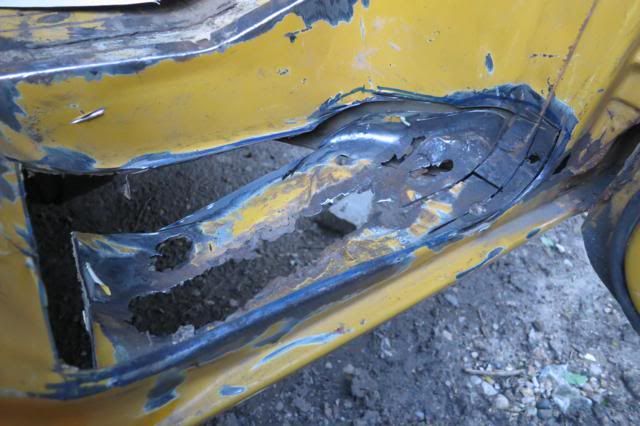
My exploration continues, I break through oh, its a plug into the wheel arch, well it was a plug, now its a plug and a pile of powdered metal. Lets go the other way to where the C post used to be.....
NO actually lets not, lest weld this bit back up and make it solid again before the whole wheel and suspension arm drops off.
So you think you have found solid metal eh ? Well I cant get the grinder in to remove any more, so its file and chisel then weld and burn....

Image

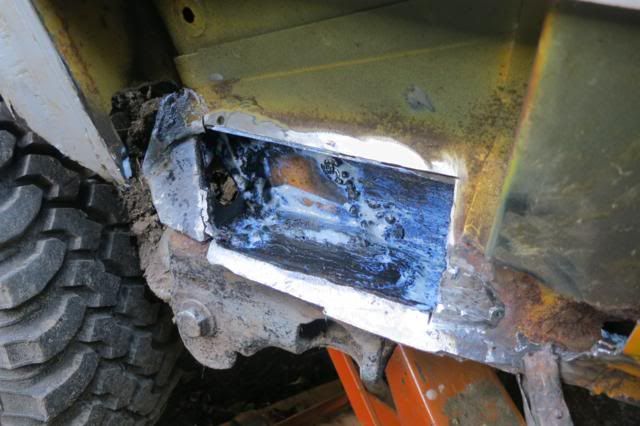
chuck some vactan in for good measure, but really its just a time bomb. New inner and outer sills sooner or later. But I have to get it solid to move and drive it even. So no choice at this point its not pretty, but its solid. Just the best I can do :oops:

and the next layer working my way back out from the horrors :? Sealing it back up behind me so as not to let the evil spread...

Image

Image

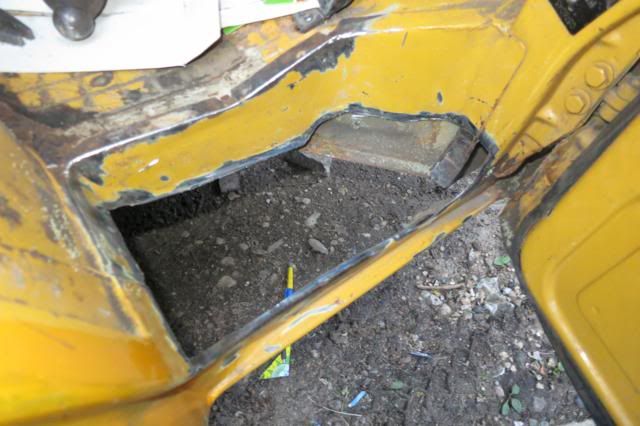
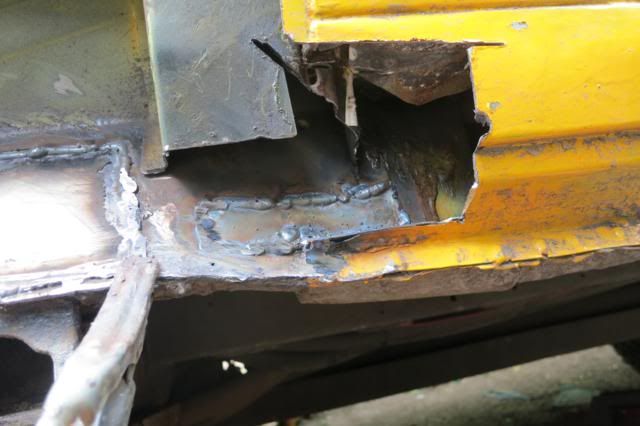
Now that C post.... I'll just errr open it up a bit more ? Errr well I'll try and keep it to the sill, so that when it gets replaced...

Image

Lots of hacking again, grinding, filing, but again not enough room to get in there. The rust doesn't appear to extend further forward ? But this is like restoring an old house ! Where do you stop ? Were getting a bit out of my league now. How much does it cost for a pro to replace the sills and get it looking pretty ?
At this point I start trawling 80-90 for photos of what the Cpost should look like. Found some remarkable thread on DIY inner and outer sill replacement, with lost of support from Metal Mickey. Wow that is quite a task. Might need a garage, or a roof atleast or maybe a professional...

Anyway start building it back up layer by layer.

Image

Hmmm I think it was Silver Bullet posted pics of a nice sill end/jacking point rebuild he di. Looked lovely and clean and really easy... :?

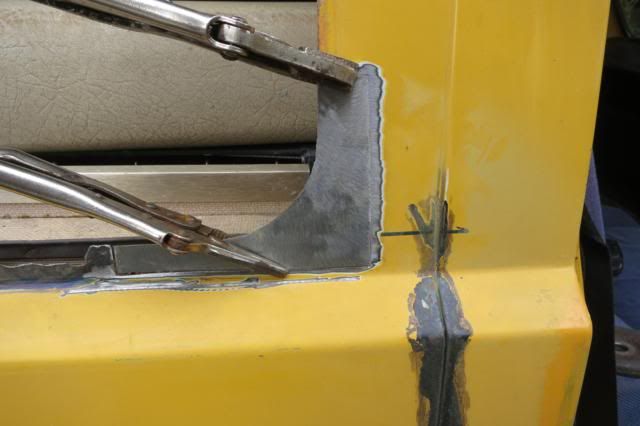
So I guess the C post is supposed to look something like this ?

Image

Spay it with gucci weld through galvanising spray, yeah that makes me fell better. Well it might help ? A bit.

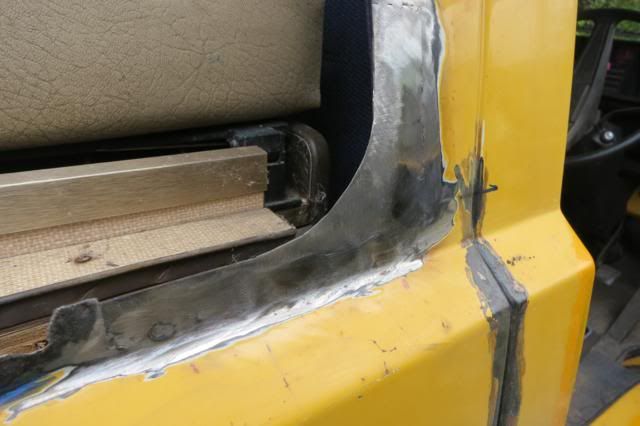
So time to hide it all wit that nice replacement panel so it looks pretty and I don't have nightmares about what lies beneath.
The plan was to try and avoid loosing the wheelarch to rear wing seam line. The panel is all one piece, so some creative cutting is required. And err welding back together cos i got it wrong. Ooops.
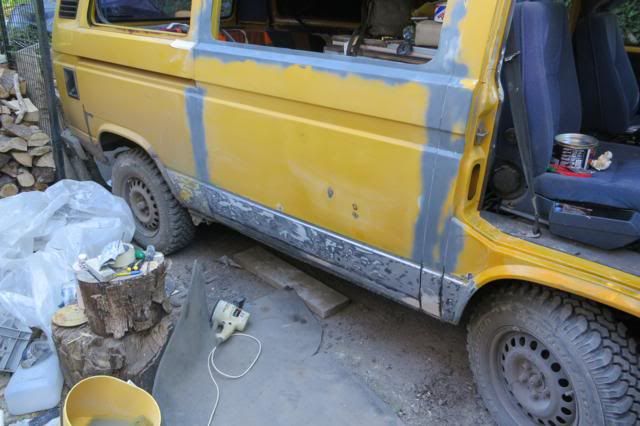
Spot, Spot, move spot repeat ad nausium or untill you run out of welding gas. I ran out of welding gas...
So I still have to finish it between downpours. gotta be done by Monday cos I'm off on another adventure :D

Cheers
Rich

Re: On the road at last !

Posted: 15 Jun 2012, 08:26
by tforturton
Loving this thread. I can't believe you bought a Syncro and immediately started stripping it down and cutting it up!
Good luck!

Re: On the road at last !

Posted: 15 Jun 2012, 16:21
by hotpod
good work. yes the c post does look something like that.
some people just stick a patch on the outside ignoring the fact that by the time the outside has rusted, the inside has been gone a long time.
a great read too.

Re: On the road at last !

Posted: 16 Jun 2012, 20:51
by Roving Rich
Thanks guys.
I was begining to wonder if anyone ever reads this ?
Sotforturton - I didn't immediately start stripping it. Built it back upto 4 wheels drive to start with. That is the point of a Syncro IMO. Next was sorting out the small problems, like the heater fan, a couple of oil leaks, bits and pieces.
Majorly its getting the body sorted before its worth doing much more. Gucci accessories aint worth a thing if the van falls apart beneath them.
Some of the previous patches looked like a good tidy professional job, so I figured it was probably sound underneath. But that sill looked like patch on patch as you say hotpod. Might look ok outside, but minging underneath. Just enough to get it through the MOT.

Right next thing to sort before Syncropendance is these protection bars.
Good and solid at the front end, but err not really connected to anything at the back ?

Image

They appear to be just held there by the tow bar. And the bolts connected it look perfect for puncturing the sump ! :shock:

Image

So I think I must be missing a bit ? Surely it connects to the chassis somewhere to make it good and solid.

Image

I guess I will have to come up with some cunning piece of bracing, maybe back upto the tow bar cross brace ?
How is it sposed to be done then.

Cheers
Rich

Re: On the road at last !

Posted: 16 Jun 2012, 20:57
by axeman
normally diesels have diesle engine bars and petrols have petrol ones, yours look like cut up petrol ones, may be worth looking at m/g limey thread on the samba as he moded petrol bars for his 5 pot audi install.

neil

Re: On the road at last !

Posted: 16 Jun 2012, 21:00
by axeman
link for you

http://www.thesamba.com/vw/forum/viewto ... c&start=40" onclick="window.open(this.href);return false;

neil

Re: On the road at last !

Posted: 16 Jun 2012, 21:04
by syncroandy
:shock:

Petrol bash-plate on diesel van ? RH muffler bracket completely missing ?

Re: On the road at last !

Posted: 16 Jun 2012, 21:05
by lloydy
new diesel one here
http://www.volkswagen-classic-parts.de/shop/" onclick="window.open(this.href);return false; for 138 euros. in the bodywork section

Re: On the road at last !

Posted: 16 Jun 2012, 21:44
by jed the spread
Roving Rich wrote:
Image

They appear to be just held there by the tow bar. And the bolts connected it look perfect for puncturing the sump ! :shock:

Image

So I think I must be missing a bit ? Surely it connects to the chassis somewhere to make it good and solid.

Image


Rich

What the blithering heck :shock:

Mate you really need to change that.

jed

Re: On the road at last !

Posted: 16 Jun 2012, 21:52
by syncropaddy
jed the spread wrote:
Roving Rich wrote:
Image

They appear to be just held there by the tow bar. And the bolts connected it look perfect for puncturing the sump ! :shock:

Image

So I think I must be missing a bit ? Surely it connects to the chassis somewhere to make it good and solid.

Image


Rich

What the blithering heck :shock:

Mate you really need to change that.

jed

Now thats taking the p155 .... You need to replace the whole thing cuz what you have there is gonna do damage if you hit something