Page 2 of 6
Posted: 01 Oct 2008, 13:30
by steveo3002
get yourself some upol weld thru primer...handy to coat the surfaces and edges that cant be got at after welding , so it doesnt rust from inside out so fast
halfords sell it
Re: Replacing a rusty arch
Posted: 16 Mar 2009, 10:28
by eddbmxdude
We are still plodding along with this

We have a deadline of the end of April now as we have a unicycling meet we want to take the van to. We have admitted defeat on the welding and are going to get a welder in to do it for us. We needed to get to the bottom of why it wouldn't start. We jumped it from another car and it fired up and ran sweet, then when we turned it off and tried to restart it, nothing. Knackered battery, RESULT! Well, at least it wasn't something more complicated

Heres a video!
http://www.youtube.com/watch?v=j0RiKLnSNHc" onclick="window.open(this.href);return false;
Its a little loud at the moment too, because we have taken the exhaust off.
We are going to need a new exhaust joint, because this is what our one looks like!
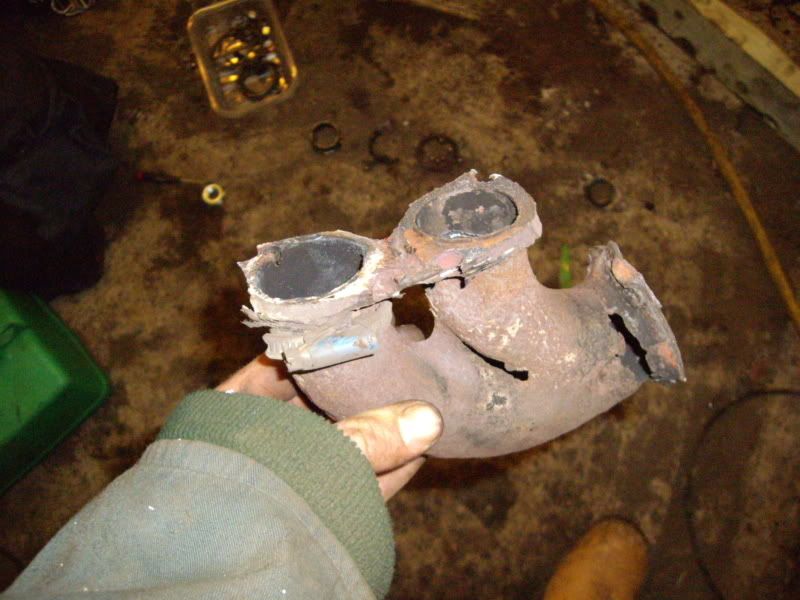
We also need a new front manifold because the one we have has a rather knackered flange. Anyone got one we could buy?
Heres a few more pics. Everything is covered in horrible filler dust from where we cut out all the rust and crappy panels.


Cheers,
Edd
Re: Edd and Leo's homebrew camper project
Posted: 20 Mar 2009, 23:00
by fix
Good work!
Youre not inspiring me with confidence with welding though, ive got to fit the same rear arch as you and havent welded before.
Practised a few weeks ago on some scrap and it went ok, need more practise though.
Was the welding really that hard that youre getting someone else to do it?
Re:
Posted: 20 Mar 2009, 23:30
by fix
steveo3002 wrote:get yourself some upol weld thru primer...handy to coat the surfaces and edges that cant be got at after welding , so it doesnt rust from inside out so fast
halfords sell it
I need to get something like this, cant you use any zinc primer and weld onto it?
Re: Edd and Leo's homebrew camper project
Posted: 23 Mar 2009, 09:24
by eddbmxdude
fix wrote:Good work!
Youre not inspiring me with confidence with welding though, ive got to fit the same rear arch as you and havent welded before.
Practised a few weeks ago on some scrap and it went ok, need more practise though.
Was the welding really that hard that youre getting someone else to do it?
I wouldn't say it was hard, just mind numbingly boring! I don't have the patience especially with the amount of welding our van needs. If it was a couple of patches it would be fine, but we need to replace almost half of one side of the van

Also the time factor is against us, we need someone who can do it quickly, but it doesn't look like were going to make it now anyway, no one can do it for us soon

Re: Edd and Leo's homebrew camper project
Posted: 23 Mar 2009, 18:40
by fix
That given me abit more confidence! I dont have alot of time either but im a tight a*** and dont want to pay someone else to weld lol
Re: Replacing a rusty arch
Posted: 25 Mar 2009, 20:20
by weldore
Re: Edd and Leo's homebrew camper project
Posted: 22 May 2009, 09:19
by eddbmxdude
A little more progress made on the van.
Rusty hole


Patch made

In place

Welded in

Just need to clean it up and primer it now.
This next one has been bugging me for a while. Its the end of the sill and the rot had spread to the wheelarch. It would be a proper bitch to make a patch from scratch so we bought a panel and trimmed it down to what we needed.
Heres how it started off looking.

Chopped it square so the patch is easier to trim to size/shape. You can see there is another hole going through to the inside of the van that we are going to have to patch too


Heres the replacement panel. We only need the botton right hand corner.

Like so:

Clamped in

Welded and cleaned up.


Its a little rough but its the first bit we've done that is going to be visible. I was dreading f**king it up but I think we've done ok for beginners. Its going to need a skim of filler over it anyway to make it the same level as the rest of the panel, I mean filler!!!
After roadtripping round Cornwall with my friend in a T4 we are determined to get the van done asap now. We are going to try and get down the workshop at least 3 times a week and get it done!

Edd
Re: Edd and Leo's homebrew camper project
Posted: 26 May 2009, 09:23
by eddbmxdude
We spent half of the bank holiday down the workshop and got a good amount of work done.

Pretty much all the rust on the passenger side of the van is sorted!
The first job was to close up the end of the sill we repaired last time and patch the hole that went into the inside of the van. Then we primered the repairs and the patch from last time.

From the inside.

After that we took a break from welding and turned our attention to the exhaust. The old elbow was rather rusty and had more than its fair share of extra holes in. We got an ebay bargain a while back so fitted it with all new nuts and bolts.

It still leaks and is a bit noisy but we are hoping with some new gaskets and some exhaust putty it'll quieten down and seal up the leaks
Right, enough of that, back to welding!
The passenger side step was really grotty. It has been patched more than once before and all the patches had started rusting away. Rubbish! Looks and feels solid enough from above:

But from underneath you can see that it really is rotten.

So, out with the step

Heres the old and new for comparison.

New step in and trimmed to shape.

Weld thru primered:

Sticking it in. Sorry about the dodgy pic. Camera didn't want to focus on welding.

Cleaned up and primered.


Done!
When we lifted the mat in the cab to start sorting the step we noticed a bit of rust on the floor.

After a bit of poking and investigation with a cutting disc it turned into this:

So thats ANOTHER patch we weren't expecting! Just where the hole is, there was a bracket that holds the brake pipes, throttle cable and what im guessing is the speedo cable. We will need to clean it up and re-rivet it to the patch once we have welded one in. We have already made the patch up ready, so next time we go down there we can get on with it straight away.
I hope this is proving interesting reading for someone. I am updating with lots of pictures so hopefully someone in the same situation as us a few months ago can read through and learn from our experiences.
Next update soon!
Edd
Re: Edd and Leo's homebrew camper project
Posted: 26 May 2009, 15:51
by jonnyels
Fair play lads.Your braver than me
keep it going im watching with great interest.
cant wait to see it finnished
Re: Edd and Leo's homebrew camper project
Posted: 27 May 2009, 15:54
by weldore
i agree..every time you do a job and back it up with pictures...everybody learns something
Re: Edd and Leo's homebrew camper project
Posted: 27 May 2009, 21:06
by eddbmxdude
Im glad people are finding this interesting. We certainly could have done with something like this to look at before we started tackling our van. We are going down after work tomorrow so expect an update on Friday
Re: Edd and Leo's homebrew camper project
Posted: 01 Jun 2009, 09:44
by eddbmxdude
Well, I forgot to update this on Friday. We got the patch done on the cab floor.
Saturday we spent the whole day down there and got quite a bit done.
First off we noticed that the seatbelt mount was a bit crusty. We whizzed off the crappy metal leaving this:

Then we made a patch to go in.

and welded it in.

Its far from our best work, but its ok.
Then we turned our attention to this side.

Its been a long time coming but we knew we would have to tackle this eventually. We were slightly scared about how to approach it but with some thinking and fiddling we decided to fit the main panel then fill in the holes left afterwards.
We cleaned up the areas that needed welding

and first tacked, then fully welded in the main panel.


This is how it stands at the moment. The lower rear panel isn't actually welded in yet, we just balanced it there. We need to sort out that 'L' shaped hole first.


Now all we need to do is fill in that hole at the back and weld in an inner arch.
We're getting there!
Re: Edd and Leo's camper project - Update 01/06/09
Posted: 01 Jun 2009, 16:03
by leo_h
Its far from our best work, but its ok.
Edd!?! What could yo possibly mean!? i did that welding! and it was my greatest yet!

Hehe, actualy though we had run run out of gas but hadn't noticed for that patch remember.

Wicked thread though edd! I probs will pinch some of those images.
It certainly feels like we're getting somewhere now, and i hope mot day is in the not so far future
leo
Ps whayhay! My first post!
Re: Edd and Leo's camper project - Update 01/06/09
Posted: 01 Jun 2009, 19:35
by dwayne
First time I've seen this thread , great write up and pics . Hard work but looks like you are enjoying it
keep up the good work lads