Page 2 of 4
Re: split the engine case
Posted: 16 Oct 2013, 22:01
by 123-jn
Dunsome measuring, big ends are well within spec and not oval. shells could even be reused but I will put new ones in. Suprisingly the main journals especially the flywheel end are way outside spec double the wear limit. How weird? Now onto the pistons. No obvious signs of wear and no ovality turning marks all still perfect and visible. Marked 93.980 and that is what they measure within a couple of hundredths now to the bores , Internal mic is imperial so had to convert but no ovality and no wear ridge at all. Bore size 94.00 mm give or take a few hundredths depending on how many decimals you use in the conversion. They need a quick very light deglaze. Now for the interesting bit. this makes the piston to bore gap way over what Haynes says. They say nominal 0.03 to 0.09. max 0.2mm. well I reckon mine started at 0.2!!!! Now looking at the gap with the piston in the lner it looks even bigger than it measures. unfortunately my feelers are too wide to measure properly.
cam bearings and shells all fine no discernable wear but I'll use new shells anyway. So next job down to the engine shop to see about the mains for a second opinion and possibly a regrind. May as well get a second opinion on the bores too and see what they charge for a very light deglaze. see if they are cheaper than brikwrks for the shells!!
Re: split the engine case
Posted: 17 Oct 2013, 17:11
by 123-jn
So Engineers reckon that crank needs regrind 0.5 under, so Ive left that with them. Pistons are ok for new rings but bores need deglazing. Now the problem they say the camshaft is toast. On two lobes there are rough areas where they say the case hardening has started to break up, very small areas but they say it will get worse.
So after browsing google for a camshaft I,m no closer. Does anyone know where I should get one from? They seem mighty expensive on the one site I've found £152 plus vat. I have seen reground ones for £50 but none for the 1.9 only 2.1. Or does anyone have a serviceable one?
Re: split the engine case
Posted: 21 Oct 2013, 21:23
by 123-jn

This thread seems to be all mine recently!! Well Ive cleaned up the liners and am debating getting the machine shop to do a quick glaze bust as although I have the tools I don't trust myself!! Ive cleaned the pistons but the gudgeon pins are very tight to fit , I will have no chance through the cooling holes for reassembly. I reckon it must be the areas around the circlips. I think I'll have to do some gentle work on them with a small stone in a drill.
Now getting the head studs out of the case was a bit of a task I almost gave up. I positioned a blow torch inside the case aiming at the area around the stud and left it there for ages. I dribbled some plus gas into the well around the stud and locked two nuts together on the top thread. I waited and waited until the plus gas started to bubble then gave the top some sharp taps with a small ish hammer to try to break the bond. All of a sudden while leaning on the spanner with a creak the stud would start to turn. Repeat x4.
I have found a new camshaft at TES so I'm hoping it's ok. The only ones on vw heritage were reprofiled for 142 pounds. The TES cam like most aftermarket ones uses a 3 bolt gear and requires an early Aircooled Oil pump, but since I needed these bits anyway it was no big problem. £69 for the cam, £25 for the gear and bolts and £30 for a heavy duty Aircooled oil pump (26mm like the original waterboxer one)
I will take some more pics at the weekend when I weld up the leaky poor quality metal waterpipe from my van. The engine case will be treated to a soak in bio washing powder (I hope it doesn't come out all soft ready to fold without ironing!!!)

Re: split the engine case
Posted: 22 Oct 2013, 21:33
by Robsey
Don't worry - you are not alone. All eyes are on your thread, waiting to read more interesting information and looking forward to seeing some progress pictures.
Re: split the engine case
Posted: 23 Oct 2013, 05:21
by itchyfeet
I don't supose there are too many people on here who have split the case so help will be limited
As for pistons and gudgeon pins its comon that a burr forms there is even a vw deburring tool for the job shown in bentley

Re: split the engine case
Posted: 23 Oct 2013, 07:15
by lees
No you are deffo not alone, i keep looking in on this thread, changed my engine a few months ago and kept the old tired 1.9 DG engine in the garage for the long winter nights to have ago at strippng and rebuilding
keep the posts coming
Cheers Lee
Re: split the engine case
Posted: 23 Oct 2013, 07:30
by T25Convert
Ah, the joys of de-burring!
After a bit of trial and error I found that these worked (although the 'pouch' was absolute rubbish!):
http://www.machinemart.co.uk/shop/produ ... =SRC-files
Good luck!
Cheers,
Alex
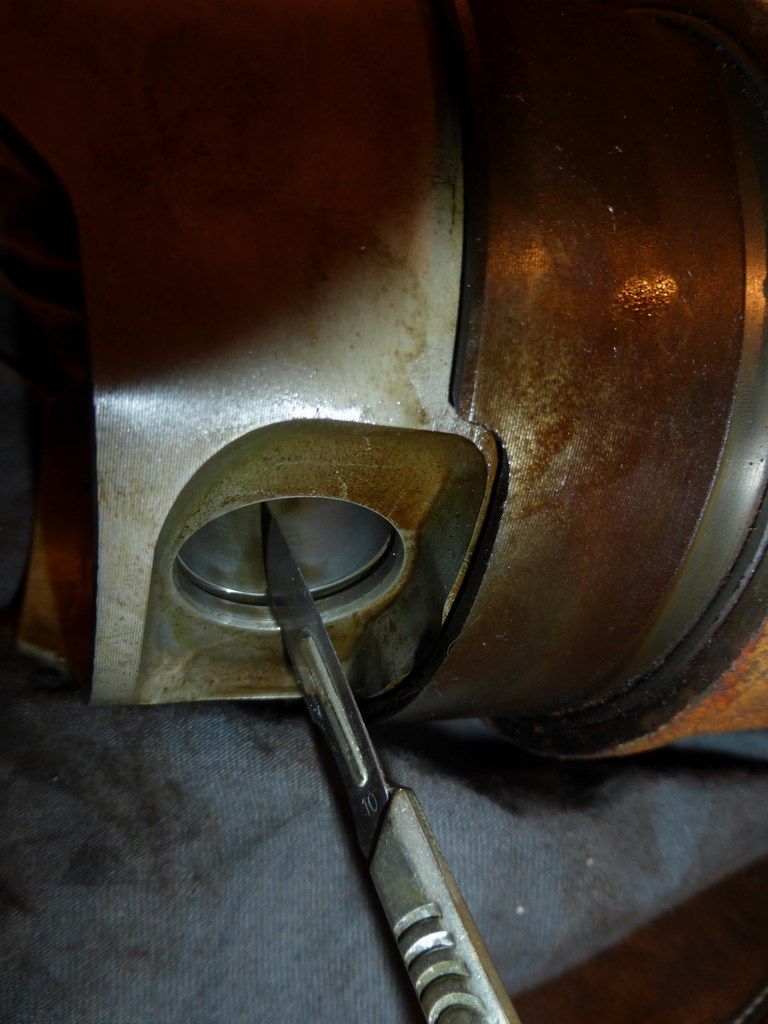
Re: split the engine case
Posted: 23 Oct 2013, 18:31
by itchyfeet
Ok so I have four pistons with the same burr on my spare engine which is still in bits awaiting the engine case back from What2d and an engine head replacement from a dealer who shall remain nameless but is taking his time.
Anyway I thought I give one a go, having looked at bentley the tool is a reamer, the burr is on the outside edge of the circlip recess, the inside edge can't rise up as the pin is there, so I used a scalpel I have from my old surgery days and it works a treat, it's a No 10 curved blade, not a 10A straight as so many people like to use, that would likely scratch the surface.
Worked it around the hole gently with some lube and hey presto it slipped in nicely

Re: split the engine case
Posted: 23 Oct 2013, 19:58
by 123-jn
Thanks for the support guys. The scalpel is an interesting one. I was going to use a small round grinding stone in the end of my battery drill. I'll let you know how it goes!! I've just been stripping down the hydraulic tappets. I've only done 4. I leave the bits in a paraffin bath for a few hours then clean the softened varnish off. They need quite a crank with a vice and a bolt to push the piston in to put the clip in. I bought one new one from TES to compare and this is much easier to push in after bleeding? This seems strange considering the old ones look like new and show no signs of wear. (strictly that's not true, the camshaft face of the tappet is very slightly dished inwards in the centre on all of them, between 0.1 and 0.2 mm. I'm hoping this will be OK. The front and back cam lobes on the old cam shaft have worn to less than 5mm lift whereas the middle two still have about 6mm. The new cam has about 6mm lift on all lobes as you would hope!!!
Re: split the engine case
Posted: 23 Oct 2013, 20:16
by itchyfeet
[uquote="123-jn"] I was going to use a small round grinding stone in the end of my battery drill. !!!
[/quote]
Id reccomend doing this by hand with your tool of choice
Any powered device could remove more metal than you need in an instant
I have heard horror stories of circlips coming out and then the liner is toast
Re: split the engine case
Posted: 24 Oct 2013, 15:14
by what2do
The engine in question will be with you (Itchyfeet) on saturday due to me watching the Saints at home. Then we'll be able to read about a second poster splitting his case! It'll be some time before i set to on mine unfortunately.
Re: split the engine case
Posted: 24 Oct 2013, 16:39
by itchyfeet
what2d wrote:The engine in question will be with you (Itchyfeet) on saturday due to me watching the Saints at home. Then we'll be able to read about a second poster splitting his case! It'll be some time before i set to on mine unfortunately.
Nice one
Re: split the engine case
Posted: 26 Oct 2013, 17:37
by 123-jn
getting ready to put the engine back together having taken a few photos to post I wondered if there was anything to gain by painting the engine case or whether its only done for looks? Anyone got any views

Re: split the engine case
Posted: 26 Oct 2013, 20:32
by itchyfeet
Gearbox yes as it corrodes engine however is just for looks
Do it if you want to why not
Re: split the engine case
Posted: 26 Oct 2013, 21:07
by 123-jn
Still tempted to paint case hammerite seems to be most peoples choice? Silver I reckon. Her are a few more pictures of my ish clean engine bits as I get ready to start to reassemble.
http://s1275.photobucket.com/user/123-j ... ebuild%202" onclick="window.open(this.href);return false;
