Page 2 of 11
Re: Oops!!
Posted: 02 Jun 2013, 17:51
by Plasticman
nice. probably the most effective way to do the reapair,good work
mm

Re: Oops!!
Posted: 02 Jun 2013, 18:38
by 300CE
Great stuff Sarran
Re: Oops!!
Posted: 03 Jun 2013, 05:16
by Titus A Duxass
Nice work.
Re: Oops!!
Posted: 03 Jun 2013, 07:15
by pionte
Its amazing what you can do... if you have to ! very impressed, good work.
Martin.
Re: Oops!!
Posted: 03 Jun 2013, 12:25
by 81AirCooled
OMG first time I've seen this thread. You're a star John
Re: Oops!!
Posted: 03 Jun 2013, 19:13
by sarran1955
Hello,
Just a quick half hour, with the sunshine streaming through the work shop windows...
Cylinder Head...
1 of 2..

Good news... no cracks, and the valve seats can be recut - reground....
Bad news... too much play in the valve guides,

This photo tries to show that the left hand (exhaust) valve guide (bronze coloured tube you can see on the right), is worn rather oval..
Also:

These are the decompression rings found inside the head.... now I see why there was lower compression on Nr 2 cylinder..
Its left a mark in the head. but that will polish out:

Any way, We will have to change all the valve guides, and also the exhaust valves.....
This will give me a chance to use my genuine Retro:

Ha Ha..

Just got to to Wiki....'Shooting fish in a barrel'

Cordialement,
Re: Oops!!
Posted: 04 Jun 2013, 19:50
by sarran1955
Hello,
Quick hour in the workshop..

Cylinder head nr 2 fine.. valve guides in 3 worn..
Nr 4 ... perfect..

So.. onto pistons and barrels....

This is the crud that eventually kills aircooleds..

Drop rear engine bearers.. strip tinware.. cleanout.. polish and re fit.. 4 hours once every 2 years,,,,,,
Is it too much to ask...

Any way..

Checking the barrels for wear.. with a flat file ..remove the carbon ridge at the top of the barrel .. and then feel for wear..
Do this at 90 degs.. 4 times..
No worn groove..
Scuffing on top of bore
Techy q... why the top?
..
Answers on a £5 note to....
So... pistons...

Rings and lands (between rings ) all in good condition
Slight scuffing on piston....
The gudgeon pins are in good condition, so there will be no need to change the 'small end' bearings..

The scuffing is slight, so I will deglaze the bores and re ring the pistons....
Right.. I'll start the shopping list tomorrow....
Cordialement,
Re: Oops!!
Posted: 04 Jun 2013, 19:59
by 300CE
Getting there John! Is there anything that can be done to slow down that build up of crud or is it just a natural build up over time?
Re: Oops!!
Posted: 04 Jun 2013, 20:13
by sarran1955
Hello,
YES YES YES..

Like I said..
If you drop the rear engine bearers, ..lower the engine so that you can get to all the tinware screws..
strip tinware.. clean and polish..
Aircooled... clean engine.. happy engine..

Aircooled... good tinware..cool engine..

Cordialement..
Re: Oops!!
Posted: 11 Jun 2013, 19:45
by sarran1955
Hello,
This was waiting for me on Monday....

Here is the shopping list for the engine rebuild:
In mostly alphabetical order:
Piston ring set 029198175 39€
Cam bearings set 021198175 26,50€
Conrod bearings set 039105701 44€
Main bearing set 021198481A 109€
4 off exhaust valves 022109612 45.20€
4 off exh valve guides 021101417A 22€
4 off inl valve guides 021101403A 26€
Case end plug 113101157 1,5€
Flywheel oil seal 029105245B 8,90€
Crank oil seal 021105247A 4€
Full gasket set 071198009A 86,50€
Oil drain plug N0297012 4,50€
8 off Valve guide seals 113109619 8€
Whew..
I'm off to 24 hr Le Mans this weekend..
A week nosing into serious engine compartments....
I feel a video coming on....
Cordialement,
Re: Oops!!
Posted: 12 Jun 2013, 09:50
by 300CE
Proper jealous John - went to Le Mans for the 24 hour about 10 years ago and it was absolute quality - i think i still have the noise ringing in my ears! Take a few pics and post em up on your return!
Re: Oops!!
Posted: 26 Jun 2013, 18:24
by sarran1955
Hello,
Well the holiday is over...

So after work this evening I made up the jig to remove and replace the valve guides...

Suppertime...
Cordialement,
Re: Oops!!
Posted: 29 Jun 2013, 10:18
by benlawlor85
Interesting thread and some amazing work there.
As my van is currently awaiting a trailing arm, i was thinking i might spend 4 hours cleaning up the engine as you describe. When you say 'drop the rear engine bearers' do you mean where the bearer bolts to the chassis? and is there anything else that needs to be disconnected while i do this? The bearer is generally quite rusty on my van so is it easy to take it out so i can it a clean up and paint? Obviously with axle stand under the engine. Finally if i paint the tinware do i need VHT paint? or is rustoleoum ok?
Thanks
Ben
Re: Oops!!
Posted: 29 Jun 2013, 18:49
by sarran1955
Hello,
Working on the cylinder heads....
On a wet Saturday afternoon...
First the valve guides are changed....
Tapping out the guides to take the thread of the extractor:

Fitting the extraction tool:

Lining up the new guides :

Using an air hammer with a flexible coupling to drive the valve guide insertion tool:
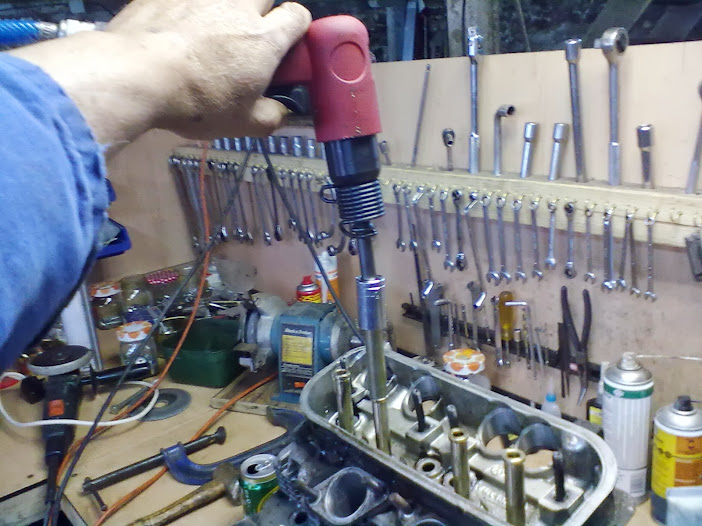
The new guides:

Checking the guides with the valve to see how much reaming is needed:

This is the adjustable hand reamer I use to obtain free movement of the valve with the minimum of 'play'

Next I have to clean the old inlet valves, and then grind all the valves in..:

More tomorrow..
Cordialement,
Re: Oops!!
Posted: 29 Jun 2013, 18:57
by Plasticman
you get the spice
mm