Page 8 of 24
Re: Rebuild Thread (Probably)
Posted: 18 Feb 2019, 08:46
by itchyfeet
ajsimmo wrote:Nice bead of sealant there on the water jacket seal - not put on with a trowel like some I see! Good work. Were you twitching at the 50Nm stage?

Sent from my ONEPLUS A3003 using Tapatalk
not enough dirko in my opinion, risky.
Re: Rebuild Thread (Probably)
Posted: 18 Feb 2019, 09:12
by 937carrera
Slightly pedantic technical question, triggered by the last two posts.
Do you guys run a bead, apply the seal, and allow the bead to spread under assembly force, or, run a bead, spread the bead across the sealing surface evenly and then assemble and tighten.
I have referenced the data sheets on the Elring website, but they offer no definitive advice, other than continuous and uniform
http://www.elring.com/en/products/sealing-compounds/
Following up on a previous discussion in Maxstu's thread, it looks like Dirko S is the aerosol delivered product, Dirko Black is the same product in a tube.
Re: Rebuild Thread (Probably)
Posted: 18 Feb 2019, 09:49
by Ciaraneng
ajsimmo wrote:Nice bead of sealant there on the water jacket seal - not put on with a trowel like some I see! Good work. Were you twitching at the 50Nm stage?
Just a bit.

I tried all the head studs with a dome nut before starting to torque - or so I thought. As per Murphy's law, the only one I missed was the one with a burr on a thread. Having lowered the head and aligned everything I got some resistance when tightening that stud. It was late and I was tempted to keep going but when I felt that 'springiness' in the stud and thought of the consequences of a snapped stud at that stage, common sense prevailed and I took the head off and ran a die over the offending thread having covered first everything to catch any swarf. I re-applied the bead of sealant on the seal and was all good second time around and a lot less nervous.
I used a bit of disulphide grease on all the stud threads and then wiped it off the top of the stud and the major diameter (outside of the threads) so that there would be some on the root. I wanted all my torque to go into tension rather than torsion but didn't want to get any on the face of the dome nuts. Does that make sense?
Re: Rebuild Thread (Probably)
Posted: 18 Feb 2019, 09:57
by Ciaraneng
itchyfeet wrote:not enough dirko in my opinion, risky.
It was enough to cause it to seep out both sides of the seal. Is the idea to have a sort of a 'fillet weld' style bead of dirko on the inside of the seal/head to act as self-sealing gasket?
I was afraid that having too much could result in a string of sealant getting loose in the coolant.
Re: Rebuild Thread (Probably)
Posted: 18 Feb 2019, 11:22
by itchyfeet
No right or wrong just personal choice.
I'd rater have a bit splurged out than not enough, see water jacket failures all too often when there is nothing else wrong, leaky water jacket lets air in then studs corrode.
Sounds like you got it right if it came out all around.
both sides of gasket too.
I let Dirko set before running an engine also, some people fire them up immediately, Dirko is silicone based and while it skins over quick it takes a while to throughly set under the skin.
Re: Rebuild Thread (Probably)
Posted: 18 Feb 2019, 12:21
by ajsimmo
937carrera wrote:Do you guys run a bead, apply the seal, and allow the bead to spread under assembly force, or, run a bead, spread the bead across the sealing surface evenly and then assemble and tighten.
The former. Just enough to squidge out a tiny bit both sides on assembly.
Actually, degrease everything, then degrease again just to make sure, run a bead inside the seal and fit to the case, degrease again where I've touched it, run a single thin uniform bead to the middle of the seal face, degrease the head again (just in case), pop a tiny bit into any significant pitting, smooth with a razor blade to ensure no air pockets, assemble and torque within 30 mins. Then do something else for at least the rest of the day. That stuff needs to be properly set before it sees any moisture or heat, IMHO.
Sent from my ONEPLUS A3003 using Tapatalk
Re: Rebuild Thread (Probably)
Posted: 18 Feb 2019, 12:22
by ajsimmo
Ciaraneng wrote:itchyfeet wrote:not enough dirko in my opinion, risky.
It was enough to cause it to seep out both sides of the seal. Is the idea to have a sort of a 'fillet weld' style bead of dirko on the inside of the seal/head to act as self-sealing gasket?
I was afraid that having too much could result in a string of sealant getting loose in the coolant.
Yes, this ^
Sent from my ONEPLUS A3003 using Tapatalk
Re: Rebuild Thread (Probably)
Posted: 18 Feb 2019, 12:24
by Ciaraneng
itchyfeet wrote:No right or wrong just personal choice.
I'd rater have a bit splurged out than not enough, see water jacket failures all too often when there is nothing else wrong, leaky water jacket lets air in then studs corrode.
Sounds like you got it right if it came out all around.
both sides of gasket too.
Thanks Itchy, makes sense. I was a bit more generous on the inside of the gasket as there is more surface area for the dirko to spread out over.
I didn't realise that the water jacket could draw in air. Does it come under slight vacuum when it cools?
itchyfeet wrote:I let Dirko set before running an engine also, some people fire them up immediately, Dirko is silicone based and while it skins over quick it takes a while to throughly set under the skin.
It will be next weekend at the earliest before it's back in the bay so the dirko should be well cured by then...
Re: Rebuild Thread (Probably)
Posted: 18 Feb 2019, 12:35
by Ciaraneng
On a separate topic. Does anyone know what the wear limit is for the clutch? Is it measured face-to-face?
Re: Rebuild Thread (Probably)
Posted: 19 Feb 2019, 09:08
by 937carrera
ajsimmo wrote:937carrera wrote:Do you guys run a bead, apply the seal, and allow the bead to spread under assembly force, or, run a bead, spread the bead across the sealing surface evenly and then assemble and tighten.
The former. Just enough to squidge out a tiny bit both sides on assembly.
Actually, degrease everything, then degrease again just to make sure, run a bead inside the seal and fit to the case, degrease again where I've touched it, run a single thin uniform bead to the middle of the seal face, degrease the head again (just in case), pop a tiny bit into any significant pitting, smooth with a razor blade to ensure no air pockets, assemble and torque within 30 mins. Then do something else for at least the rest of the day. That stuff needs to be properly set before it sees any moisture or heat, IMHO.
Thanks Andrew, really helpful.
Having read the technical sheet yesterday it appears that it is moisture from the air that drives the curing process. On page 5 there is also a graph of curing time. 24 hours for a 2mm thick seal, a full week for 9mm, depending on temperature and humidity
http://www.elring.com/fileadmin/Dateiab ... 1-2017.pdf
Re: Rebuild Thread (Probably)
Posted: 19 Feb 2019, 09:56
by itchyfeet
Thickness cure time is misleading.
the thickness is very small. If you measure up the seal takes almost all the gap so there is not much dirko left ( an old head and case thats been sanded down will have a bigger gap.of course hard to judge) but having just degreased the surface there is very little surface moisture left and the moisture has to travel through the dirko which is some distance to the middle.
The sqidging out the sides risk or paranoia has to be balanced with the risk of not enough, yes way too much is silly but a bit squided out isn't going to do any harm imo as long as its left to set.
Any tiny gaps in the dirko at all may not leak initially but air and moisure get in the gap cause corrosion and it then creeps under the dirko just like rust creeps under your paint from an exposed edge.
look at any head where the seal has failed and its covered in aluminium oxide.
You want the dirko to squide out.
Re: Rebuild Thread (Probably)
Posted: 19 Feb 2019, 10:54
by 937carrera
Ciaraneng wrote:On a separate topic. Does anyone know what the wear limit is for the clutch? Is it measured face-to-face?
Such a simple question.....
Ideally you should be checking the clutch diaphragm to make sure it isn't distorted, clutch disc for run out and wear.
I could not see a specification for wear in the bentley manual so went back in time to the VW 412 manual where it is stated to be 0.6mm min from lining surface to rivets.
From a non technical perspective, for all the hassle of taking an engine out to replace a clutch, and the cost of a replacement, then unless the existing one is in good condition then replace the whole assembly with a
good quality item.
A few different types have been used so you will need to measure yours first, diameter can vary.
Re: Rebuild Thread (Probably)
Posted: 19 Feb 2019, 11:16
by Ciaraneng
937carrera wrote:Ciaraneng wrote:On a separate topic. Does anyone know what the wear limit is for the clutch? Is it measured face-to-face?
Such a simple question.....
Ideally you should be checking the clutch diaphragm to make sure it isn't distorted, clutch disc for run out and wear.
I could not see a specification for wear in the bentley manual so went back in time to the VW 412 manual where it is stated to be 0.6mm min from lining surface to rivets.
From a non technical perspective, for all the hassle of taking an engine out to replace a clutch, and the cost of a replacement, then unless the existing one is in good condition then replace the whole assembly with a
good quality item.
A few different types have been used so you will need to measure yours first, diameter can vary.
Thanks carrera. I suspected that that might be the answer but as I've spent a lot on the rebuild I thought I might get away without replacing the assembly.
Oh well, in for a penny etc.....
Re: Rebuild Thread (Probably)
Posted: 19 Feb 2019, 12:32
by itchyfeet
new Sachs clutch 2mm to rivets if that helps
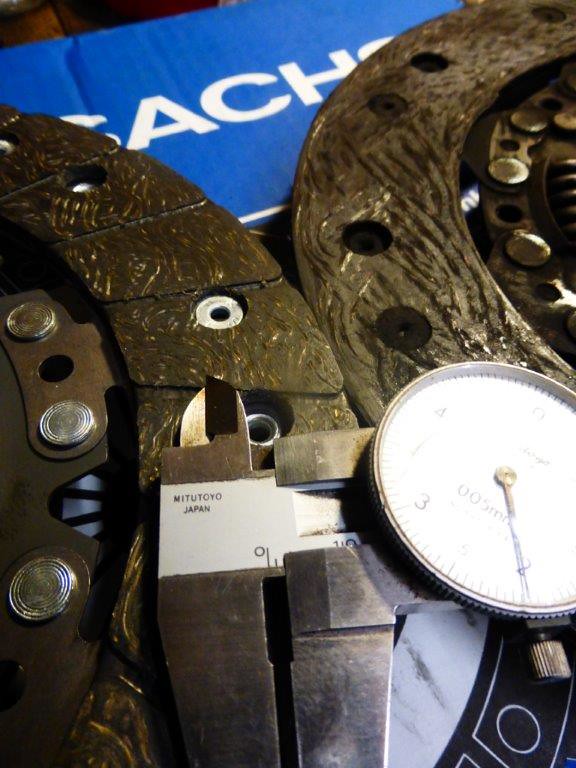 P1060759
 by
Paul_Barr, on Flickr
Re: Rebuild Thread (Probably)
Posted: 19 Feb 2019, 12:36
by Ciaraneng
Thanks Paul. Will check tonight but from memory I think I'm sub-1mm.