Page 8 of 30
Re: WBXlog
Posted: 09 Nov 2016, 18:52
by itchyfeet
Pistons into barrels and into engine tonight

Made sure everything was in the right direction, oiled barrel piston and ring compressor, then fitted compressor to piston taking care not to move rings when tightening, ring compressor needs to be covering as much of the piston as possible so that when you push it in the piston gets some speed up before passing into the barrel.
 P1060288
 by
Paul_Barr, on Flickr
 P1060291
 by
Paul_Barr, on Flickr
align it and a big shove.
 P1060292
 by
Paul_Barr, on Flickr
 P1060293
 by
Paul_Barr, on Flickr
all four done
 P1060294
 by
Paul_Barr, on Flickr
next I got the engine on the flywheel, the best orientation to make fitting gudgeon pins so con rods don't move under their own weight.
 P1060295
 by
Paul_Barr, on Flickr
Cleaned barrel seal grooves and crankcase mating surfaces with meths, last chance to remove any dirt.
 P1060296
 by
Paul_Barr, on Flickr
 P1060298
 by
Paul_Barr, on Flickr
Re: WBXlog
Posted: 09 Nov 2016, 19:04
by itchyfeet
Lower liner seals from gasket set and fit to the barrels
 P1060300
 by
Paul_Barr, on Flickr
Carefully push piston out until gudgeon hole is clear, push too far and rings will come out!!
Check circlip moves both ways by pushing on just one hole (different circlip hole in each direction), if it does it will be in the groove, last chance to make sure, check them all before fitting.
 P1060302
 by
Paul_Barr, on Flickr
align with conrod as best you can then pin in
 P1060304
 by
Paul_Barr, on Flickr
carefully placed rag then circlip in, again check movement on both directions.
 P1060306
 by
Paul_Barr, on Flickr
Push barrel home and align next barrel
 P1060307
 by
Paul_Barr, on Flickr
pin in, rag in, then circlip in.
 P1060311
 by
Paul_Barr, on Flickr
Push barrel home, I fit a wooden clamp with some bits of copper tube to hole them in place, it helps to stop them moving when you turn the engine over to fit the other two barrels.
 P1060313
 by
Paul_Barr, on Flickr
Then when all four barrels in and clamps on both sides the engine can be turned over to check it's all smooth.
 P1060314
 by
Paul_Barr, on Flickr
Re: WBXlog
Posted: 09 Nov 2016, 19:22
by 300CE
Almost there Paul, bet you can't wait to get it up and running

Re: WBXlog
Posted: 09 Nov 2016, 19:41
by itchyfeet
Needs to be in by the end of the year so it's well run in and trusted by Summer for the trip to France
Re: WBXlog
Posted: 09 Nov 2016, 21:55
by 300CE
I'm sure it'll be fine chap - you'll have to do a vid of it running!
Re: WBXlog
Posted: 10 Nov 2016, 17:51
by itchyfeet
Time to move on to heads
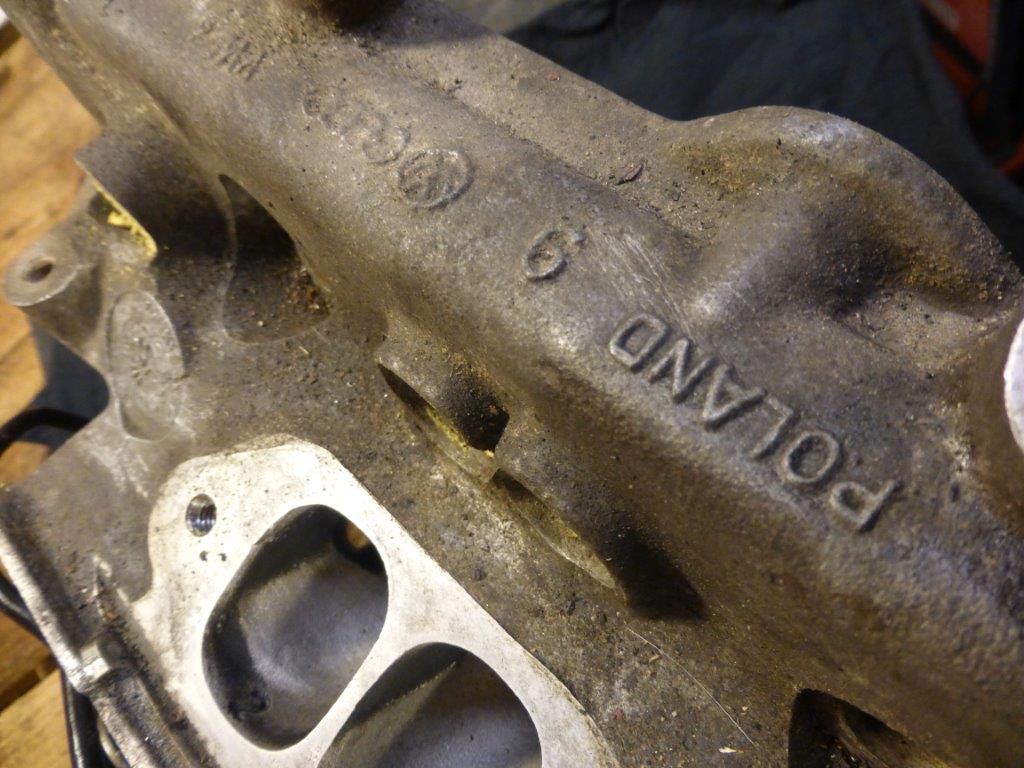
These are 1998 Polish cast heads ( all the others I have seen are German cast), perhaps some of the latest heads made?
They came fitted to a 2002 VW recon which is now in the van with different heads, they are in great condition, no cracks between valves and no major corosion
 P1060316
 by
Paul_Barr, on Flickr
 P1060317
 by
Paul_Barr, on Flickr
head 3&4 has some oily deposits on No 3, I'm pretty confident this is from a worn barrel/rings due to a cracked head 3 years ago which let water in to this barrel, the barrel is now gone swapped for a better one.
 P1060315
 by
Paul_Barr, on Flickr
head 1 & 2 is good no oily deposits
 P1060322
 by
Paul_Barr, on Flickr
pop the valves out
 P1060318
 by
Paul_Barr, on Flickr
Valve seats are still good, three years since they were last ground.
 P1060321
 by
Paul_Barr, on Flickr
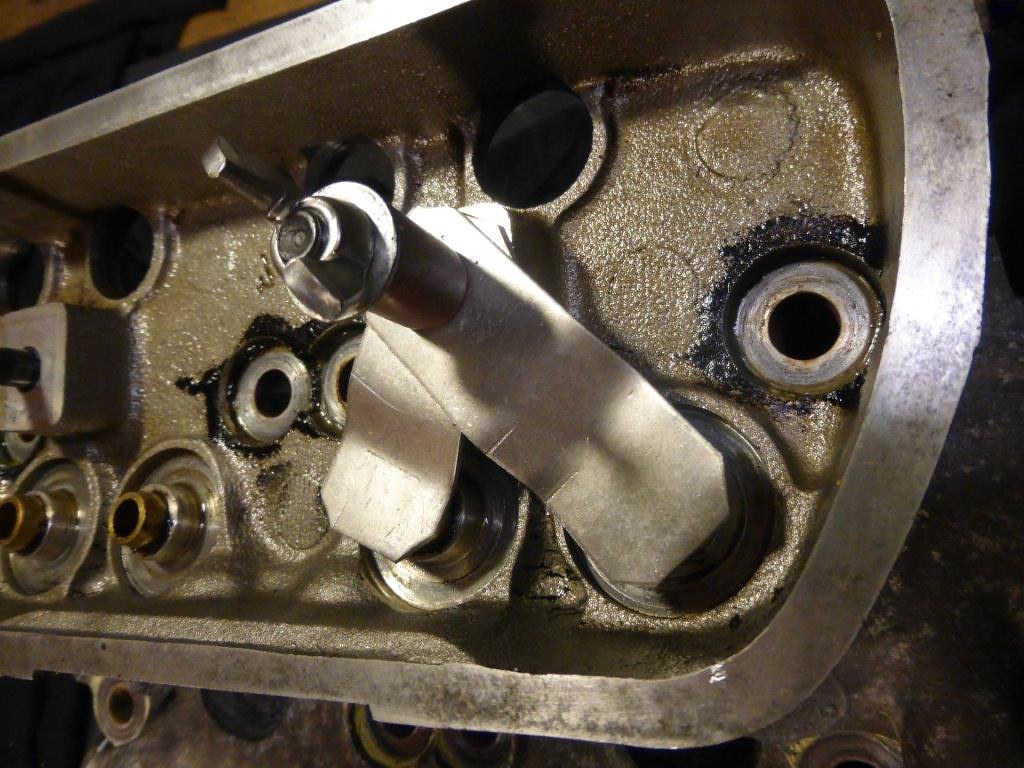
first thing I want to do is check the valve play, Bentley specifies 1.2mm with valves level with end of guides.
These brackets help the measurement
 P1060323
 by
Paul_Barr, on Flickr
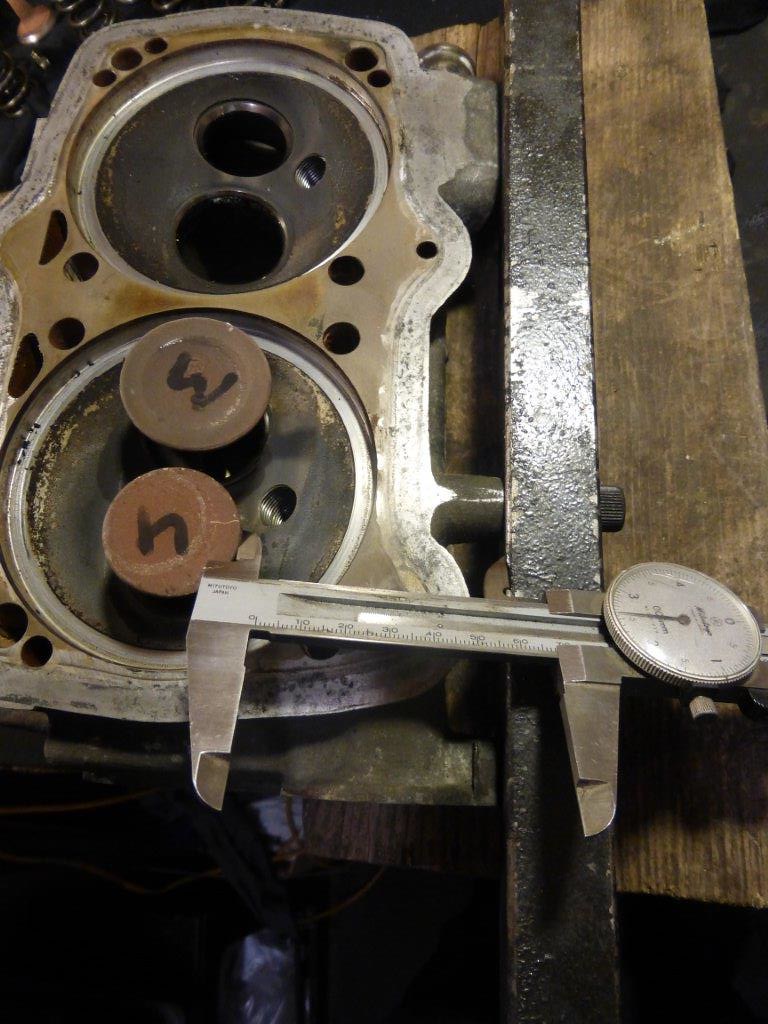
Turn it over and fit a square tube as a reference edge
Measured with a dial caliper
 P1060324
 by
Paul_Barr, on Flickr
Re: WBXlog
Posted: 10 Nov 2016, 18:17
by itchyfeet
The results are disappointing, two exhaust vales are 1mm too close to wear limits for me to be happy putting these back

1&2
 P1060327
 by
Paul_Barr, on Flickr
3&4
 P1060328
 by
Paul_Barr, on Flickr
Spent a little time cleaning them up anyway, used an M10 threaded bar to clean out the head stud holes
 P1060330
 by
Paul_Barr, on Flickr
Wires brushed the head nut surfaces and combustion chamber.
 P1060331
 by
Paul_Barr, on Flickr
 P1060332
 by
Paul_Barr, on Flickr
Re: WBXlog
Posted: 10 Nov 2016, 20:44
by what2do
Where you've used the threaded bar for cleaning threads, are you familiar with cutting a groove along the length of the thread with a hacksaw? Just a little tip I thought I'd mention.
Re: WBXlog
Posted: 10 Nov 2016, 20:58
by itchyfeet
Threaded bar is just like a file for cleaning the head stud clearance holes out
Re: WBXlog
Posted: 10 Nov 2016, 21:29
by what2do
itchyfeet wrote:Threaded bar is just like a file for cleaning the head stud clearance holes out
I know. The cut groove acts like a tap and prevents any binding.
Re: WBXlog
Posted: 12 Nov 2016, 17:01
by itchyfeet
I have decided to just replace the exhaust guides, the Inlet are not so bad and can stay for another day, I assume the inlets have a bit more lubrication from the fuel.
Note Inlet valves are 8mm diameter and exhaust 9mm diameter!!
I have an old head so I practised removing and refitting the guides first as I have not done this before, I had a few problems particularly with galling of the thread but that may have been low quality threaded bar.
The normal method, so I have read, is to tap the guide then using a long bolt or threaded bar and a tube spacer wind it out. Easier said than done, I found if you didn't tap right through the bolt hits the end of the thread and then starts expanding the guide which stops it moving, I snapped a bolt doing this so I moved to tapping right through not sure if it's the best way but it's what worked for me.
There are problems with tapping right through in that the tap is not long enough so I counter bored 20mm from both ends and just tapped the middle section.
Counter bore from top was 10mm followed by 11mm drill, counter bore from valve side was just 10mm
 P1060362
 by
Paul_Barr, on Flickr
I used M8 studding carefully slid through the inlet valve guide acts as a good guide to drilling and tapping square, vacuum cleaner to reduce the amount of swarf left.
 P1060383
 by
Paul_Barr, on Flickr
Keep pulling the drill out to check it's drilling square and evenly
 P1060387
 by
Paul_Barr, on Flickr
then drill from valve side
 P1060390
 by
Paul_Barr, on Flickr
using two M10 tap sizes, first runs through easy the second is a bit harder, never going to get in there with a tap wrench so used a battery drill on slow, and kept going forwards and backwards, used grease.
 P1060395
 by
Paul_Barr, on Flickr
 P1060396
 by
Paul_Barr, on Flickr
Checked the studding threaded through easily
 P1060399
 by
Paul_Barr, on Flickr
spacer tube and washer two nuts locked off on the end, a hardened bolt would be better I think
 P1060400
 by
Paul_Barr, on Flickr
wind it out
 P1060401
 by
Paul_Barr, on Flickr
 P1060403
 by
Paul_Barr, on Flickr
clean holes out removed as much swarf as possible with a rag first then washed it all down with paraffin
 P1060404
 by
Paul_Barr, on Flickr
 P1060405
 by
Paul_Barr, on Flickr
 P1060406
 by
Paul_Barr, on Flickr
Re: WBXlog
Posted: 13 Nov 2016, 12:34
by itchyfeet
I got these exhaust valve guides from Brickwerks, nobody else seems to sell 9mm WBX exhaust guides?
a bit of guesswork went for the smallest oversize, they are a bit longer because they have a flange ( snigger)
I measured up and came to the conclusion I could drive them home to the flange, no other reason for it to be there I guess.
 P1060342
 by
Paul_Barr, on Flickr
 P1060347
 by
Paul_Barr, on Flickr
 P1060354
 by
Paul_Barr, on Flickr
 P1060358
 by
Paul_Barr, on Flickr
Popped the heads in the oven on the lowest gas setting, used a twin channel K type thermocouple reader to check temperatures, air temp just over 110 deg C and after 45 minutes the casting temp was about 70 deg C
 P1060408
 by
Paul_Barr, on Flickr
 P1060413
 by
Paul_Barr, on Flickr
guides in the freezer
 P1060411
 by
Paul_Barr, on Flickr
I made this tool but I think you could use an M8 bolt with an unthreaded portion and cut the thread off.
 P1060410
 by
Paul_Barr, on Flickr
out of the oven and freezer and hammered them in.
 P1060415
 by
Paul_Barr, on Flickr
 P1060416
 by
Paul_Barr, on Flickr
 P1060417
 by
Paul_Barr, on Flickr
Re: WBXlog
Posted: 13 Nov 2016, 16:10
by itchyfeet
Oh well, if you never made a mistake you probably never made anything.
 P1060419
 by
Paul_Barr, on Flickr
One was much harder to fit than the others, drilled a hole to stop the crack
 P1060421
 by
Paul_Barr, on Flickr
it is quite a way from the water channel and not by the combustion chamber but I'm not happy with it.
 P1060422
 by
Paul_Barr, on Flickr
was expecting to need to ream the guide but they were a good fit on valves, no reaming needed.
Cleaned the barrel compression seal and green seal mating surface with 600 grit wet and dry and paraffin ( this is a different head forgot to take this picture)
 P1060163
 by
Paul_Barr, on Flickr
Ground valves with battery drill but they didn't need much, I use minimal turns and as much pull as possible, I'm aiming to replicate the speed and number of turns you would do by hand. Ran a clean piece of oiled cloth through valve guides first and oiled stems.
 P1060423
 by
Paul_Barr, on Flickr
 P1060424
 by
Paul_Barr, on Flickr
through clean down with carb cleaner
 P1060425
 by
Paul_Barr, on Flickr
 P1060429
 by
Paul_Barr, on Flickr
Re: WBXlog
Posted: 23 Nov 2016, 09:06
by george2490
Good work, needs a pic of finished article.
What was total cost?
Re: WBXlog
Posted: 23 Nov 2016, 09:29
by itchyfeet
Thanks,
It's not finished yet
I'm not happy with the head I cracked the valve guide flange, I asked Andrew at campershack to find me an uncracked head in his aladins cave of wbx parts if he can but he's a very, very busy man.
Costs are on page 2 but I changed direction half way through from a DG rebuild to a DJ I will update when finished but its a shopping list of parts because every rebuild is different in what it needs.