Page 8 of 43
Re: The GASWAGON (act III)
Posted: 17 Jan 2014, 10:21
by lloydy
yeah, maybe a bollard or something? Looking forward to seeing how it all goes back on, VERY interesting
found a pic of a guy on this forum (fin) version of a intercooler scoop. Hope he won't mid me posting them on here?..
He's put it just above the rear arch, looks ok on a doka

[/quote]
and this is a vw version of some sort of precleaner that never made it to production

Re: The GASWAGON (act III)
Posted: 17 Jan 2014, 10:28
by Plasticman
pre cleaner?? no openings on either of them , so styling maybe??
ah the doka , yes that works fine, few other options on a doka really hehe
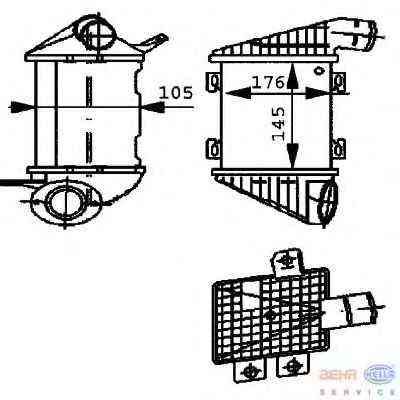
got dimensions for the intercooler
mm
Re: The GASWAGON (act III)
Posted: 17 Jan 2014, 10:54
by lloydy

No idea how accurate that is though..
Re: The GASWAGON (act III)
Posted: 17 Jan 2014, 12:19
by AdrianC
lloydy wrote:and this is a vw version of some sort of precleaner that never made it to production
metalmick8y wrote:pre cleaner?? no openings on either of them , so styling maybe??
The air's probably taken from "round the corner", up onto the roof. Going to play havoc with a poptop or hightop, though...
Re: The GASWAGON (act III)
Posted: 17 Jan 2014, 12:52
by Plasticman
how? on the picky you can see the inside(roof) bit and no opening there, mystery
Re: The GASWAGON (act III)
Posted: 17 Jan 2014, 13:07
by lloydy
it's meant to have a air inlet facing over the roof, it was never offered by vw but did have a part no i think. I posted it more as a curiosity than anything else.
Re: The GASWAGON (act III)
Posted: 17 Jan 2014, 13:20
by Plasticman
wonder what their reasons/thoughts were
mm
Re: The GASWAGON (act III)
Posted: 17 Jan 2014, 15:13
by AdrianC
metalmick8y wrote:how? on the picky you can see the inside(roof) bit and no opening there, mystery
Not on those two pics - I'm thinking the intake's going to be on the edge that's curled around the corner, facing sideways and inwards. If you stood on the opposite rear tyre, you could probably see it.
Re: The GASWAGON (act III)
Posted: 18 Jan 2014, 16:10
by garyd
Is there not a grille visible in the second picture? In the top face at the leading edge?
I would suspect that the idea is to take the air intake up and forward, away from the dust plume that is generated by the air passing under the front bumper and out through the front wheel arches. If you look at a dirty van the pattern up the side to the normal air vents is plain to see.
Re: The GASWAGON (act III)
Posted: 18 Jan 2014, 16:23
by AdrianC
garyd wrote:Is there not a grille visible in the second picture? In the top face at the leading edge?
I think you're right.
A google finds this pic of the other side - again, there's something sorta visible on the upper/front edge.

Re: The GASWAGON (act III)
Posted: 18 Jan 2014, 17:56
by Plasticman
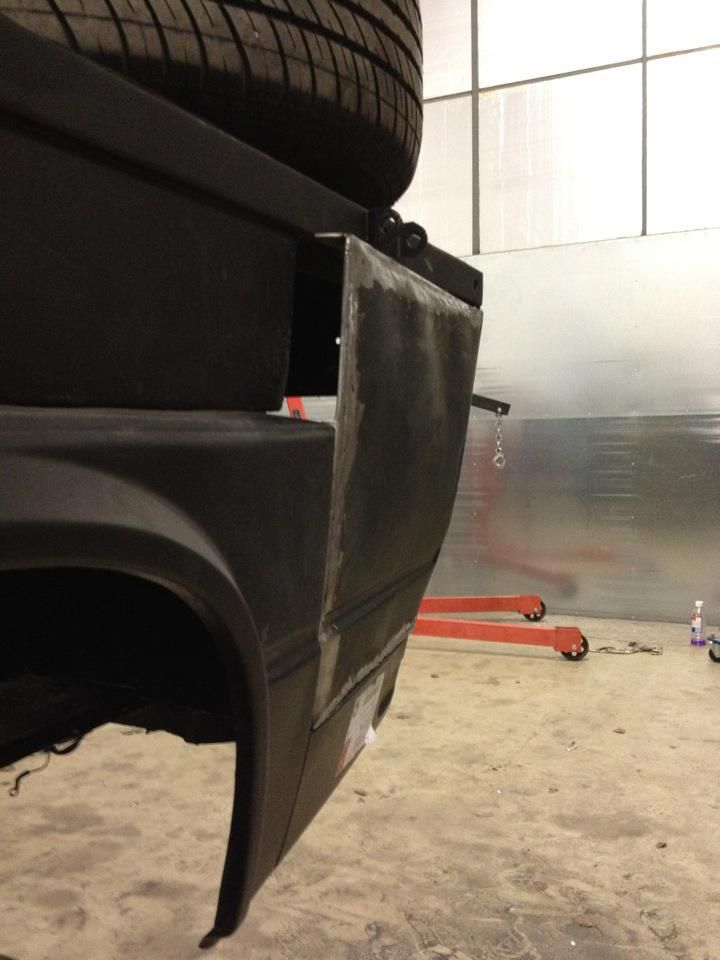
Well, busy hacking up the new front. the following show the original fixings, it may help others if you are planning on taking a front off
basically 4 juicy spots up each side of the legs/outriggers


the 2 outriggers are also welded top and bottom, one half of the box section is maybe 18g the other maybe 12g

main legs are the same all round
here the tow eye welds to the underside, note the main legs are not welded to the defo panel on the bottom

this is the rear of the n/s corner, you can see the construction method, i have unpicked the join with the defo closure part so this can be welded over the A post outer skin as per OE

new s/h panel even has a pt no


so whilst it looks a rapid job there is rather a lot of selective cutting to be done

its now sat in place

and

but

they fitted the n/s outrigger 20mm too close to the main leg! when removing the washer bottle i thought it was a bit of a tight fit, there is also a telltale additional bit of plate where this outrigger joins the innerside of the A post skin, its not an issue as no suspension is affixed to it ,and i can get some clearance for the washer bottle but it is sloppy and i can see no reason for it save forgetting to measure i suppose , im splitting hairs in a way but....
i shall leave the front for now until i have the lower panal etc aas i want to trial it all together before welding.
so will move to chopping another area out, there are a few to pick from , rear arch/s, fridge panel im easy
mm

Re: The GASWAGON (act III)
Posted: 18 Jan 2014, 18:07
by Woodyyellow
Just love reading this, fabulous work mm.

Looking forward to the next instalment.
Re: The GASWAGON (act III)
Posted: 18 Jan 2014, 18:22
by mrhutch
Thats all well and good mike, but I thought this was an intercooler thread
Re: The GASWAGON (act III)
Posted: 18 Jan 2014, 18:30
by Plasticman
nah, well in a way ... we removed the old cooler havent we,
mm
Re: The GASWAGON (act III)
Posted: 18 Jan 2014, 19:44
by Dave307
^^^^^^ don't care what thread it is I'm getting info and enjoying reading it. That's all that's required.
Anyway I don't even know what an intercooler does......lol.


