Difference between revisions of "VW Electrics battery to dash"
| Line 3: | Line 3: | ||
==Upgrading power to dash and headlights== | ==Upgrading power to dash and headlights== | ||
There could be several reasons why you might want to upgrade the power cable to dash, ie adding extra lights etc, but for anyone wanting bright headlights (by default) or needing a really good connection at the dash without voltage losses, this is the ultimate heavy-duty way to do it. I don't for a minute suggest that this is the only way, but this method does make a neat job of it and solves a lot of problems along the way for relatively low cost. | There could be several reasons why you might want to upgrade the power cable to dash, ie adding extra lights etc, but for anyone wanting bright headlights (by default) or needing a really good connection at the dash without voltage losses, this is the ultimate heavy-duty way to do it and unlike other 'professional installs I've seen, bypasses the fusebox feed. I don't for a minute suggest that this is the only way, but this method does make a neat job of it and solves a lot of problems along the way for relatively low cost. | ||
First of all, a little about how things are as standard. The existing (stock) 6mm cable to the ignition switch and fusebox in the T25 (Vanagon) was 'just' adequate at the time the vehicle was in production, but can quickly be put under strain with the upgrades we tend to fit almost as standard these days, particularly if the hot air blower and rad fan are drawing more than when they were new. Supply to the front is akin to sucking treacle through a straw. | First of all, a little about how things are as standard. The existing (stock) 6mm cable to the ignition switch and fusebox in the T25 (Vanagon) was 'just' adequate at the time the vehicle was in production, but can quickly be put under strain with the upgrades we tend to fit almost as standard these days, particularly if the hot air blower and rad fan are drawing more than when they were new. Supply to the front is akin to sucking treacle through a straw. | ||
Revision as of 19:07, 7 November 2016
Penned by Covkid
Upgrading power to dash and headlights
There could be several reasons why you might want to upgrade the power cable to dash, ie adding extra lights etc, but for anyone wanting bright headlights (by default) or needing a really good connection at the dash without voltage losses, this is the ultimate heavy-duty way to do it and unlike other 'professional installs I've seen, bypasses the fusebox feed. I don't for a minute suggest that this is the only way, but this method does make a neat job of it and solves a lot of problems along the way for relatively low cost.
First of all, a little about how things are as standard. The existing (stock) 6mm cable to the ignition switch and fusebox in the T25 (Vanagon) was 'just' adequate at the time the vehicle was in production, but can quickly be put under strain with the upgrades we tend to fit almost as standard these days, particularly if the hot air blower and rad fan are drawing more than when they were new. Supply to the front is akin to sucking treacle through a straw.
More to the point, it is not unusual for the original 6mm feed to actually get warm or even hot, and like any resistor, a hot wire is soaking up power and that means less volts for everything else - including lights. Using relays is unlikely to help either unless you at least double the existing cable capacity to start with. In fact, some relays can create a greater (albeit small) voltage drop than a big switch. Fitting relays with no other modifications is a waste of time frankly, although it does take the load off the headlight switch. So, rather than mess with the 6mm stuff, the easiest solution is to fit a new supplementary cable back to the battery with marine-quality junction boxes that can meet the demands of all the power-hungry stuff, take the load off the existing fusebox and put a bit of sparkle back into the lights. The original 6mm cable can then be left to power the lighter stuff.
This project assumes that you've already upgraded the main cables from alternator to starter to battery (see: http://wiki.club8090.co.uk/index.php/VW_Electrics_main_cables ) - if not, do that first. Its important to have a really good skeleton supply throughout. You should also increase the quality of any earthing. A new thick cable (at least equal value to what you're using for the positive cable) from the body of the starter to chassis is recommended. If your battery is underneath one of the front seats, you can follow these instructions as they are. If your battery is in the engine bay, you can route accordingly and it may suit you better to mount your junction box there. However, it still makes sense to mount a junction box inside the vehicle and under a front seat is as good as any place.
Firstly, if you reorganise things properly, you'll lose the mutitude of extra cables that can end up fastened to the battery positive terminal. Most campers seem to end up like this with several cables crammed together at the battery which can create the potential for sparks/shorts between other things - particularly the underside of the seat. Whilst you can lay carpet across etc, it is not ideal connecting cables like this and it all starts to get messy and unreliable once you've removed the battery several times. Its therefore better to relocate these extra cables in a secure junction box and only have the one single cable to battery positive. From the junction, you can run a new thicker cable to another junction box under the dash.
I chose to use 16mm 110amp cable for maximimum surface area but a 10mm cable should be perfectly adequate. As stated, VW used 6mm for the original shared feed to ignition and to supply interior lights with ignition off. Everything up front effectively runs off that 6mm cable so a second cable helps no end. For this project, you leave the 6mm feed exactly as it is, but move all the heavy stuff on to the new mega-cable. The relay circuit for headlights is covered elsewhere - you just tap into the new junction box you'll be fitting under the dash.
Materials
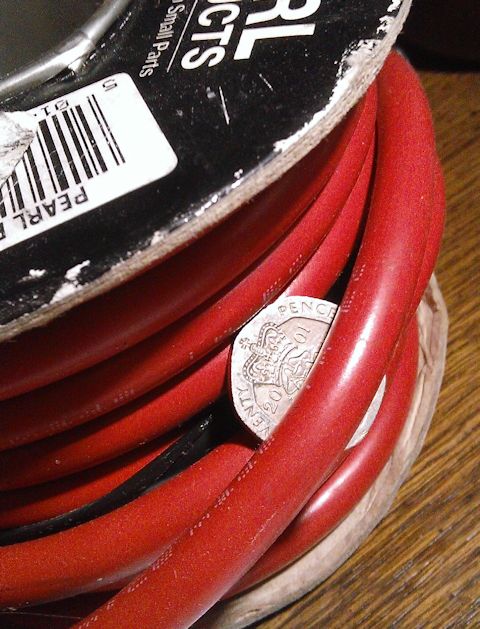
The new cable I used is similar to the upgraded power cables used on high-powered stereos, described in some places as simply 'battery cable'. In any event, its multi-strand and very flexible. I bought a complete reel of it (just under £40).
This is the stuff I used - 16mm 110amp (20p coin for reference):
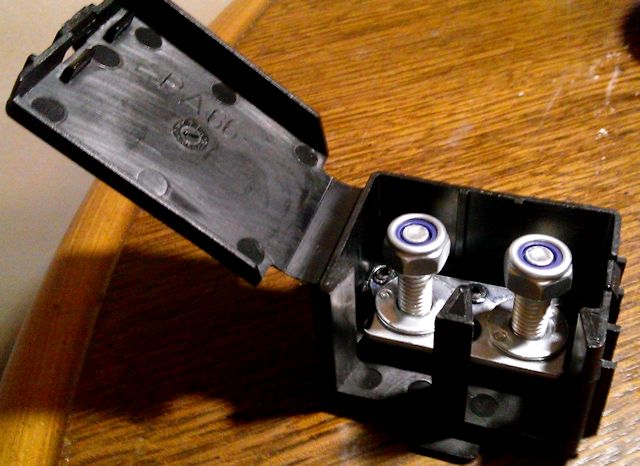
For the terminal block, you need to look at marine/auto terminal blocks in the 300amp range. You'll never draw that much ofcourse but better to steer towards the heavier stuff. There are many more terminal blocks out there that are only rated for low-draw stuff and many seem to rely on little more than philips screws to hold cables firm. You do NOT want those - too lightweight for this job. The junction box must also have some kind of lid/cover to protect against accidental shorts.
The type I used (above) consists of two 8mm nuts and bolts house in a black insulalted case with a snap-down lid. It doesn't take up too much space and can be screwed/bolted to a convenient position - say inside wall of seat mounting base or the inside of engine bay. Its robust enough and more suited to heavy battery cables. You'll need two of these - one for battery end, and one for under the dash. I paid under £12 for both of them including postage.
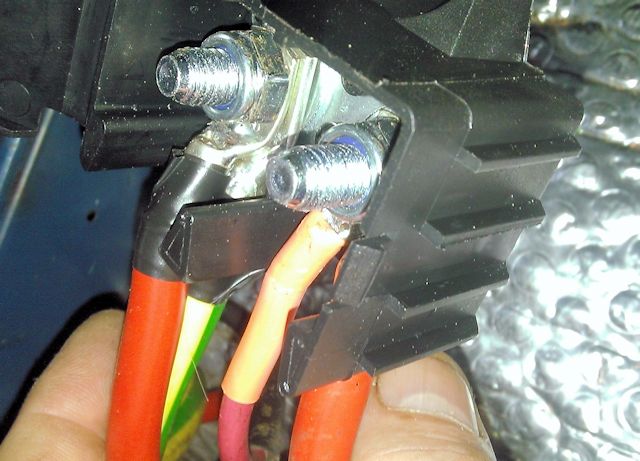
See photo below of terminal block with cables in place and lid off:
If you look, the thin red cable on right is the original 6mm cable to dash (hard to believe I know). On the left is the uprated one which now runs to the terminal block under dash. Beneath these cables (extreme right) is the now single cable to battery positive and the other thick green/yellow wire (ignore the colour) goes to starter - four cables in all. If you have a split charge relay there will be at least five cables. There is plenty of room for more should you need them - such as a quick battery plug connector to make jump charging/starting easy or a mains charger.
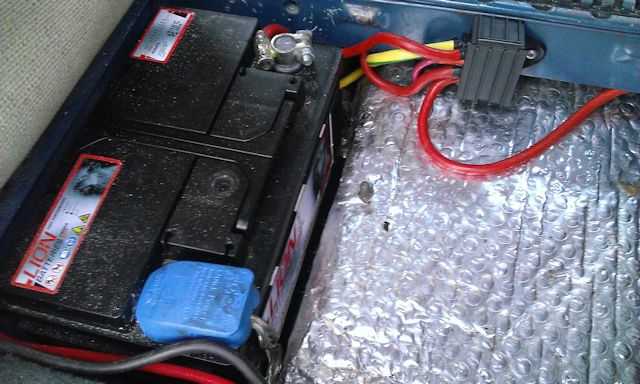
Fitting a box like this means all those annoying wires that originally terminated at positive terminal can now be fastened inside the terminal block out of harms way, with just one to starter battery. It makes removing the battery a lot simpler too. I use quick-release clamps on mine.
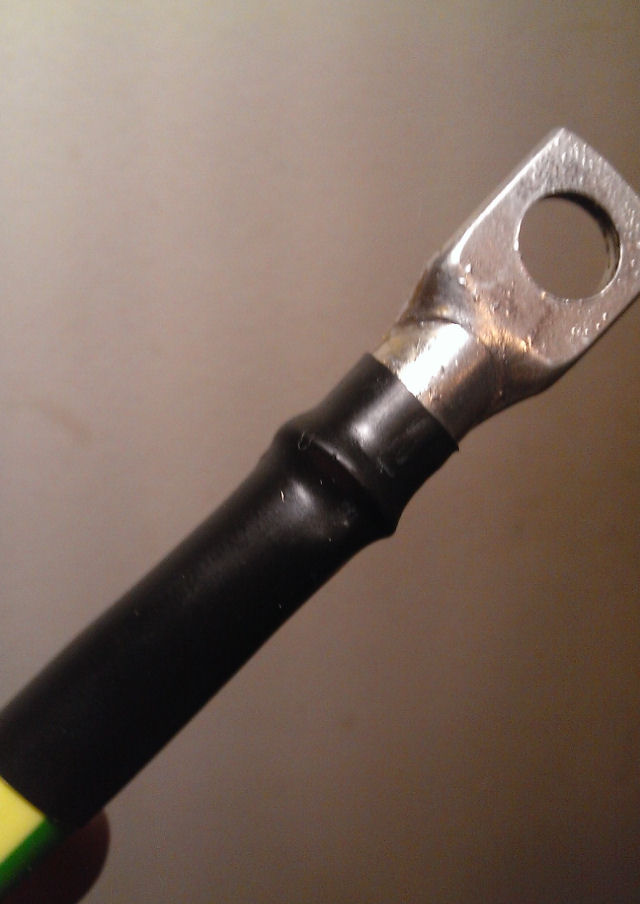
For reliability, you'll need to source good quality connectors for this - soldered 'Copper Tube Terminals' (as below) - not conventional crimp ring connectors, and use proper shrink tubing - NOT insulating tape:
Toolstation do the solder-on lugs cheap (branches everywhere and in some places they're based in Wickes): http://www.toolstation.com/shop/Electri ... ugs/p32996
I bought 8mm ones (correct size for terminal block I used) in 6mm, 10mm and 16mm sizes (10 of each in pack) - £6.35 for all of them (30). Its well worth buying all three bags as they're so cheap at Toolstation and you'll always want one in future. Theres also enough thread in terminal block to stack washers between connectors if you want to space them better.
Part numbers for Toolstation lugs: 55534, 87832, 11930
You'll need a mini blowtorch or gas soldering iron, flux and solder to fit them but not too tricky and best connection you'll get. REMEMBER to slide shrink tubing on BEFORE you solder on lugs, then slide it back over join and shrink.
I discovered that although I have a small blowtorch, the ALDI workzone gas soldering iron (with soldering bit removed) will also do the job. Did five lugs on the trot with that - no probs. Well worth buying one next time they come in if you don't have a gas soldering iron. Very useful. Forget how much it was - prob under £15.
Above: All cables mounted in junction box screwed to side of seat base. That leaves just one cable to battery positive from the box - much simpler.
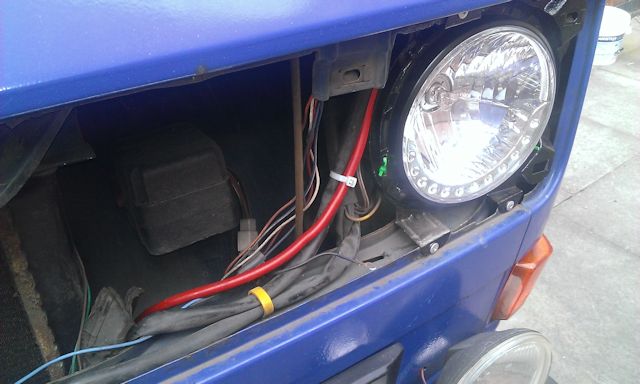
The best way to route the cable would be underneath the vehicle, suitably tied up out the way (always use grommets on any holes you make) and bring it up behind dash (big red cable pictured above) through one of the existing grommets and ideally as short a run as possible. You could run it inside but its awkward to hide and not ideal under carpets! From there (with fuses) you can supply headlights or run all the heavy stuff like rad fan & blower etc and leave the existing fusebox running on the 6mm stuff for low-draw items or even install an extra mini fusebox - up to you.
Conclusions
If you need an overview of voltage drop, see: https://www.youtube.com/watch?v=LMWvu7RV8qs
Its also worth including the thoughts of member Ghost123UK here as they may help you understand 'load'. When you're running a great many ancilleries, it can be bigger than you might think. As he rightly points out:
"If a cable is getting warm it is certainly using up some of the power. You could work it out quite easily - if you really wanted to. Measure the current flowing with "every thing on" (everything fed from the dash feed cable that is), Now measure the voltage at the battery, subtract from that the voltage at the other end."
Example:
20 Amps flowing to fusebox. 2 Volts difference between battery and fuse box end feed
Using Ohms law - 20A X 2V = 40 Watts being wasted (as heat) which in turn = 3.3 Amps wasted in producing that heat. Again using Ohms law, 2V divided by 20A = .1 of an Ohm (is the resistance of the cable)
Now for a little easy reckoning (and you won't be running all of them at once but even so):
- Propex 2 Amps
- bEngine 8 Amps
- Lights (x2) 10 Amps
- Heater blower on full 8 Amps (???)
- Rad fan on full 12 Amps (???)
- Radio (playing reggae !) 5 Amps
- Tail lights/ instruments etc ~5 Amps
- Fridge 8 Amps
- Trickle charge both batteries 4 Amps
Did I miss anything off ??
= 62 Amps!!!
I fitted a voltmeter in the front at least a year before this upgrade. It is fairly accurately calibrated and I discovered that the new battery to dash cable also increases the available power generally. This is because the original 6mm cable, sometimes overloaded, would get warm, further stealing power. Obviously post-upgrade, this no longer happens so the voltmeter now reads a volt or two higher as a result. That said, a 45amp alternator may be better swapped for a 90amp one - for headroom.
I guarantee if you go to all this trouble (perhaps a couple of hours max), voltage drops to fusebox or anywhere under the dash won't be a problem at all, and even on standard bulbs you'll see the difference but throw in some Osram nightbreakers, relays and modern 7" headlight units and you won't want for much. Providing a good source of power can really transform the lighting out front as well as reduce the ever-increasing load on an old fusebox. Re-route the radiator fan and blower unit (with fuses) to the new cable and your existing fusebox can go into sleep mode on the original 6mm feed. Well worth doing.
Covkid
