VW Electrics LED Number plate light
CovKid: Heres a project for anyone considering going over to LEDs (Light Emitting Diodes) for running lights.
Edit (March 2015) In retrospect, things have moved on somewhat and rather than go to the trouble of soldering components as below, it would be far simpler to use a short LED strip stuck up where the old number plates are. However, for those that like soldering:
Firstly, the brightness of LEDS (light emitting diodes) has come on in leaps and bounds over the last year or so and the light emitted, whilst no substitute for halogen bulbs in headlights, is certainly a great substitute for most other bulbs around a T25, if not a distict improvement. They also consume much less power (just milliwatts compared to watts), a consideration if you need to leave some lights on in the dark (ie a breakdown) and give a clearer, whiter colour.
Now, most bulbs can be replaced for compact LED arrays on ordinary bulb type fittings or festoon type arrangements. Ebay is already awash with these, ready made, and some might find these do the job. Typically they are 19 LEDS crammed together for indicators, brake lights etc. The one thing NOT so good about LEDs is they tend to be very directional compared to the 'all round' glow of an ordinary bulb. However, tungsten bulbs lose some light as well as an enormous amount of heat - in fact they are not very efficient at all.
Lets consider the number plate light.
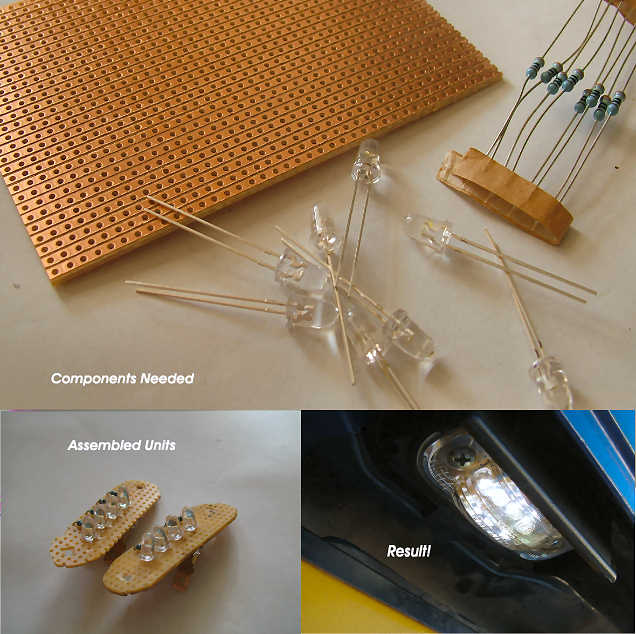
The number plate light on a T25 is actually two units, each supporting (or boasting as it might have been described in the VW brochure) 2 x 5watt bulbs. They're not bad I guess, but the bulbs will ultimately go and usually after they've already become blackened. I decided to keep the original plastic lenses for these to afford some protection from rain and washing the vehicle. I could have replaced the bulb with a ready-made LED equivalent but I wanted a better spread of light so opted for 4 LEDs per unit, soldered on to veroboard with 450ohm resistors for each LED. Without resistors they will die within seconds at 12v since most LEDs are around 3-3.5v I could also have made one single, long unit to replace both but wanted to keep the original look as far as possible.
I used 8 x Ultra-bright white LEDs (try Ebay for these) and 8 resistors and a small piece of veroboard.
Basically all I did was fix all the components, shape and fit the veroboard to fit the housing then soldered two male tags on the back so I could just connect to the existing wires. The original light comprises a plastic box, a rubber seal and a bulb fitting. All I did was dump the bulb fitting. I won't go into the exact circuit since its so simple and theres a link further down this post showing layouts you could use. The long lead on LEDs is the positive by the way.
I made a new new flat unit from plain, blank veroboard, using the original bulb holder as a size guide and rounded the corners with nippers and a file. Next I made 8 fine holes enough to poke the leads from each LED through, plus a hole either end so that the lens retaining screws went through these too. Most LEDs have one lead that is longer - this is the positive side and should therefore be powered by the + side of 12v. Since conventional LEDS are typically 3.5V each, 12v would blow them straight away so you fit a 450 ohm resister to the + lead to take up the extra voltage. Once everything is soldered in place, you only have to 'splay' the LEDs slightly to spread the light pattern a little, connect, refit the screws and away you go. Chances are, the vehicle would have long since rotted away or the supply of fuel dried up before the little suckers ever blow.
The light is far better and should I ever leave my lights on accidentally, it will make little odds since my side and tail lights are also LEDs and draw milliamps compared to the old bulbs.
Someone out there could do a neater job than I've done I'm sure, but hopefully my rough explanation will be some help to anyone considering doing this. Cutting tracks is easily done with an 8mm drill bit by hand. You certainly want to ensure that the ends of each board which take the screws, are cut off from the rest otherwise you might short part of the circuit. Some may be able to make their own custom boards. I'm told this is possible using a laser printer and the right paper, but veroboard is ok.
Incidentally, the last photo was taken in broad daylight and we all know how 'yellow' the ordinary bulbs are.
For reference, I found this page really useful for calculating correct resistor, how many etc: http://led.linear1.org/led.wiz - you just need the specs for the LED type you're using to input the required info.
Next project is to convert the rear light housings to LED arrays (ie whole boards crammed with them). Again, it is dooable but I think I'll need to print a complete layout for this and you'll need to cut part of the plastic on the rear of the light unit to get these lights in square, but hopefully I can do mine before the Autumn and pass on the info.
I may be able to supply these at reasonable cost in kit form with a specially made circuit board - will look into it!
