Difference between revisions of "Coolant and Heating heater blower replacement"
Ghost123uk (talk | contribs) |
Ghost123uk (talk | contribs) |
||
| Line 232: | Line 232: | ||
Pic = (Not my van = hope the owner of the pic doesn't mind ;)) | Pic = (Not my van = hope the owner of the pic doesn't mind ;)) | ||
[[Image:ColinVWT25Heaterfanmod.jpg]] | |||
---------------------------------------------------- | ---------------------------------------------------- | ||
Revision as of 10:17, 20 December 2014
Blower Motor Dead - Fault Diagnosis
From CovKid:
Firstly, go grab your Haynes manual and turn to 12.38 - (wiring diagrams) - its towards the back.
See V2 bottom left? thats your blower motor, and as complicated as yours may seem to be, its just a bigger version of those tiny motors you wired up to a PP3 battery as a kid.
The wire below it is the earth (brown). Just above the motor there are two other wires that connect to it, but further up there are three that come out of E9 (the fresh air/heater blower switch) - the three wires for the three different speeds. By default the motor runs full pelt so they added resistors (N23) to slow it down for the two other speeds (in fact you could make it a 4 speed with a few mods but hardly worth it). If you read my answer and look at the diagram carefully, it should all make sense.
Basically these are the three speeds and the wires are coloured thus:
1) ge (stands for yellow and motor would be flat out)
2) ge/sw (yellow and black - motor at medium speed)- power now going through one resistor
3) ws (white - motor at slowest speed) - power now going through TWO resistors
As long as the motor is earthed, and it should be in situ, apply 12v to the yellow wire first and see if it responds. In theory it should go flat out, then apply 12v to yellow & black and finally white for the lower speeds. Motor could have a bad earth, could be seized, or stone dead but above should help you discover whats going on. If it works on yellow but not on one or more of the others, the resistors are probably cooked or shot.
Removing dash to get to heater box
To get to the heater box, you need to take column cowls off, remove steering wheel.
Remove 2 shear bolts at top of column. (Use mole grips)
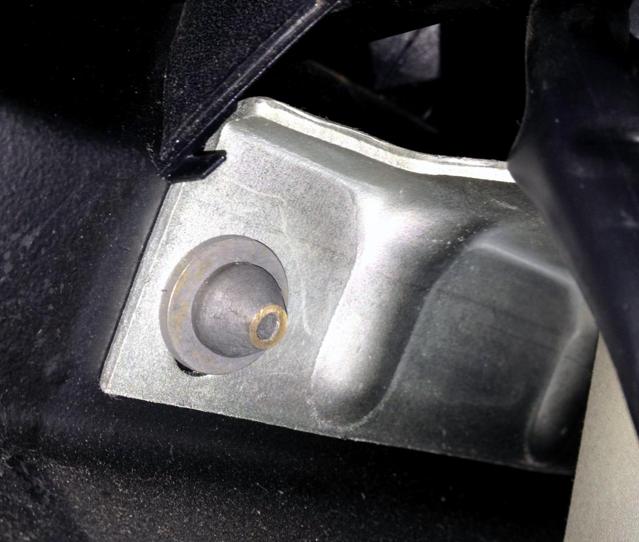
EDIT by ghost123uk = This is a pic (courtesy of Midge) of the end of the shear bolt. A chisel can be used to start it moving.
Remove 2 M8 (13mm) bolts lower down column. Lay column on drivers seat, no need to unplug!
Gently pry off heater knobs and fan switch. Very carefully pry off heater facia, two plastic plugs tend to break very easily!! Remove 2 screws behind that hold controls to dash.
Pull off plastic cover over dash unplug all switches, unclip dash plug, undo speedo cable.
Remove dash console.
Undo screw to left hand side of hole that holds heater controls in.
Take glove box down.
Undo smaller screws along the front of the dash, but don't undo the bigger ones they are for the wipers.
Undo screws at side of dash that hold it to pillars..
Find red/black wire that goes from heater switch into loom and snip it. Follow brown wire from heater to behind fuse box, remove said wire from earth spider and pull free from loom.
Take front grille off and undo 2 Phillips head screws just above radiator, identified by large washers for size of screw!
Pull off plastic heater cover panel.
Clamp water pipes where they exit the floor, undo water pipes from heater box.
Undo all plastic heater hoses.
There's 4 number 3 Phillips screws that hold the heater box in, one in each corner, the one at the bottom right is the hardest as its hidden by one of the water pipes and it also has a clamp around it.
Heater box should now come free.
Removing dash to get to heater box 2
(from ermie571)
1)Disconnect battery 2)Remove Dash as follows:
Undo the LITTLE screws in front of the dash (or your windscreen wipers will fall off!! ok, the motors will...) Couldn't do it by hand, but the electric screwdriver did the job well. Remove anything mounted on the dash, and the assorted tat that gathers there!
Strip the cowling from the instrument panel and remove the instrument panel as well. Remember the fun you had putting the stereo in...well take it out - you get to put it back later! Now the heater control panel and sliders....pull the 3 or four plastic knobs towards you....they come off, honest. Then the switch itself...pull off the bit you turn. Right, with a small screw driver, slowly prise off the cover, bottom left and top right. Slowly slowly here. The three screws (poss 2) to release the slider gubbins from the dash.
Got a cigarette lighter....remove the connections. Remove the glove box. Hand underneath at each end, pull off the two air hoses. 2 screws or bolts on the pillar on either side...remove and the dash should now come away. Sorry - missed a bit....the bolts that hold the steering column on. Right - these are special sheer bolts....but we were able to remove and reuse, but you do need decent mole grips, and attack the bolt at the one straight part of the bolt. You don't have to take the steering wheel off....but it did give a little more space to work in.
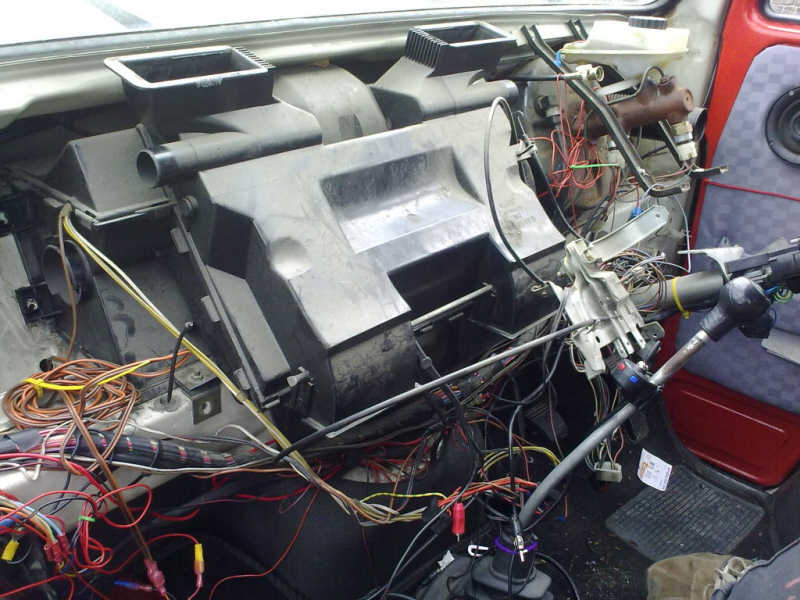
this is what is revealed under the dash:
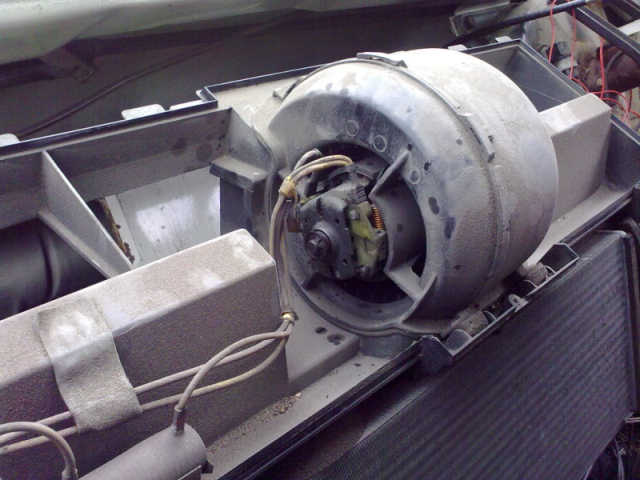
2. Remove the fan heater unit....screws and bolts all over the place. Remove the front grill (yep fixes in from the front too!). IF you have clips around the heater unit, unclip and seperate the box. If not....and we didn't in Ritchie you are going to have real fun working your way around with a small screw driver to get into the thing. PS - you will need some silicone sealant to stick it back together!! Once its unbolted and you are in you get this....
that skinny thing on the bottom right is the resistor that controls the speeds apparently!
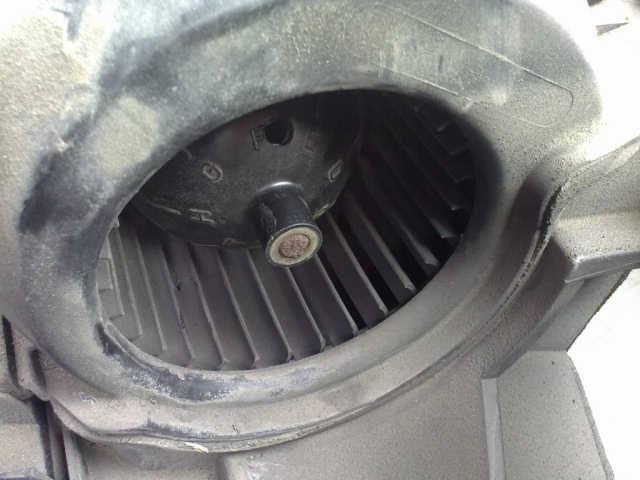
3. Oil the bearings. Right in the middle of the picture is the fan. you can see the first bearign you need to oil - its that brown spot in the middle of the fan. A little bit of WD40 followed by a manual spin of the fan will clean any gunk, then a drop or two of engine oil will lubricate that bearing.
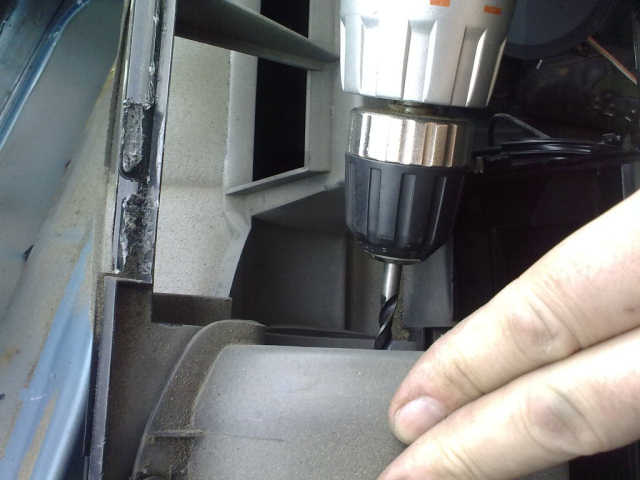
Now look round the other side... You wlll see a plastic drill with letters on it. Now be brave as you are going to drill next to the letters, aiming towards the centre as the other bearing in lurking beneath:
and after drilling (we used a 5mm bit)
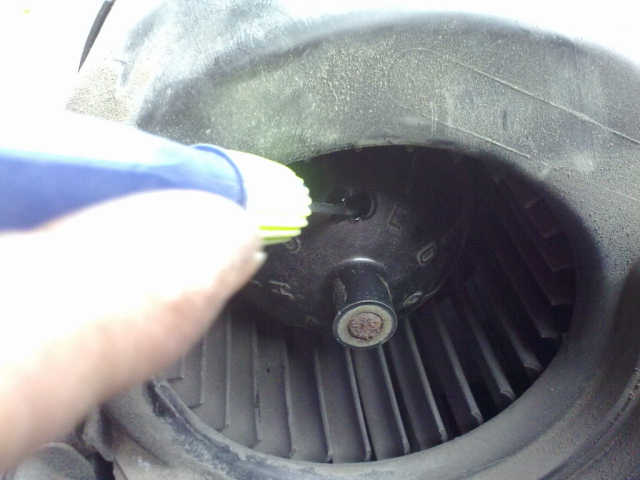
Now, with a little screwdriver dipped in engine oil, offer some lubricant onto the bearing....
Give it a good dose....u don't want to be doing this again next year!!!
Spin the fan...drop more oil on both bearings and you are good to go! It should be silent now!!!
Now, put it all back.....oh - just to mention...when we put the dash back, and were at the putting the instruements back, we both found that the speedo cable had gone walkabout....dunno how, but they were both up in the same place....right up under the windscreen....need little fingers to hook it out. May be worth hooking it round something to stop it wandering off!!
Further Help (and you don't always have to replace it!)
Mocki: You can "short" past the switch or check the continuity with a meter or battery and bulb with the switch disconnected...
If it is the resistor, or the motor its a dash out job...
Not sure of the resistance of the resistor, but its the same as the dim dip resistor on later vans on the headlights i'm told...
Horace83: New switch £5 from GSF
Miss Marple: I'm about to do the 'dash out' thing due to smoke under the dash = heater now not blowing. I have sourced a replacement heater box and have read the wiki, but the wiki only takes you up to removing the box. I'm a bit concerned about what happens after I've reconnected the water hoses... how do I then bleed the system? I'm really determined to do it myself, but I am a learner!
CovKid: Mine gave a puff of smoke too and blew the fuse every time but once I got in there and gave the motor a spray of WD40, away it went - had heating ever since.
Getting the dash out isn't that difficult once you get going. Takes 30 mins at most. What took me longer was getting the blasted screws out that hold the fan unit against the bulkhead.
Basically they seize through drying out.
Miss Marple: So, you didn't replace the motor then? I haven't considered that the motor may still work. I haven't replaced the fuse, just thought that as there was a fair amount of smoke the motor would now be dead. So you recommend changing fuse and wd40 before I rip my van to bits???
CovKid: Well if you had CLOUDS of smoke maybe it IS toast now. Depends. I definately had smoke appear from under the dash yet it still runs and very well at that. Nine times out of ten with apparently dead blowers is that the motor fan assembly is seized solid - long periods of non-use. However, you still have to pull the entire heating unit away from the bulkhead to get to the motor itself. You can then access it from the rear (the bit screwed on to the bulkhead if you see what I mean).
I actually had a replacement unit to go in but guess what - THAT was seized too and WORSE than the one I was intending to remove. Trick I guess (in the longer term) is to switch the fan on periodically to make sure it operates as it should. Whether replacing the unit or lubricating it, you still have to remove dash and pull blower unit forward though
Tommy the Cat: Just got my blower working had the dash out and the thing has just seized up...loads of wd40 contact cleaner and hey presto..... this is an easy job even for a muppet like me the hard thing is getting the screws out, if they're really bad.
I would do it again and would take half the time as I spent quite a while looking at it rubbing me chin and stressin!!!! Tell you what though it does scare you a bit when you look at the old girl with the dash out and all the wires and all. Just for ref. I cleaned up the earth spider(s) and cleaned up all the other earths as theyv are easy to get to then (mine looked cack)
CovKid: They can seize up solid those things. As I say, 9 times out of ten a spray with WD40 and a quick turn by hand is all thats needed - providing you don't cook it before you get that far.
Yes I agree, it all looks a right state with the dash out but all the awkward jobs can be done whilst its out, like:
1) Relubing wiper mechanism, replacing knackered washer jets if they need doing (some great light-up twins around) and maybe replacing washer pipe. I found a pet shop that had silicon pipe rather than the solid stuff and that worked a treat;
2) tidying up wires or fitting new items;
3) I mounted my front speakers under the dash (a lot easier with it out) and despite being blasted for this on another thread they sound excellent!;
4) check for leaks around the base of your windscreen seal;
5) wire your stereo in properly;
6) set your cold air/heater cables up properly.
Also as an aside, pet shops also stock 'T' pieces that are great for renewing any old ones that feed the air cleaner in the engine bay.
Miss Marple: This is all sounding very encouraging... So, when the smoke started to appear, the fan had been running fine for ages (we were on a long journey). Would the fan just seize mid use even though it was running very nicely? Would be nice to be able to get the original fan going if indeed it is seized and not burnt out.
CovKid: No. Seizure is highly unlikely if it had been run very recently.
Miss Marple: I was advised to WD40 the 4 screws that hold the box on about a week before I intend to attempt it... so I'll do that now so I have time to scratch my head and look at the situation. I'll let you know how I fare
CovKid: The threads of the four screws emerge (barely) through the front of the bulkhead (behind top of radiator I think) and clearly when the heater box has been in for some 20 odd years moisture tends to rust them. Must confess, mine were a PIG to get out - the ones close to the steering column being the worst!
My view is if you're going to deal with this job (and inevitably we all have to at some point), use the opportunity to deal with all the other things I mentioned. You can also sort out any problems with the dash panel itself like a good clean and touchup - notably along top edge where its screwed down. More importantly perhaps, you'll be able to see what state the bottom of your windscreen seal is in (any leaks).
The shear bolts on the steering column will usually come undone with mole grips by the way (I refitted mine the same way) but you don't need to remove entire column as Haynes described - just drop it out of the way by undoing the upper bolts.
If you have to change the entire heater unit or dismantle it (always possible its totally kaput) then you'll need to disconnect the heater radiator hoses and top-up and rebleed cooling system after. Take the time to ensure the foam seals around orifices on the heater unit are all in good order (we don't want draughts now do we, hot or cold?) and put back properly when you refit unit. You could make up your own if any are shot.
Incidentally, the first time I had experience of a seized unit was in driving rain on the M1. I went to switch the blower on (hadn't had the bus long) and it promptly blew the wiper fuse - doh. It was 6 miles before I found somewhere I could stop to replace the fuse!
I did buy a second hand blower unit (and incidentally there are subtle differences between earlier and late blowers) but managed to free off the original as described above, but you can only get to the blower itself through the two holes behind the unit (i.e. back of heater which is facing front of vehicle). Normally a turn by hand and some WD will do it. Haynes say it's possible to open the unit (sourcing new clips for reassembly apparently) but I found I could get to things OK once the unit was pulled back.
If anyone gets as far as removing the blower itself and finds the brushes are gone, heres a good tip. Try a lawnmower shop for brushes! They have loads in all different sizes and you can usually find a pair that will fit - even if a little rubbing down is required to ensure they do fit. Done this with Beetle wiper motors in the past.
As far as I know, the blower motor is also common to the following vehicles so may be useful info for scrap pile enthusiasts:
CADDY MK1 Pickup (14) 08.82 - 07.92 GOLF MK1 Hatch (17) 04.74 - 12.85 GOLF MK1 Cabriolet/Cabrio (155) 01.79 -
08.93 JETTA MK1 Saloon (16) 08.78 - 02.84 PASSAT MK1 Hatch/Saloon (32) 05.73 - 07.80 PASSAT MK1 Variant/Estate (33) 05.73 - 10.81 PASSAT MK2 Hatch (32B) 08.80 - 12.88 PASSAT MK2 Saloon (32B) 08.84 - 03.88 PASSAT MK2 Variant/Estate (32B) 08.80 -
06.89 SANTANA Saloon (32B) 08.81 - 12.85 SCIROCCO Hatch MK1(53) 02.74 - 07.80 SCIROCCO Hatch MK2 (53B) 08.80 - 07.92 TRANSPORTER MK1 Bus/Mini Bus (22, 24, 25, 28)
01.50 - 12.68 TRANSPORTER MK1 Box/Van (21, 23) 01.50 -
12.68 TRANSPORTER MK1 Flatbed / Chassis/Pickup (26)
01.50 - 10.70 TRANSPORTER MK2 Bus/Mini Bus 08.67 - 09.79 TRANSPORTER MK2 Box/Van 08.68 - 07.79 TRANSPORTER MK2 Flatbed / Chassis/Pickup
08.68 - 07.79 TRANSPORTER MK3 Bus/Mini Bus 05.79 - 07.92 TRANSPORTER MK3 Box/Van 05.79 - 07.92 TRANSPORTER MK3 Flatbed / Chassis/Pickup
05.79 - 07.92
AUDI Model Year of construction from - to 80 Saloon MK1 (80, 82, B1) 05.72 - 07.78 80 Saloon MK2 (81, 85, B2) 08.78 - 08.86 COUPE MK1 (81, 85) 07.80 - 10.88 90 Saloon MK1 (81, 85, B2) 08.84 - 03.87
Additional from ghost123uk
Here is some info re the "drill a hole and squirt some grease on the bearing" trick (it usually doesn't work for long though)
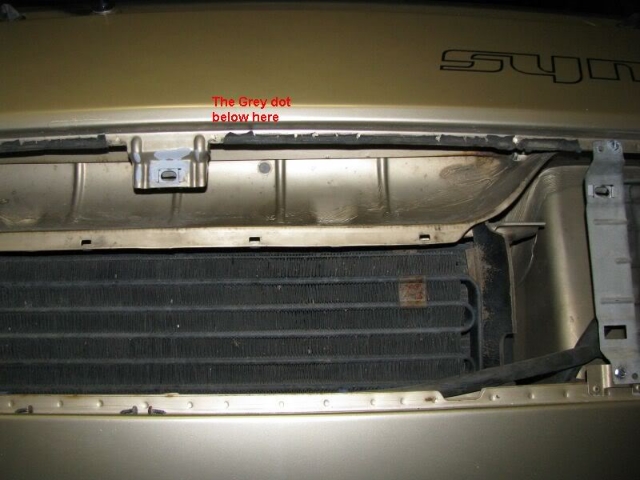
I have pic of where you drill the hole. I tried this a few years ago on my van. I drilled 2 holes, one to point a (long) squirty tube attached to my can of aerosol grease through, and another to look through, to see where I was spraying. I also dangled an indicator bulb, with wires soldered to it, down behind the gap that is right at the top of that panel, this helped a lot !! After finishing I simply put some "Gaffer tape" over the holes. It is still safely in place a few years later.
The "fix" only lasted a couple of months though :( - I then bit the bullet and fitted a new heater motor.
Pic = (Not my van = hope the owner of the pic doesn't mind ;))
POSSIBLE MOTOR WIRING REVERSAL ISSUE
ghost123uk: It seems there is a possibility of the wires on the new motor to be confusing re the colour codes. See this re lack of air coming out after a fan replacement, nonny112i says = Turn's out I just needed to reverse the polarity to the motor as it was turning the wrong way (they work great now :D ) I assumed like a muppet that the red coming out of the motor would be the live. Just to give everyone a heads up who's going to do the job check the direction of the motor wired up first before putting it all back!
BLOWER SWITCH REMOVAL
(Acknowledgtement to 'Fozzie' for this excellent description of switch removal)
If you can get the radio out easily, it's not necessary to remove the instrument pod to remove the main blower switch.
You can remove the heater controls fascia by pulling it gently forward (to ease out the plastic covered lugs at the back which hold it in place) revealing the switch behind. (You'll need to pull the knob off the fan switch first, but shouldn't need to remove the heater knobs.) Next push in the retaining spring at the right side of the switch (either through the hole where the radio was, or from the top if you removed the instrument pod), and pull the switch towards you. At this point you can separate the switch from the connector block behind it. Note it is a tight fit, and as you do this you tend to lift one or more of the four connection tags - more on this in a moment.
You have 4 tags marked +, I, II and III. On mine a voltmeter (set to measure resistance) showed only one worked as it should.
Use the blade of a small screwdriver to open the lugs and prise the switch apart. At this point the whole thing springs up at you and bits fall on the floor. Well, maybe not you, but that's what happened to me. You should end up with: the switch body; the connector inside which rotates and holds the copper contact mounted on springs; two tiny steel slivers with punched points which hold the splined bit of the rotating connector (to give you that pop-pop-pop feel as you turn the knob); and the cap which holds the tags.
Clean off all the contact points with emery paper (a borrowed emery board worked for me) and smear a tiny bit of petroleum jelly on them.
Now to reassemble... First drop the two steel springs into the locating holes in the switch body, ensuring the raised points are facing each other. This is actually easier than it sounds; a SLIGHTLY magnetic screwdriver helps to fit them. Then drop the rotating connector gently into place between them - it might take a couple of goes. This needs to go the right way round; the side of the copper with a tiny a depression goes nearest to the flat part of the otherwise round body. Finally offer up the cap, rotate to line up the flats on cap and body, and press into place.
Check again with the voltmeter. If one of the contacts seems not to work check whether that tag became raised when you separated the switch. If so use a screwdriver to press it firmly down again (so that it makes proper contact with the rotating connector underneath).
PRE-85 FUSEBOX MOD - ENSURING WIPERS WORK IF BLOWER KILLS FUSE
Heres a tip from member Covkid for those with earlier cartridge rather than blade fuseboxes.
Because the blower and wipers use the same fuse on the these fuseboxes (a daft idea to be honest), any problem with the blower that for whatever reason, pops the fuse, also kills the wipers. Likewise the wipers could take out the blower. This can be a safety issue. I've mentioned before on here that I once had it happen on a busy motorway leaving me with no wipers in torrential rain and it was some miles before I could find a place to stop and replace the fuse - not good. In my view it was a design flaw.
For this reason, I'd recommend anyone that has the same layout, gives the wiper circuit at least its own independent fuse. I suspect that with an older blower or wiper motor, having two on one fuse is more likely to blow it. Starting a motor always draws more current and simply fitting a bigger fuse doesn't offer the right protection. Heres how to solve it.
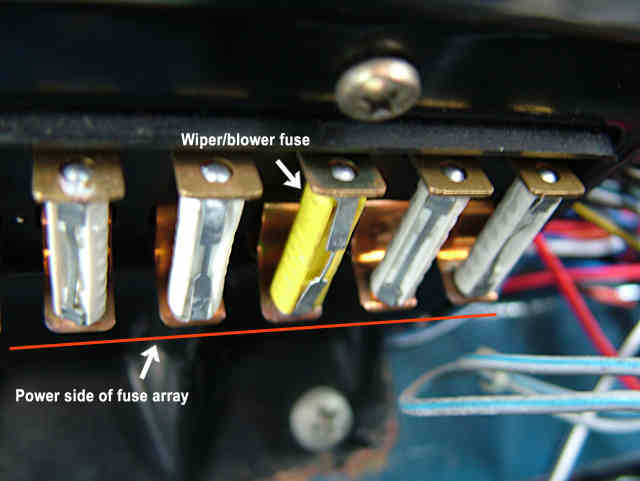
If you look at the photo below, the third fuse from the right is the wiper/blower fuse - the one that blows. To ensure that the wipers aren't taken out by the blower in future but still protected by a fuse, disconnect the battery/batteries and unscrew the fusebox retaining screws, carefully lifting it forward so you can see the reverse of the wiper/blower fuse.
Theres a black/red wire that sits in the middle - this is the wiper circuit supply. pull this spade terminal off, and connect an inline fuse (the sort normally used on car stereos) to this wire (you may need to cut connector off completely to do this) and then connect the other end of the inline fuse to a vacant connector on the power side of the fusebox. I've shown this with a red line in the photo so you know which side of the fuse array has a permanent 12v. Sometimes there isn't a vacant one to be found along this side (VW were not generous with spare ones) and you'll need to join the wire into an existing connector somewhow. This will then provide the wipers with their own fuse. Try an 8amp or 10amp fuse for the inline - should be enough.
Alternatively you could take a feed from the power side of existing fusebox and screw another smaller fusebox under there. That way you can add more dash items with each on its own fuse. For some, that may be a better and tidier solution altogether, but getting the wipers on their own fuse has to be a better idea than the way VW designed it.
As a belt n' braces approach I always use Rain-X on my windscreen so that if my wipers do go AWOL, I can at least continue to drive safely in heavy rain. Anyone who has ever used it will tell you how good it is. You don't actually need wipers once its applied and it lasts around a month before you need a retreatment. A bottle lasts a couple of years I find. Worth thinking about, particularly if you have the earlier un-modified fusebox, but improves visibility enormously in rain either way.
http://www.youtube.com/watch?v=p1S_Jm_FwM0
Useful information
New front heater fan amps draws are approx 1=4A, 2=7A, 3=12A.
