Difference between revisions of "Coolant and Heating New radiator"
| Line 23: | Line 23: | ||
== Replacing radiator == | == Replacing radiator == | ||
'''HarryMann:''' General | '''Elvis:'' Radiator Replacement - how easy ? | ||
'''HarryMann:''' General post on rad-changing memories! | |||
There are two lower brackets with 3 self-tapping setcsrews each I seem to remember, going into anchor nuts (Spire nuts) | There are two lower brackets with 3 self-tapping setcsrews each I seem to remember, going into anchor nuts (Spire nuts) | ||
Revision as of 20:40, 11 October 2007
New Radiator - Gneeral Comments
HarryMann: Sometimes the only answer to consistent overheating on an older vehicle is a new radiator
... as the old one gets blocked up and loses efficiency. Cleaning (backflushing) can help, but in time the overall efficiency will obvioulsy drop as things age and corrode - this is particularly true of Turbo-Diesels as the heat-load seems to be much higher (and they not only have a more powerful fan, but diesels have a wider cooling duct running under the cab (hence carpets or rubber mats are different, as well as the gearlever gate box support under the cab).
Now, there are two radiators for T25s listed, an A version and an E. The A is listed for the 1.9 WBX vehicles and the E for 2.1s and diesels as well as 1.9's used for towing or usage in hot climates.
However, these days it seems only the A is stocked by VW (and GSF) for all vehicles although the E is probably available on back-order. GSF charge about £90 and with a discount the Genuine VW 'A' can be got for about £120...
As with a lot of parts, the design changes over the years, and the new A version is fractionally different as far as mounting the plastic fan cowling... it seems slightly taller, as well as having horizontal bracing bars instead of vertical.
-- --
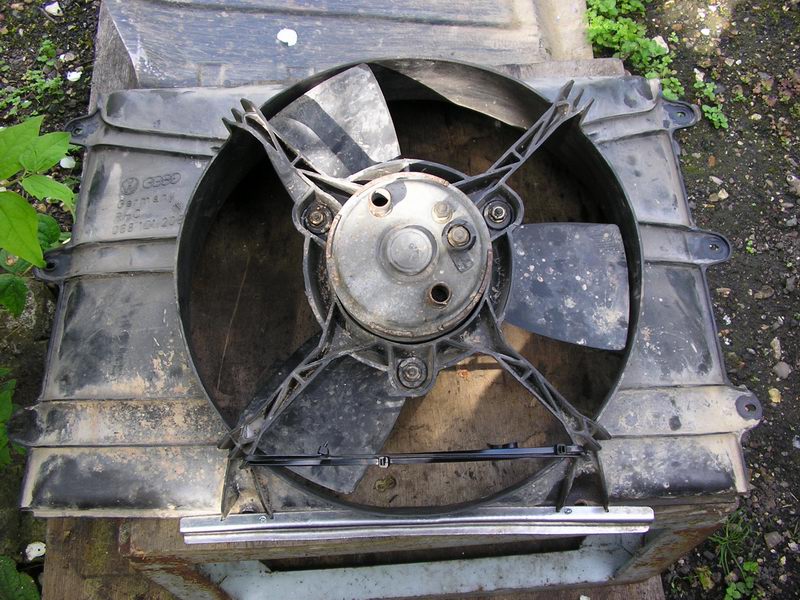
I found that the fan cowl fitted only with the 3 lage self tappers down each side, with nowhere for the 2 smaller ones at the bottom, as found on the original. This and the slight increase in height, meant the cowling deformed enough at the bottom for the fan to rub the shroud... (the weight of the heavy diesl fanmotor (550W) doesn't help either).
I made up a stiffener brace (Z-section) curved in 2 planes to force the bottom edge of the plastic cowl back into line when rivetted on. I also found that tieing the two lower fan support arms together with cable ties also helped to distort the cowling back into shape... I think either solution would work, but implemented both.
Here is a pciture of the 'fix'... Hope it helps someone sometime!
Replacing radiator
'Elvis: Radiator Replacement - how easy ?
HarryMann: General post on rad-changing memories!
There are two lower brackets with 3 self-tapping setcsrews each I seem to remember, going into anchor nuts (Spire nuts)
No serious bolt corrosion issues, maybe one was a bit difficult and worried me for a second or two..
As usual, before starting a job, have a good look a round at waht's involved and even try loosening the bolts and in this case checking the consition of other parts involved, so you can get them ordered 'before the crisis'..
The bottom bracket setscrews are the ones, they should come out if you use a good socket or ring on them and 'commit' to them first time out. Then the top is just slotted in.
Rest is pretty easy if you have plenty of time - like all jobs if you want to do it 'bish, bosh, bash' something will go wrong... think it through first. e.g. check for incipient hose and pipe leaks, condition of clamps and clips and make sure you have these sorted, slightly loosen and pre-lube anything that has to come apart, a quick wire brush and clean-up before attempting to remove something.
As you'll see when you read the Wiki item, is that I hadn't reckoned on a new rad being somehwat different in design as far as allowing the cowling to seat nicely - but with a bit of time, turned it to my advantage I suppose. Take the opportunity to clean the fan terminals and coat with No-Crode or similar, ditto, thermoswitch wiring.
Good luck. Might be best to drain the WHOLE cooling systen and refill with new 50/50 mix, although you can easily tie the hoses up high enough to prevent a flood of coolant (I always seem to have more trouble fully sraining T25 than re-filling and bleeding, which seems fairly easy).
PS. Also a good time to take a look at the heater valve, and cable connections, ensuring it turns off and on fully and has no leaks, ditto I also removed and washed out the windscreen washer bottle (Ugh stuff inside it) and replace rubber seal etc.
