Camping interior fridge servicing/Maintenance
Westfalia fridge service
LHD: This is a guide to servicing a Westfalia fridge, which does not include replacing faulty parts that are not servicable
If electrical probs, it could be the elements 12v, 240v or both...
My 240v worked when I got my van but the 12v was poor.
When the 240v stopped working I decided to replace both elements at around £70.
It now produces ice on 12v and the 240v is even better,well worth the investment.
It actually gets colder now than my fridge at home.
If the fridge is not working on 12v or staying on when the engine is not running (thus draining the battery) the 12v relay must be investigated - this can be replaced with an original relay used by Westfalia (I think) for about £7 from Gunzle Gunzle, or a similar 12v relay can be purchased from many motor shops, Ebay, Maplin etc
While you have the fridge removed from situ give the jet a clean or replace at around (£15), if doing so make sure you re-fit the burner shroud properly with the holes facing upwards.
A main reason for poor ignition is the ignitor/sparker - make sure this is not loose or corroded.
I would set mine at the correct position only for it to work loose after a month or two.
It would always slowly move out of the optimum position due to the vibration whilst driving and so causing poor ignition. The igniter/sparker can be bought new for around £15.
To get the parts give Ashbridge Domestic a call Ashbridge domestic
Make sure you give them the model No. and product No. which should be on the silver sticker inside your fridge.
Also the exhaust should be fixed securely to the heat exchanger pipe and should not move.
On mine the weld had broken so the exhaust had slipped over the heat exchanger causing poor oxygenation, which was the reason the fridge was so inefficient on gas and would blow out whilst driving.
A small tack weld cured this and now I can drive on the motorway without the flame going out. Before anyone winges it does say in the Westy manual that you can use the fridge on gas whilst driving.
Some think this is not a great idea and I can see why.
Another reason it could have been going out was due to the outside vent cover being cracked around the screws,purchased for £15 via Gunzle at Vanfest.
While I was at it I replaced the insulation around the heat exchanger with some stuff they were removing from work(basically fire proof rockwool),do make sure it's fire proof then pack it as tight as possible into the heat exchanger insulation shroud.
You could also relace the fan with a 12v computer one.
You can see how this is done by visiting the Go westy site as they have a kit for sale, but you can then get the gist of how it's fitted and do it yourself. (how to see below)
You should also check the condition of the fridge door seal as this will also cause the fridge to cool inefficienty, again supplied by Gunzle, maybe even Ashbridge domestic.
If the fan is inoperatve, it could be the temperature switch which is secured by two small scews to the cooling fins on the back of the fridge. I would imagine that the values of this switch are printed on it some where. It can be tested by connecting to the 12v circuit and using a hair dryer on hot to make sure it operates correctly.
Obviuosly it goes without saying that the rear of the fridge, especially the cooling fins should be dusted off to aid cooling.
Apparently there is cotton wool type filter in the gas piping just before it connects to the fridge, which can be replaced. I never could locate it (probably because it's missing).
Beware when filling an underslung tank (ALWAYS) make sure that the gas tank supply valve is turned off. Due to these tanks being quite old they have a certain amount of muck inside them. Because of the high pressure used whilst filling, it will blow all sorts of muck into your gas lines, usually blocking your jet (especially if you can't locate your filter). This results in a blocked jet and removal of appliance to clean it out.
Another thing to remember is that the main union that connects the gas pipework to the fridge is a left hand thread, i.e. clockwise rotation to undo.
This is about as a comprehensive service I can think of, but I'm sure someone could add to it though.
Rob
Re: Westy fan replacement:
Went for the Go Westy way, see their website, couldn't post link in case of copyright infringement .
Right been meaning to do this for a long time so thought lets get to it. Found an identical fan on ebay(apart from lazer printed name) obviously generic and probably Chinese. http://www.ebay.co.uk/itm/PC-CASE-FAN-ALUMINIUM-12CM-120MM-SILVER-COOLING-AL12025-/270804647269?pt=Computing_ComputerComponents_Fans_Heatsinks_SR&hash=item3f0d36fd65#ht_1922wt_1009
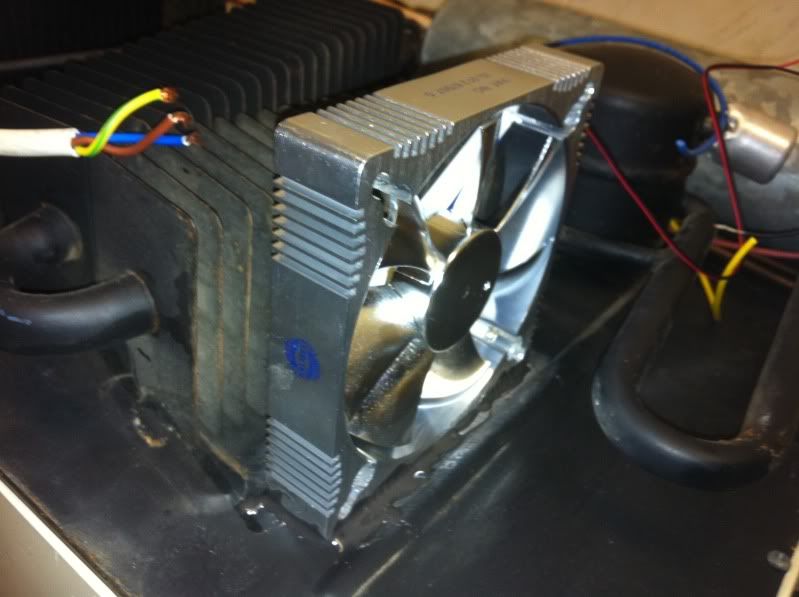
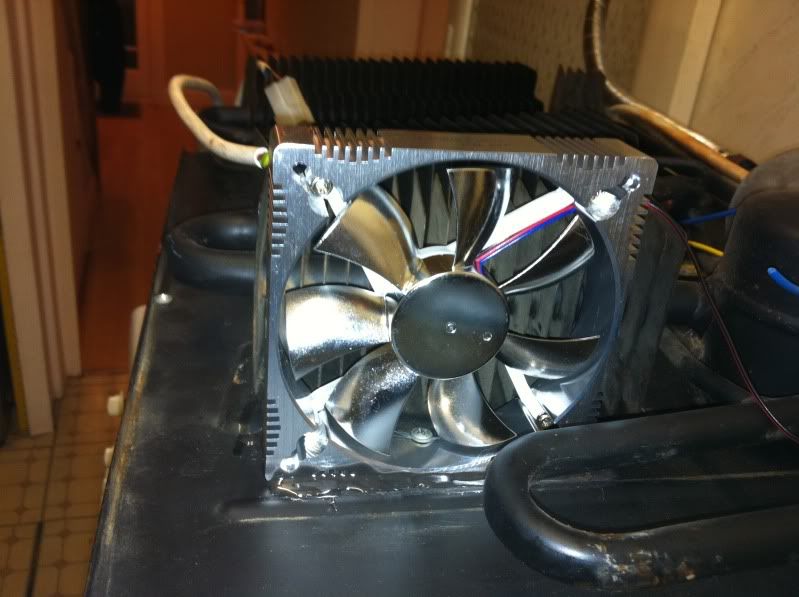
I went for the aluminium fan as I thought GW probably spent at least an enth of tenth of f**k all on R&d..... Easy peasy using top screw from your original fan and original hole (how much easier can it get) and drilling a tiny hole in the fan housing.
I also used Plastic Padding Super Steel Epoxy weld (All Parts) as I was worried that as mine's a Syncro, the bouncing around may cause the screw only fixture to weaken and fail.
Roughed up both surfaces with a wirebrush drill and a few scrapes with a screw driver to get a scored surface, then cleaned this off with brake cleaner.
Obviously before I applied the Plastic Padding I did a temporary fit just to make sure everything was fine. Fan comes with three wires, clip the blue one (not needed) red + black to -. Make sure you get the fan the right way round, blowing not sucking...... [img]http://i49.photobucket.com/albums/f283/lhdwesty/IMG_0317.jpg[/img] [img]http://i49.photobucket.com/albums/f283/lhdwesty/IMG_0321.jpg[/img] [img]http://i49.photobucket.com/albums/f283/lhdwesty/IMG_0319.jpg[/img]
All in all probably about £15.00.
I recon I could lift the whole fridge by the fan due to the Plastic Padding...... Rob.....
Cleaning the gas jet (Electrolux)
toolsntat: These are just videos of how I did it and if you undertake to follow the same process then:
-BE SAFE - BE SURE - and if in any doubt DO NOT DO IT
So, first off I must stress that this is purely my way of sorting this problem and in no way endorse my actions as something others should follow.
Had to get the fridge out again today and having took everything else apart the only thing left was the jet and burner assembly.
The symptom was originally fridge alight but failing to chill.
And after first strip down it failed to light at all.
The following videos are a few minutes long each and display in Windows Media Player
NB. Please use the back button after watching the video to regain this page
Disassembly and gas jet clean video
The jet was well and truly blocked and you can now see the flame change between the 3 setting
Andy
lhd: As this is not recomemded I would not recomend it, but this is how I cleaned out my blocked jet...
I threaded a single thread of speaker wire about a half a metre long through the aperature of the jet (Which was smaller than not bigger than the aperature) then spun it round twice with the jet in the middle. Cleaned it out a treat.
I would imagine that unless a Jet was kept in a sealed bag that it would probably be partially blocked too.
Rob
redman: I too recently cleaned my jet (pin-hole of light) and burner chamber after my fridge failed to ignite, afterwards the fridge ignition and burner work fine exhaust gass exits up and out of the pipe (which gets very hot) unfortunately the fridge now fails to cool on gas!?
Works fine on AC and 12DC! Can you offer any thoughts /advice from your own experience? Your views would be very welcome as I do not understand why it is heating the chiller gas but not chilling the inside of the fridge.
toolsnstat:' Alas Radman I cannot really be sure what your solution is
What springs to mind is that maybe when you cleaned out the jet the pinhole has become enlarged and now the flame/heat is too great for efficient heat transfer......
Then again as I said "The symptom was originally fridge alight but failing to chill..." which could mean you are now experiencing my initial problem ...Not getting enough gas :cry:
Did you physically take the jet out?
Could there be more dirt in the jet?
Something I did not mention in the post was the supply pipe from control valve to jet.. this can be easily removed, upended and blown through to ensure its clear :wink:
A few pics of control valve...
If all is well with the burner end there may be more opportunities for restrictions to the flow in the control valve
Inspecting the pilot thermocouple (Electrolux)
toolsntat: These are just pictures and a guide to how I did it and if you undertake to follow the same process then:
-BE SAFE - BE SURE - and if in any doubt DO NOT DO IT
So, first off I must stress that this is purely my way of sorting this problem and in no way endorse my actions as something others should follow.
How to take out a fridge and inspect the thermo-couple end, and check the piezo-electric igniter.
Remove setting knob by pulling off and unscrew grill


Undo the coupling using 2 spanners


Carefully remove the perforated shield, cover burner and clean off any soot

fridge/?action=view¤t=camperfridge027.flv Link to flash video checking spark generation
Vent elbow and airflow vane
Flexi duct pipe for vent

remove rear vent

Bit of a tight fit but just manage to ensure the flue is connected

All being well thats it.
Andy