VW Electrics Standard Headlights: Difference between revisions
mNo edit summary |
|||
| (30 intermediate revisions by the same user not shown) | |||
| Line 1: | Line 1: | ||
==Round headlights== | ==Round headlights - Aftermarket== | ||
'''Budget Lucas-style headlights''' | '''Budget Lucas-style headlights''' | ||
| Line 5: | Line 5: | ||
Penned by Covkid. | Penned by Covkid. | ||
If you want to save a few quid and are up for some simple tinkering, this might be for you. Currently stocked by Euro Car Parts for under £10, and described as 'lucas' headlights, these basic headlights can be made to fit existing headlight holders fairly easily | If you want to save a few quid and are up for some simple tinkering, this might be for you. Currently stocked by Euro Car Parts for under £10, and described as 'lucas' headlights, these basic curved headlights can be made to fit existing headlight holders fairly easily. | ||
My eternal thanks to Oldie but goodie for guiding me on the fitment, which requires only very minor modifications. In fact the Lucas-type drop straight in to the headlight frames, the only thing missing being a way to fix them in firmly - but thats easily solved! | More to the point, in the process of making them fit, you'll also increase the choice of 7" light units now available to you as you'll be able to fit both stock and numerous aftermarket round units (including ones with LEDs etc) with ease - and without damaging the headlight frames in any way. | ||
My eternal thanks to Oldie but goodie for guiding me on the fitment, which requires only very minor modifications. In fact the Lucas-type drop straight in to the headlight frames, the only thing thats missing being a way to fix them in firmly - but thats easily solved! | |||
Oldie tells me that you can also get Lucas securing rings (at a price) but the clips I suggest here will do the job fine. | |||
[[File:headclip3.jpg]] | |||
'''Fitting/Adapting''' | |||
First remove the existing headlight assembly complete by taking off headlight grill, removing the four screws that hold complete assembly to vehicle and unplugging all bulb connectors. | First remove the existing headlight assembly complete by taking off headlight grill, removing the four screws that hold complete assembly to vehicle and unplugging all bulb connectors. | ||
Next undo the three | Next undo the three screws that hold the old light unit in the frame - the small philips ones. Use a little plusgas on them and tighten the screw slightly '''before''' undoing - this will help avoid rounding out the screws. Ignore plastic fittings - these are for light adjustment only. | ||
With old unit out, the three lugs on back of the new light unit should drop nicely into the three recesses in existing light frame (see photo below). Do NOT cut them off. You need them to help locate the headlight. In practice I found on one, I had to bend them very slightly (careful) towards the outer edge so that they dropped in really snugly into these recesses without the light moving side to side. Spend a few minutes getting this right and don't bend lugs out of shape too much. With headlight pressed firmly into all three recesses with your fingers, it shouldn't move side to side or up and down. It won't stay in there ofcourse, not without clips, but it should sit in there. | |||
Photo below shows lug and recess I'm talking about. At bottom left you can see screwhole which held old unit which will now be used for the clips you need to fit: | Photo below shows lug and recess I'm talking about. At bottom left you can see screwhole which held old unit which will now be used for the clips you need to fit: | ||
| Line 19: | Line 27: | ||
[[File:headclip2.jpg]] | [[File:headclip2.jpg]] | ||
Once they're right, all you need is three metal clips similar to those used to fasten brake or gas pipe to bodywork, bent slightly so it grips outer metal edge of front lens. Below are actually what I used. Not sure what they are called but not too difficult to fashion | Once they're right, all you need is three metal clips similar to those used to fasten brake or gas pipe to bodywork, bent slightly so it grips outer metal edge of front lens. Below are actually what I used. Not sure what they are called but not too difficult to fashion. You may find something in your junk box that will do the same job | ||
If you can't get hold of suitable clips, stiff coathanger wire can be used, bent round on itself to take the screw, with the tails bent and cut to length so they grab outer rim of headlight. You can swap existing screws for similarly sized but longer self-tapping screws if it makes fitting easier. All the clips do is stop headlight falling out. They don't need g-force clamping power, they just need to be secure. | |||
[[File:headclip.jpg]] | [[File:headclip.jpg]] | ||
Now refit headlamp assemblies, connectors and headlight grill. | |||
Bear in mind they ARE curved headlights rather than flat like stock ones but you don't really notice to be honest. The light pattern is fairly good - for the price. | |||
I have concluded that these units are almost certainly the same as those fitted to the Ambassador car, common on India's streets. Certainly thats where they're made. They are Autopal HL-101 units and they make fancier versions with fluted reflectors but these are bog standard reflectors. For under a tenner, they're a bargain but remember you'll need clips to hold them in place. The big plus perhaps is once you've made up the clips, there are a whole host of 7" lights you can now fit including ones with built-in LEDs, fluted reflectors and goodness knows what else. Checkout ebay and other places and you'll see what I mean. Good as Hella units are, there are some very neat units out there now. | |||
Alternatively you could fit these: | |||
[[File:7inchlucas6.jpg]] | |||
You can buy them through powerfuluk on ebay for around £40 the pair. Excellent bright and focused beam which puts Hella units to shame. They're lightweight and can easily be fitted using three cable ties and the adjustment screws unaffected. | |||
For reference, I marked a wall with chalk prior to removing headlights and the new lights lined up perfectly with those marks but you may wish to mark a wall like this in case you do have to readjust yours. | For reference, I marked a wall with chalk prior to removing headlights and the new lights lined up perfectly with those marks but you may wish to mark a wall like this in case you do have to readjust yours. | ||
| Line 40: | Line 52: | ||
==Adjusting headlights== | |||
(Penned by Covkid) | |||
Accurately adjusted headlights are not only a legal requirement, it ensures you can see where you're going with maximum light on the road and importantly - without dazzling others. The settings are made on dipped beam only. Full takes care of itself. You could have them professionally aligned but I've come across just too many instances where the lights on dipped are too high and now ALWAYS set my lights as here. | |||
If you want the maths, there is a prescribed setting for adjustment: http://www.motuk.co.uk/images/lights_diagram1.gif | |||
But theres a much easier way to carry out headlight adjustment and still get them right... | |||
These are my headlamps (round ones) on dipped on a dark country road. There is a good spread of light but they still conform. There are basically two things you need to get right, the placement of the kicks (where the light goes off at an angle) and where the cutoff point (light at bottom, dark at top) sits in each lane. Confused? You won't be. Its actually very simple. | |||
[[File:Dip7drl.jpg]] | |||
For reference below photo is where those 'kicks' should be and the cutoff points on an average flat road (along the blue line) to ensure you can see but not blind other drivers. | |||
[[File:Dip7drlmark.jpg]] | |||
If you're not sure what I mean by 'headlight kicks' take a look at this next pic as I go round a bend. | |||
[[File:Dip7drlkicks.jpg]] | |||
At that distance you can see both 'kicks' clearly. You can set them on a garage door to some extent but you'll only get a 'near enough' adjustment and other than putting them in front of headlight aligners (which are not always as accurate as they should be), setting them up on the road is not only perfectly possible, you should be able to get them spot on. | |||
[[File:Dip7drlmark.jpg]] | |||
Going back to a straight road once more, you'll see that the kick on the left is designed to help pick out road signs etc, and should start at the kerb edge. If you look at the right kick and its angle to the white dotted line on the road, it effectively directs light away from oncoming traffic and for that reason should start at centre line of road. What little light is left on the opposing lane (horizontal line) needs to be below eye level of oncoming traffic. | |||
You only have to look at height of the beams then. Make minor adjustments to height to allow for suspension bounce so that your lights aren't continually straying into the eyes of others on rough roads but cover the dipped area well. Headlight aligners simply get you to that point but even when set by the book, they often need tweaking. Quite a few places actually set them too high in my experience. You should NOT be lighting up the backs of drivers heads. Set them like this and they will be right. | |||
'''Remember''', dipped beam should give you enough light to see a good proportion of the tarmac in front of you but in no way in the eyeline of others or lighting up trees. On full it doesn't matter. MOT testers are only concerned with dipped beam and how that might affect you and others. | |||
Each headlight has two adjustment screws - one for height, the other for lateral side-to-side adjustment. | |||
----------------- | ----------------- | ||
Latest revision as of 09:56, 22 November 2015
Round headlights - Aftermarket
Budget Lucas-style headlights
Penned by Covkid.
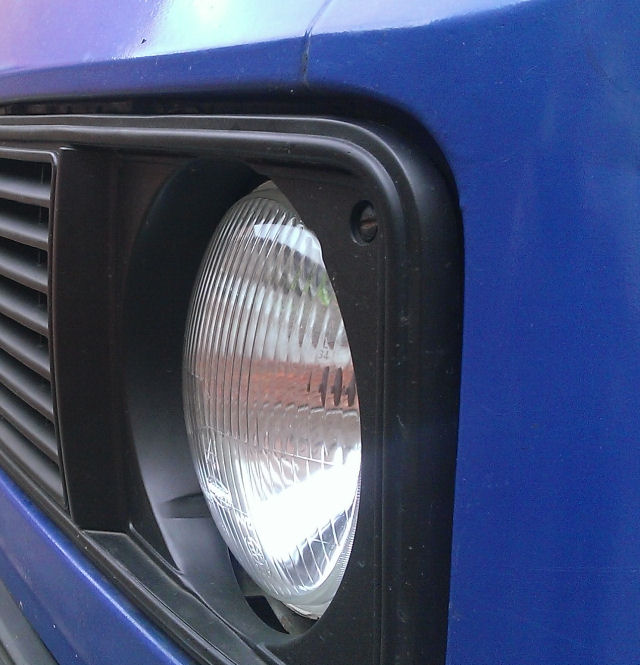
If you want to save a few quid and are up for some simple tinkering, this might be for you. Currently stocked by Euro Car Parts for under £10, and described as 'lucas' headlights, these basic curved headlights can be made to fit existing headlight holders fairly easily.
More to the point, in the process of making them fit, you'll also increase the choice of 7" light units now available to you as you'll be able to fit both stock and numerous aftermarket round units (including ones with LEDs etc) with ease - and without damaging the headlight frames in any way.
My eternal thanks to Oldie but goodie for guiding me on the fitment, which requires only very minor modifications. In fact the Lucas-type drop straight in to the headlight frames, the only thing thats missing being a way to fix them in firmly - but thats easily solved!
Oldie tells me that you can also get Lucas securing rings (at a price) but the clips I suggest here will do the job fine.
Fitting/Adapting
First remove the existing headlight assembly complete by taking off headlight grill, removing the four screws that hold complete assembly to vehicle and unplugging all bulb connectors.
Next undo the three screws that hold the old light unit in the frame - the small philips ones. Use a little plusgas on them and tighten the screw slightly before undoing - this will help avoid rounding out the screws. Ignore plastic fittings - these are for light adjustment only.
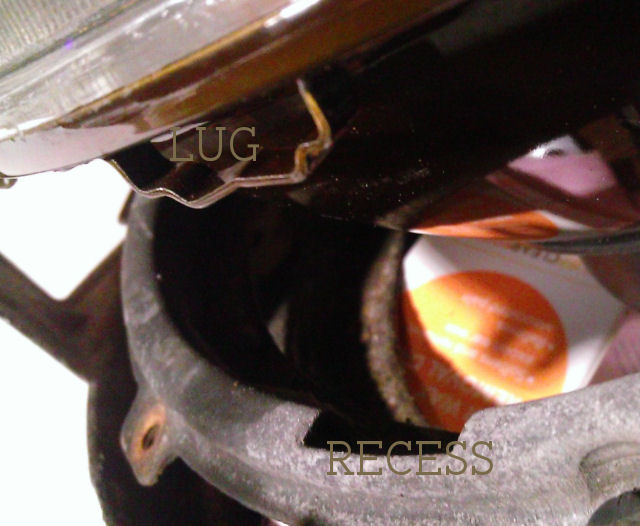
With old unit out, the three lugs on back of the new light unit should drop nicely into the three recesses in existing light frame (see photo below). Do NOT cut them off. You need them to help locate the headlight. In practice I found on one, I had to bend them very slightly (careful) towards the outer edge so that they dropped in really snugly into these recesses without the light moving side to side. Spend a few minutes getting this right and don't bend lugs out of shape too much. With headlight pressed firmly into all three recesses with your fingers, it shouldn't move side to side or up and down. It won't stay in there ofcourse, not without clips, but it should sit in there.
Photo below shows lug and recess I'm talking about. At bottom left you can see screwhole which held old unit which will now be used for the clips you need to fit:
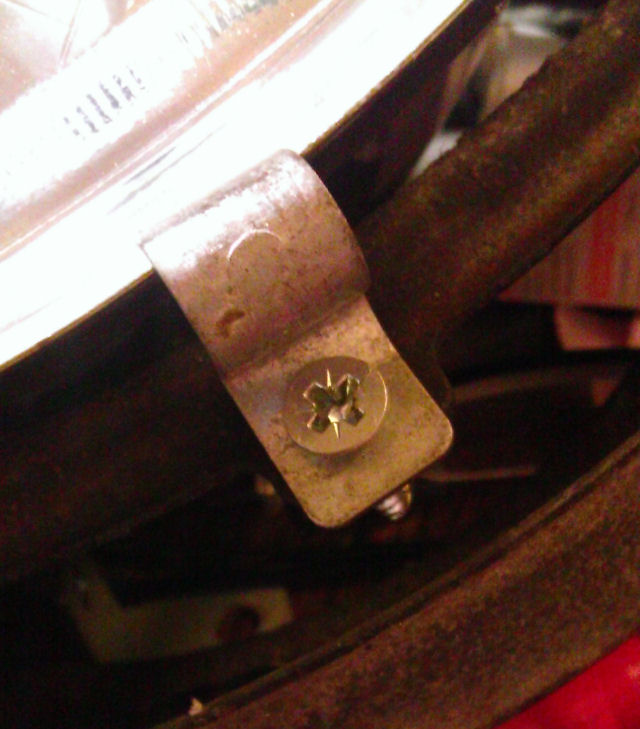
Once they're right, all you need is three metal clips similar to those used to fasten brake or gas pipe to bodywork, bent slightly so it grips outer metal edge of front lens. Below are actually what I used. Not sure what they are called but not too difficult to fashion. You may find something in your junk box that will do the same job
If you can't get hold of suitable clips, stiff coathanger wire can be used, bent round on itself to take the screw, with the tails bent and cut to length so they grab outer rim of headlight. You can swap existing screws for similarly sized but longer self-tapping screws if it makes fitting easier. All the clips do is stop headlight falling out. They don't need g-force clamping power, they just need to be secure.
Now refit headlamp assemblies, connectors and headlight grill.
Bear in mind they ARE curved headlights rather than flat like stock ones but you don't really notice to be honest. The light pattern is fairly good - for the price.
I have concluded that these units are almost certainly the same as those fitted to the Ambassador car, common on India's streets. Certainly thats where they're made. They are Autopal HL-101 units and they make fancier versions with fluted reflectors but these are bog standard reflectors. For under a tenner, they're a bargain but remember you'll need clips to hold them in place. The big plus perhaps is once you've made up the clips, there are a whole host of 7" lights you can now fit including ones with built-in LEDs, fluted reflectors and goodness knows what else. Checkout ebay and other places and you'll see what I mean. Good as Hella units are, there are some very neat units out there now.
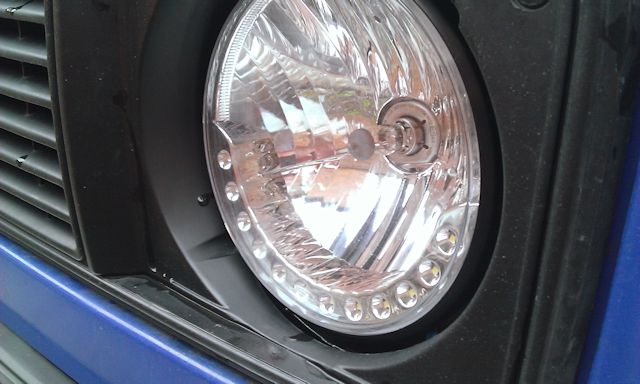
Alternatively you could fit these:
You can buy them through powerfuluk on ebay for around £40 the pair. Excellent bright and focused beam which puts Hella units to shame. They're lightweight and can easily be fitted using three cable ties and the adjustment screws unaffected.
For reference, I marked a wall with chalk prior to removing headlights and the new lights lined up perfectly with those marks but you may wish to mark a wall like this in case you do have to readjust yours.
Square Headlights
Inner main beam lights are The same as a MKII Scrirocco They are becoming hard to source and are no longer available from dealers. The Hella part numbers for RHD are LEFT 301-127 761-01 RIGHT 301-127 760-01 This is etched into the glass. The Adjusters are hard plastic and are very difficult to remove without snapping I have found it is best to remove the entire headlight unit to get to the rear plastic retaining lugs and rotate them by 90 degrees to remove all at the same time. The two upper ones are adjustable and the lower one is fixed (The Scrirocco screws are shorter and probably not suitable but some of the plastic clips are interchangeable). If you have condensation in your lamp I managed to remove it by removing all the plastic parts and oven baking for 10-20 minutes at 100degrees, take it out and shake it to disperse the droplets and aid evaporation. There is a fix which involves using a bag of silica gel attached to a piece of fishing line or dental floss popping it in then refitting the bulb and leaving it in till the moisture is absorbed. The string is used tea bag style to retrieve the bag when done. It would save you having to remove the plastic clips which are likely to snap. When refitting clean up the threads of the adjusters as best you can with scribe or small wire brush and coat with copper grease so adjustments can be made easily without the rust on the screws binding and ending up with chewed screw heads, it sees a lot of weather in its position and any rust prevention you spend time on will pay dividends in the future when bulb replacement or adjustment comes around.
Adjusting headlights
(Penned by Covkid)
Accurately adjusted headlights are not only a legal requirement, it ensures you can see where you're going with maximum light on the road and importantly - without dazzling others. The settings are made on dipped beam only. Full takes care of itself. You could have them professionally aligned but I've come across just too many instances where the lights on dipped are too high and now ALWAYS set my lights as here.
If you want the maths, there is a prescribed setting for adjustment: http://www.motuk.co.uk/images/lights_diagram1.gif
But theres a much easier way to carry out headlight adjustment and still get them right...
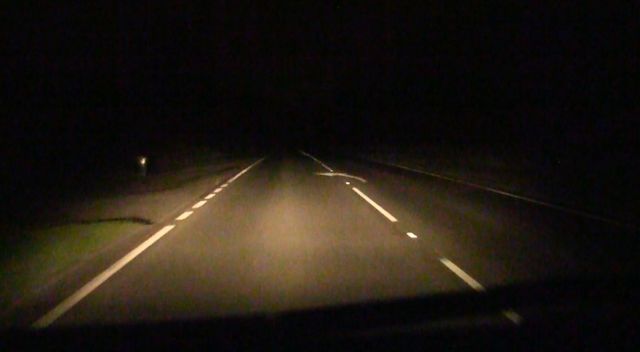
These are my headlamps (round ones) on dipped on a dark country road. There is a good spread of light but they still conform. There are basically two things you need to get right, the placement of the kicks (where the light goes off at an angle) and where the cutoff point (light at bottom, dark at top) sits in each lane. Confused? You won't be. Its actually very simple.
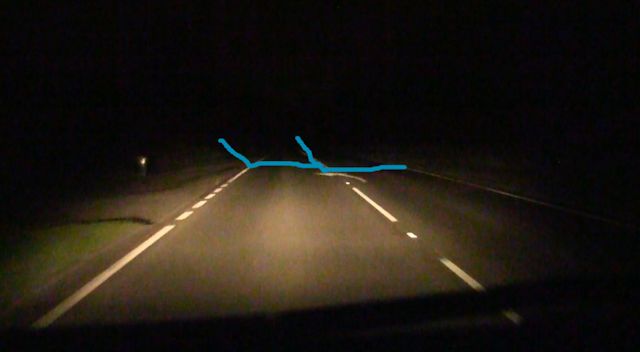
For reference below photo is where those 'kicks' should be and the cutoff points on an average flat road (along the blue line) to ensure you can see but not blind other drivers.
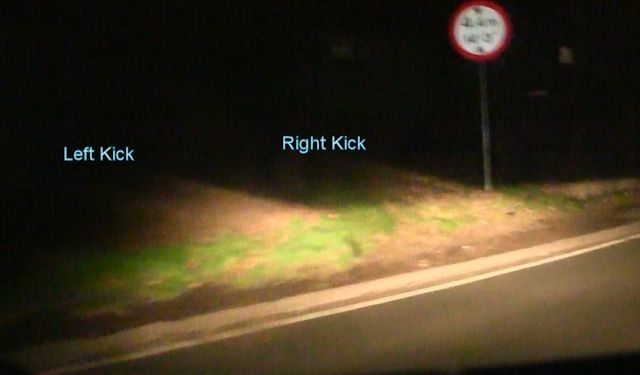
If you're not sure what I mean by 'headlight kicks' take a look at this next pic as I go round a bend.
At that distance you can see both 'kicks' clearly. You can set them on a garage door to some extent but you'll only get a 'near enough' adjustment and other than putting them in front of headlight aligners (which are not always as accurate as they should be), setting them up on the road is not only perfectly possible, you should be able to get them spot on.
Going back to a straight road once more, you'll see that the kick on the left is designed to help pick out road signs etc, and should start at the kerb edge. If you look at the right kick and its angle to the white dotted line on the road, it effectively directs light away from oncoming traffic and for that reason should start at centre line of road. What little light is left on the opposing lane (horizontal line) needs to be below eye level of oncoming traffic.
You only have to look at height of the beams then. Make minor adjustments to height to allow for suspension bounce so that your lights aren't continually straying into the eyes of others on rough roads but cover the dipped area well. Headlight aligners simply get you to that point but even when set by the book, they often need tweaking. Quite a few places actually set them too high in my experience. You should NOT be lighting up the backs of drivers heads. Set them like this and they will be right.
Remember, dipped beam should give you enough light to see a good proportion of the tarmac in front of you but in no way in the eyeline of others or lighting up trees. On full it doesn't matter. MOT testers are only concerned with dipped beam and how that might affect you and others.
Each headlight has two adjustment screws - one for height, the other for lateral side-to-side adjustment.
update Feb 2013
Just an update as eurocarparts don't stock the alternatives any more and the eurowagens links have changed
(original part 255-941-141B top) Alternative top adjusters (two needed) http://www.eurowagens.com/en/headlamp-adjusting-screw-vw-golf-mk2.html
(original part 255-941-133A bottom) Alternative to bottom adjuster http://www.eurowagens.com/en/vw/golf-2-jetta-2/headlights/headlamp-adjusting-screw-long-vw-golf-mk2.html
So to replace all adjusters on both mainbeams you need to order two sets of the first link but only one set of the second link
