Difference between revisions of "VW Electrics Headlight Adjustment"
| Line 9: | Line 9: | ||
[[File:headlightscrews.jpg]] | [[File:headlightscrews.jpg]] | ||
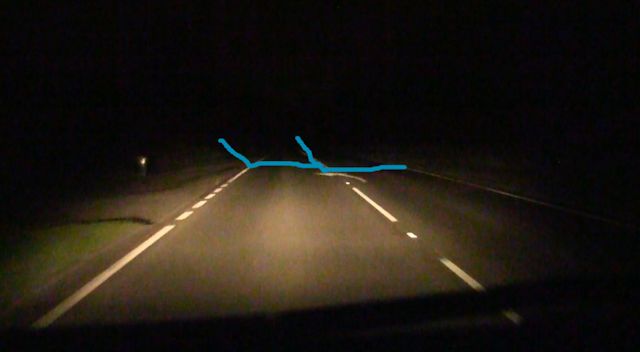
If the headlight aim is way off, refer to http://www.wikihow.com/Adjust-Car-Headlights to get a starting point. However, to get the optimum position on an average single carriageway, the below photo is where the 'kicks' should be and the cutoff points on an average flat road. The blue line denotes the cutoff point of the headlights to ensure you can see but not blind other drivers. The 'kick' on the left is there to help pick out signs etc, and should start at the kerb edge. The right kick should start at centre line of road. The right headlight beam needs to be below eye level of oncoming traffic. This 'on the road' refinement of adjustment may help anyone trying to set them up from scratch and get them right prior to an MOT test. Once the lateral position is correct, you only have to adjust the height of the beams then. Professional headlight aligners simply get you to that point and quite a few set them too high I've found. You should NOT be lighting up the backs of drivers heads. Set them like this and they will pass alignment check. | |||
[[File:Dip7drlmark.jpg]] | [[File:Dip7drlmark.jpg]] | ||
Revision as of 22:07, 28 March 2015
Round headlight adjustment
(Penned by Covkid)
This article is for round headlight adjustment only although the principles should apply for square headlights too.
If you remove front grill you will see two adjustment screws at the positions shown by the coloured dots in photo below. Red denotes vertical (up & down) adjustment and blue denotes lateral (side to side) adjustment. These units are actually combined DRL units but this has no bearing on how they are adjusted.
If the headlight aim is way off, refer to http://www.wikihow.com/Adjust-Car-Headlights to get a starting point. However, to get the optimum position on an average single carriageway, the below photo is where the 'kicks' should be and the cutoff points on an average flat road. The blue line denotes the cutoff point of the headlights to ensure you can see but not blind other drivers. The 'kick' on the left is there to help pick out signs etc, and should start at the kerb edge. The right kick should start at centre line of road. The right headlight beam needs to be below eye level of oncoming traffic. This 'on the road' refinement of adjustment may help anyone trying to set them up from scratch and get them right prior to an MOT test. Once the lateral position is correct, you only have to adjust the height of the beams then. Professional headlight aligners simply get you to that point and quite a few set them too high I've found. You should NOT be lighting up the backs of drivers heads. Set them like this and they will pass alignment check.
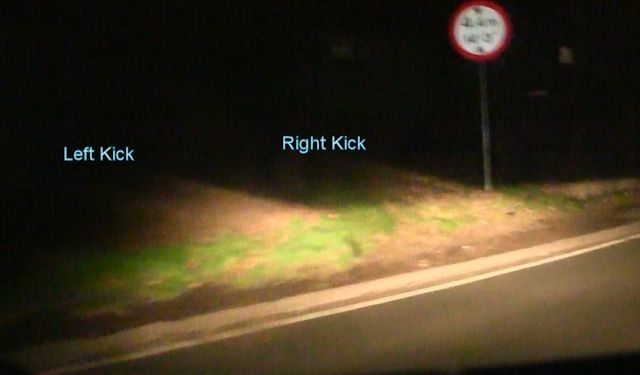
If you're not sure what I mean by 'headlight kicks' take a look at this next pic as I go round a bend. At that distance you can see both 'kicks' clearly. On a straight road, the very start of the left kick should be at the kerb edge. I worked on bugs for many years and had no problem setting up headlights accurately by hand like this and they always passed. You can set them on a garage door to some extent but you'll only get a 'near enough' adjustment and other than putting them in front of headlight aligners, the above is perfectly true and sets them so you get a good spread of light where you need it, without inconveniencing anyone else and within the rules.


