Difference between revisions of "VW Electrics battery to dash"
| Line 18: | Line 18: | ||
[[File:Heavycabletodash.jpg]] | [[File:Heavycabletodash.jpg]] | ||
For ther terminal block, you'll need to look at marine/auto terminal blocks in the 300amp range. You'll never draw that much ofcourse but there are many terminal blocks that are for low-draw stuff the rely on philips screws to hold cables firm. You do NOT want those. The type I used consists of two 8mm nuts and bolts house in a black insulalted case with a snap-down lid. It can be screwed/bolted to a convenient position. Its robust enough and more suited to battery cables. You'll need '''two''' of these - one for battery end, and one for under the dash. I paid under £12 for them including postage. See photo below of | For ther terminal block, you'll need to look at marine/auto terminal blocks in the 300amp range. You'll never draw that much ofcourse but there are many terminal blocks that are for low-draw stuff the rely on philips screws to hold cables firm. You do NOT want those. | ||
[[File:Junctionboxnew1.jpg]] | |||
The type I used (above) consists of two 8mm nuts and bolts house in a black insulalted case with a snap-down lid. It doesn't take up too much space and can be screwed/bolted to a convenient position - say inside wall of seat mounting base. Its robust enough and more suited to heavy battery cables. You'll need '''two''' of these - one for battery end, and one for under the dash. I paid under £12 for them including postage. See photo below of terminal block with cables in place and lid off: | |||
[[File:junctionboxbatt.jpg]] | [[File:junctionboxbatt.jpg]] | ||
| Line 24: | Line 28: | ||
If you look, the thin red cable on right is the original 6mm cable to dash. On the left is the uprated one which now runs to the terminal block under dash. Beneath these cables is one to battery positive and the other to starter - four cables in all. | If you look, the thin red cable on right is the original 6mm cable to dash. On the left is the uprated one which now runs to the terminal block under dash. Beneath these cables is one to battery positive and the other to starter - four cables in all. | ||
It means all those wires that originally terminated at positive terminal can now be fastened inside the terminal block out of harms way, leaving one single cable to the battery. That makes removing the battery a lot simpler too. I use quick-release clamps on mine. | It means all those annoying wires that originally terminated at positive terminal can now be fastened inside the terminal block out of harms way, leaving one single cable out of the box to the battery. That makes removing the battery a lot simpler too. I use quick-release clamps on mine. | ||
For reliability, you'll need to source good quality connectors for this - soldered 'Copper Tube Terminals' (as below) - not conventional crimp ring connectors, and use proper shrink tubing: | For reliability, you'll need to source good quality connectors for this - soldered 'Copper Tube Terminals' (as below) - not conventional crimp ring connectors, and use proper shrink tubing: | ||
Revision as of 15:46, 19 February 2015
Penned by Covkid
Upgrading power to dash and headlights
There could be several reasons why you might want to upgrade the power cable to dash, but for anyone fitting headlight relays or needing a connection without voltage losses, this is the heavy-duty way to do it. I don't for a minute suggest that this is the only way, but this method does make a neat job of it and solves a few problems along the way.
Your battery may be under the seat or in the engine bay, but assuming you've also upgraded main power cables (see: http://wiki.club8090.co.uk/index.php/VW_Electrics_main_cables ) then you may want to improve the cable to the dash and perhaps tidy up (for good) the mutitude of extra cables that can end up fastened to the battery positive terminal.
The existing cable to the fusebox was quite adequate at the time the vehicle was in production but only just copes with all the upgrades we do now. If you want to fit headlamp relays, you really need a direct path to battery. I fitted a 16mm 110amp cable for maximimum surface area but a 10mm cable would be equally good. VW used 6mm for the original feed. You could either leave the 6mm feed as is, and run the heavy stuff from the new cable, or supply both - up to you.
Materials
The replacement cable I used is similar to the upgraded power cables used on high-powered stereos, described in some places as simply 'battery cable'. In any event, its multi-strand and very flexible. I bought a complete reel of it (just under £40). It goes from an insulated connection box close to the battery and then to another under the dash and from there to the fusebox or wherever you want raw power.
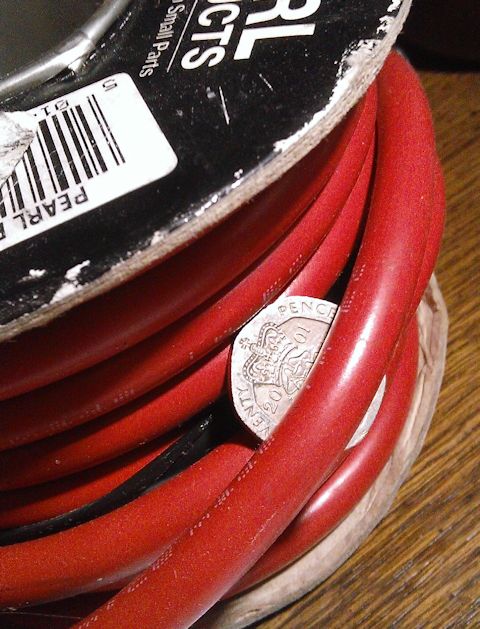
This is the stuff I used - 16mm 110amp (20p coin for reference):
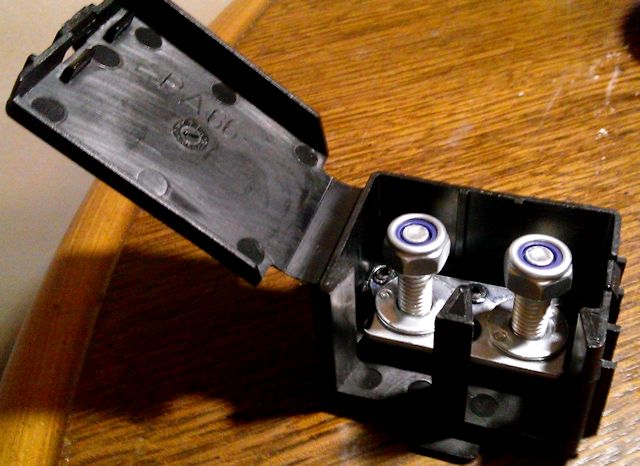
For ther terminal block, you'll need to look at marine/auto terminal blocks in the 300amp range. You'll never draw that much ofcourse but there are many terminal blocks that are for low-draw stuff the rely on philips screws to hold cables firm. You do NOT want those.
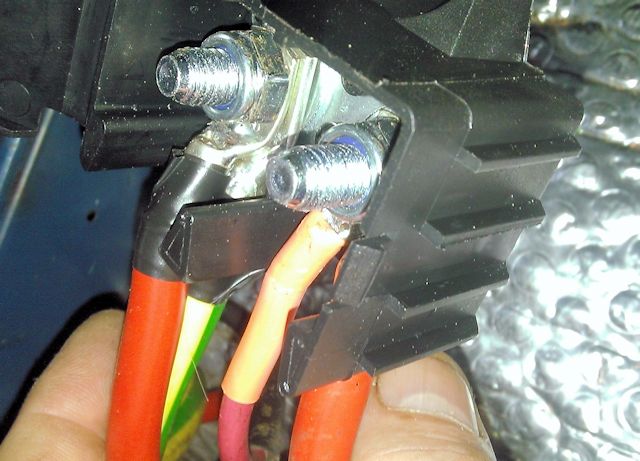
The type I used (above) consists of two 8mm nuts and bolts house in a black insulalted case with a snap-down lid. It doesn't take up too much space and can be screwed/bolted to a convenient position - say inside wall of seat mounting base. Its robust enough and more suited to heavy battery cables. You'll need two of these - one for battery end, and one for under the dash. I paid under £12 for them including postage. See photo below of terminal block with cables in place and lid off:
If you look, the thin red cable on right is the original 6mm cable to dash. On the left is the uprated one which now runs to the terminal block under dash. Beneath these cables is one to battery positive and the other to starter - four cables in all.
It means all those annoying wires that originally terminated at positive terminal can now be fastened inside the terminal block out of harms way, leaving one single cable out of the box to the battery. That makes removing the battery a lot simpler too. I use quick-release clamps on mine.
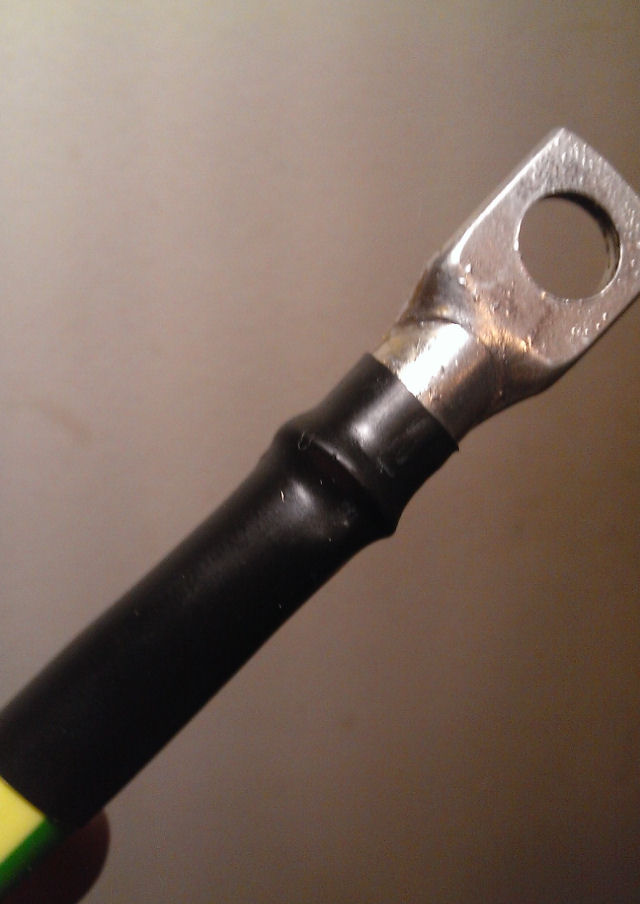
For reliability, you'll need to source good quality connectors for this - soldered 'Copper Tube Terminals' (as below) - not conventional crimp ring connectors, and use proper shrink tubing:
Toolstation do them cheap (branches everywhere and in some places they're based in Wickes): http://www.toolstation.com/shop/Electri ... ugs/p32996
I bought 8mm ones (correct size for terminal block I used) in 6mm, 10mm and 16mm (10 of each in pack) - £6.35 for all of them (30). There should be enough thread in terminal block to stack washers between connectors if you want to space them better.
Part numbers for lugs: 55534, 87832, 11930
You'll need a mini blowtorch or gas soldering iron, flux and solder to fit them but not too tricky and best connection you'll get. REMEMBER to slide shrink tubing on BEFORE you solder on lugs, then slide it back over join and shrink.
Incidentally, I discovered that although I have a small blowtorch, the ALDI workzone gas soldering iron (with soldering bit removed) will also do the job. Did five lugs on the trot with that - not probs. Well worth buying one next time they come in if you don't have access to a gas soldering iron. Forget how much it was - prob under £15.
The best way to route the cable would be underneath the vehicle, suitably tied up out the way (use grommets on any holes you make) and bring it up behind dash and ideally as short a run as possible. You could run it inside but its awkward to hide and not ideal under carpets! From there (with fuses) you can supply headlights or run all the heavy stuff like rad fan & blower etc and leave the existing fusebox for low-draw stuff or even install an extra mini fusebox - up to you.
I guarantee if you go to all this trouble (perhaps a couple of hours max), voltage drops to fusebox or anywhere under the dash won't be a problem, but the headlight harness may need upgrading to really get the best out of it.
More pics to follow....


