Tips or advise for head gasket change - 1.6d

General Technical Questions and Answers last answered over 1 year ago.
You may also want to visit the Wiki(pedia) for a more structured index of T25 repair, maintenance, technical and ownership topics

Moderators: User administrators, Moderators

User avatar
dansto
Registered user
Posts: 14
Joined: 08 Jan 2007, 20:20
80-90 Mem No: 3266
Location: Cambridgeshire 3266

Post by dansto »

I've been doing the same job today...

I had a bit of a disaster when removing the cam sprocket though. I couldn't get any pullers on the sprocket where it was and was at the end of my teather so tried a little gentle persuasion with a hammer - STUPID IDEA. It really doesn't take much 'tapping' to snap the end of the cam off! :cry: :oops: :evil:

Also with my TDC marker in the bell housing lined up, the slot in the cam doesn't, it looks about one tooth out on the cam belt... about 5-10 degrees. I wouldn't have thought it would run that far out? Academic now anyway as I have to replace the cam IF I keep the engine and IF the heads not cracked - I'm not that hopeful, its got very little compression.

I could really do without this after the week I've had (my brand new garage blew down in the wind)

More than likley time to get a 1.9TD in it... been looking all over this evening and can't find anything though!

User avatar
HarryMann
Admin/Mod
Posts: 9610
Joined: 30 Sep 2005, 11:40
80-90 Mem No: 379
Location: Herts, UK

Post by HarryMann »

Its ally, and with a big enough flat plate (and I mean flat, no half measures) it's conceivable you could get 6-7 thou off it in a few hours ... if money's scarce. Start with 80 grade and go to 120 or 180 to finish. Vacuum off the swarf every minute or two, the paper will last.

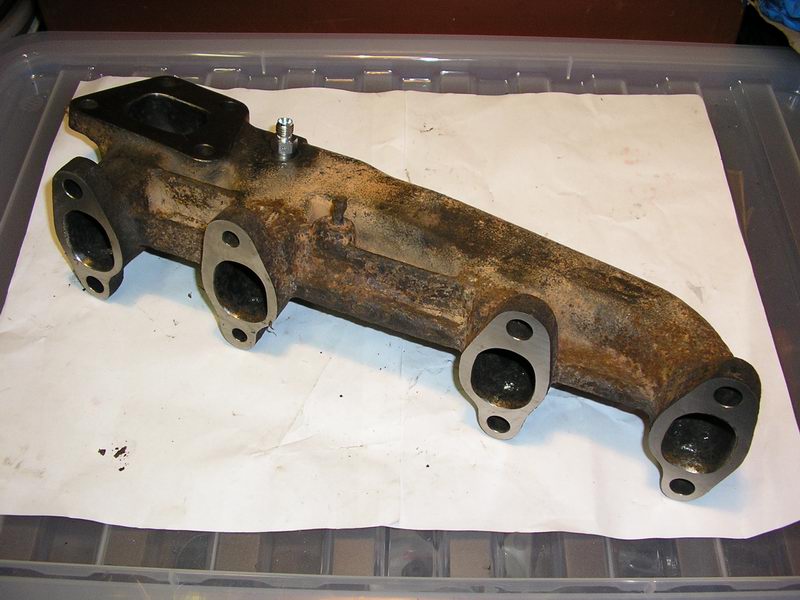
I've just taken 0.025" or so off my exhaust manifold flanges (distorted badly) and that's cast iron as you know and all the turbo's mating faces (iron), ally's a doddle. It can be done, your choice.. use a very thin and even layer of spray-glue, let it almost dry before tacking the paper down on the lapping plate/surface (try checking out a thick glossy kitchen worktop for level, they're pretty flat by most standards!)

PS. White spirit removes spray glue nicely, when changing sheets... and if you're still unhappy - then get it skimmed.

Image

The 80-90 Tech Wikipedia Your 1st port of call :idea

Syncro Kastenwagen / 16" Kombi Camper
Syncronaut No. 1

User avatar
SplendiferousII
Registered user
Posts: 178
Joined: 01 Aug 2006, 08:09
80-90 Mem No: 2893
Location: Membership No 2893 Cornwall / Gloucestershire

Post by SplendiferousII »

Lapping it in by hand is something I have considered, I have done this many times with single cylinder bike engines on herself's glass topped coffee table. I even have a granite surface plate I could use for the job. Its the Swirl Chambers which stop me, they would take a bit longer and I could end up with problems.

I asked my dad last night and he estimated about 2 thou was the max distortion he would consider on an alloy head. He suggested I scrape the head by hand - great idea if Ihave 10K's worth of sine bar, slip gauges surface plate (which I do actually) and about 24 hours of spare time.

Nope its going to the local machine shop.

User avatar
SplendiferousII
Registered user
Posts: 178
Joined: 01 Aug 2006, 08:09
80-90 Mem No: 2893
Location: Membership No 2893 Cornwall / Gloucestershire

Post by SplendiferousII »

Sorry to hear of your problems Dansto - but why were you trying to remove the Cam Pulley? And what the hell was your garage built from?

I have a Golf 1.9TD here on my drive 104K on the clock, I bought it 9 months ago as a donar car for my 1.6d to 1.9TD conversion. I decided against it due to time problems and the fact it would not fit without grief.

You could have that if your desperate, only problem is its now got a full MOT so I would want £350 for it. + it needs a full service including cam belt change etc so it's not a cheap option.

User avatar
HarryMann
Admin/Mod
Posts: 9610
Joined: 30 Sep 2005, 11:40
80-90 Mem No: 379
Location: Herts, UK

Post by HarryMann »

I even have a granite surface plate I could use for the job.

Coffe top no good, too bendy unless sat on another perfectly flat and stiff surface, but that granite surface plate, if big enough superb..

I also, started this lapping surfaces in back in motorbike days :) a long time ago though

Don't be agin butting two sheets of paper together, carefully done it works just fine. Don't be tempted to do what some say, rotate the piece, straight lines but occasionally reverse or work at 90 degrees, but with the head, it might pick up and jerk if flatted off sideways on. I'd do lengthwise strokes or at a slight angle to the length axis and then reverse 180..

Whole thing would need wrapping up in wide masking tape, including the pre-chambers and vacuum, vacuum vacuum :)

The 80-90 Tech Wikipedia Your 1st port of call :idea

Syncro Kastenwagen / 16" Kombi Camper
Syncronaut No. 1

camper
Registered user
Posts: 357
Joined: 30 Oct 2005, 20:26
80-90 Mem No: 1710
Location: Bookham Surrey

Post by camper »

Interestly no one has mentioned that you need to press out the steel inserts for the injectors fuel combustion before its skimmed or other.And to leave them very slightly proud when its pressed back. This allows them to make a good seal on the head gasket

User avatar
dansto
Registered user
Posts: 14
Joined: 08 Jan 2007, 20:20
80-90 Mem No: 3266
Location: Cambridgeshire 3266

Post by dansto »

but why were you trying to remove the Cam Pulley?

It's got a fully enclosed cam belt, so it has to come off! believe me I would have left it on if I could ;)


And what the hell was your garage built from?

One of those cheap (£550) metal garages - it looks pretty strong and I'm sure it would have stood up to the 100mph gusts we got here if I had finished putting the roof on it :oops: (the windiest place in the country that day apparently!). Luckily the insurance is going to pay for it :) its the only time I've ever claimed for anything!

Thanks for the offer of the golf - after a bit of research I've realised thats its probably less hassle just to get the engine I have running.

I can get a cam for £135 locally or EuroCar has two on their site, one for £175 and one for £65 under that same code, so I'm hoping for the £65 option :wink: but neither are in stock. The price of stupidity I suppose :x

By the time I've got the head skimmed (if it needs it, I have yet to check its straight!), the gaskets, head bolts etc its all still going to cost over £200 even if I can get the cheaper cam.

on the plus side the head looks visually on first inspection.

User avatar
SplendiferousII
Registered user
Posts: 178
Joined: 01 Aug 2006, 08:09
80-90 Mem No: 2893
Location: Membership No 2893 Cornwall / Gloucestershire

Post by SplendiferousII »

camper wrote:Interestly no one has mentioned that you need to press out the steel inserts for the injectors fuel combustion before its skimmed or other.And to leave them very slightly proud when its pressed back. This allows them to make a good seal on the head gasket

Is that possible?

User avatar
HarryMann
Admin/Mod
Posts: 9610
Joined: 30 Sep 2005, 11:40
80-90 Mem No: 379
Location: Herts, UK

Post by HarryMann »

That no one has mentioned it previously?

Or that you can remove the pre-chambers?

:)

The 80-90 Tech Wikipedia Your 1st port of call :idea

Syncro Kastenwagen / 16" Kombi Camper
Syncronaut No. 1

camper
Registered user
Posts: 357
Joined: 30 Oct 2005, 20:26
80-90 Mem No: 1710
Location: Bookham Surrey

Post by camper »

I will explain .When i took the 1.6td jx cylinder head to the reconditioners there was a charge for pressing out the steel inserts and refitting.What i refer to is the ferrous part that covers the fuel injector chamber.The reconditioner said these need to be removed before the head is skimmed.Then refitted after the insert seating was recut to allow them to be slightly proud after pressed back.The reconditioner said when the head is refitted to the gasket the fuel injection steel inserts bed into the gasket and form a good seal.No i am not trying to be a clever d---k as the company who did the work is very well known been around over 40 years.And before i had the work done i asked a lot of questions.

User avatar
SplendiferousII
Registered user
Posts: 178
Joined: 01 Aug 2006, 08:09
80-90 Mem No: 2893
Location: Membership No 2893 Cornwall / Gloucestershire

Post by SplendiferousII »

I will make some enquiries, I must confess I have no idea.

User avatar
SplendiferousII
Registered user
Posts: 178
Joined: 01 Aug 2006, 08:09
80-90 Mem No: 2893
Location: Membership No 2893 Cornwall / Gloucestershire

Post by SplendiferousII »

Right, this what I have learnt this morning.

The swirl chamber inserts do need to be removed prior to machining. Heat the whole head and they fall out.

The inserts are usually "cock" on 4mm thick and should stand off by about 2 thou when all is finished - just as stated above to ensure good gasket seating.

During normal running the head expands and the inserts can become lose in the head and can allow a carbon build up behind the inserts.

The best method of sorting this is to remove the inserts, skim the head and than counter bore the recesses, to clean up the seating face and to reset the depth. (4mm - 2 thou)

I could face the head on a plate and then surface grind the inserts to suit, but I am better off using the above method as this at least ensure a new insert seating.

camper
Registered user
Posts: 357
Joined: 30 Oct 2005, 20:26
80-90 Mem No: 1710
Location: Bookham Surrey

Post by camper »

Well done Spendiferousii for providing this information its a learning curve for all of us with the T25s.Thanks and good luck with yours

User avatar
SplendiferousII
Registered user
Posts: 178
Joined: 01 Aug 2006, 08:09
80-90 Mem No: 2893
Location: Membership No 2893 Cornwall / Gloucestershire

Post by SplendiferousII »

Well I dropped the head off to the machine shop to be skimmed this afternoon and this is what the guy told me.

First of all, it was one of those realy old guys in a real old style shop. Belt drive machines etc - the sort of guy you know you can trust.

He took one look at the head and said - your gaskets been gone for a while as it shows water marking in the head (cumbustion chamber) He showed me the little pot marks. This rings true as it did actually use a little water over a long period - 6 months or so = 2 ltrs.

He then proceeded to poke around the swirl chambers and said - leave them in there as they are nice and snug. I can pop them out and reset them but its not worth it and will cause more problems than its worth if I remove them. I said - am I not supposed to have them protruding a couple of thou. He said yes if they are lose or if the head was cast iron.

But in this case No.

Keeping you posted - will ask another question about stub bolts on another post, so go look please.

User avatar
SplendiferousII
Registered user
Posts: 178
Joined: 01 Aug 2006, 08:09
80-90 Mem No: 2893
Location: Membership No 2893 Cornwall / Gloucestershire

Post by SplendiferousII »

Ok the head is back on. Three groove gasket to replace the two groove gasket now the head has been skimmed. Problem with camshaft and no keyway for the pulley - thats on Dansto's post about his camshaft woo's.

Blimey the tightening of the head bolts is scary stuff.

40Nm / 60Nm / 90 degree - all ok up till then. The next 90 is a Nightmare.

I didnt even make 90 on a few of the bolts as the my Snap On ratchet would not take the strain and the ratchet slipped. Ended up going over with the torque wrench to ensure even torque at least.

Will hopefully finish tomorrow.

Splen

Locked