PCB Damage Repair Advice

An alchemy of sparks, copper wire and earth

Moderators: User administrators, Moderators

Post Reply
User avatar
maxstu
Registered user
Posts: 5209
Joined: 07 Feb 2008, 01:05
80-90 Mem No: 3946
Location: Margate

PCB Damage Repair Advice

Post by maxstu »

My Autosleeper HAD a perfect blue foil with everything working. But the clock was a bit lazy on some days. And the temp needle a bit higher than it used to be. So l though l would change out the voltage regulator.

l oh so stupidly slipped with a small screwdriver and cut across these two tracks for clock, temp gauge and temp light.

I did a slight bit of scraping to expose copper tracks and bridged with copper tape (used to stop slugs entering pots) But to no avail. I doesn't stop the slugs either! :rofl

What's the best permanent repair option please?

Regards
Stuart

Image
MaxStu
1987 2.1 Automatic Carb/LPG Autosleeper.
"Blissfully happy in your presence".

silverbullet
Trader
Posts: 17463
Joined: 08 Jun 2009, 09:51
80-90 Mem No: 6908
Location: Surrey Syncronaut #156
Contact:

Re: PCB Damage Repair Advice

Post by silverbullet »

Conductive paint for pcb track repair is a thing. Never used it myself.

PS copper tape probably won't work because the adhesive is an insulator.
1985 Oettinger 3.2 Caravelle RHD syncro twin slider. SA Microbus bumpers, duplex winch system, ARC 7X15 period alloys

User avatar
maxstu
Registered user
Posts: 5209
Joined: 07 Feb 2008, 01:05
80-90 Mem No: 3946
Location: Margate

Re: PCB Damage Repair Advice

Post by maxstu »

Thanks Ian,

Will scrape away more to reveal the copper. Then try some conductive paint.

There's a computer repair shop across the road. Perhaps they can fix it?
MaxStu
1987 2.1 Automatic Carb/LPG Autosleeper.
"Blissfully happy in your presence".

User avatar
Aidan
Trader
Posts: 7289
Joined: 11 Oct 2005, 19:21
80-90 Mem No: 742
Location: Llanfyllin, mid Wales : )

Re: PCB Damage Repair Advice

Post by Aidan »

if you have completely torn through the laminate then you'll need to remove the foil and reinforce the rear with an insulator layer as the plate for the heatsink is also a conductor and could be bridging the two tracks
You can also follow the tracks and do some point to point wiring to replace the tracks, soldering to the component crimps, but you will still need to ensure the original tracks are insulated
The guitar industry uses copper foil that has electroconductive glue for shielding cavities in guitars, I have some of that, could send you a couple of square inches that you could cut up and try, probably best with some conductive paint in addition
I have a petrol clock foil in stock that is pretty good but it has one very poor 14 pin connector track, iirc track 1. I sold the voltage regulator off it to someone on here a couple of years ago as they didn't want to use the reverse pin version that is sold now, though I found it was possible to find the correct one, old stock, from various suppliers, but more expensive than the one Brickie and others sell
AIDAN :)

User avatar
maxstu
Registered user
Posts: 5209
Joined: 07 Feb 2008, 01:05
80-90 Mem No: 3946
Location: Margate

Re: PCB Damage Repair Advice

Post by maxstu »

Thanks. A good piece of advice..

That's what caused the damage. Well l did. :oops: .

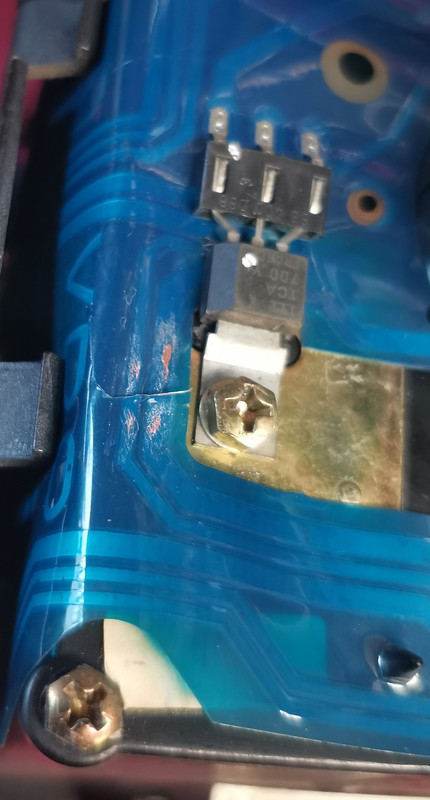
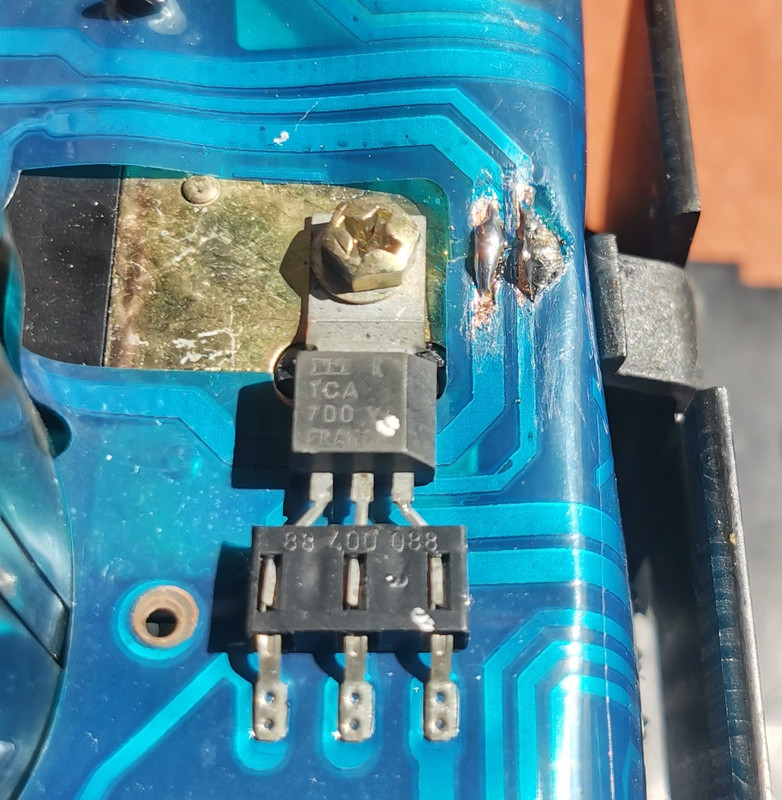
I was replacing the regulator for a reverse Brickie version and slipped across the track and it is now completely in two halves. I was using a watch screwdriver to remove two rubber bumps below the regulator as shown and advised on Brickwerks website. My usual cackhandedness and poor eyesight close up buggers the day.

So that plate the regulator sits on is a heatsink plate? And as it sits under the two broken tracks it could conduct current away and prevent continuity?

Got it thanks.

Thanks for those offers. As l feel a bit out of salts with this, for now l would rather pay someone to fix it properly. Will pop down the road to computer repair place and see of they have a solution. And will inform about the heatsink.

If they are not interested will make use of you kind offer.

Regards
Stuart
MaxStu
1987 2.1 Automatic Carb/LPG Autosleeper.
"Blissfully happy in your presence".

User avatar
maxstu
Registered user
Posts: 5209
Joined: 07 Feb 2008, 01:05
80-90 Mem No: 3946
Location: Margate

Re: PCB Damage Repair Advice

Post by maxstu »

Decided to put my adult trousers on and sort this myself.

I managed to solder the bridge with good results and no interference from the sink plate below.

Image

Clock, coolant light and gauge now working. COOL!

Image

Tested and running as it should....

Plus l now have the odometer & trip working.

But now no oil light again :twisted: l think the bulb has blown. Perhaps something to do with my soldering???

Thanks to all

Stuart
MaxStu
1987 2.1 Automatic Carb/LPG Autosleeper.
"Blissfully happy in your presence".

User avatar
tobydog
Registered user
Posts: 1513
Joined: 07 Mar 2009, 21:03
80-90 Mem No: 6484
Location: Near Saarfend, Essex

Re: PCB Damage Repair Advice

Post by tobydog »

I'd slip a thin piece of card or plastic underneath your repair to be safe  :wink:
 
Knowledge is power
1970 CU

The Hairy Camper
Registered user
Posts: 432
Joined: 03 May 2017, 00:19
80-90 Mem No: 16820
Location: Cheshire

Re: PCB Damage Repair Advice

Post by The Hairy Camper »

tobydog wrote: 12 May 2026, 20:08 I'd slip a thin piece of card or plastic underneath your repair to be safe  :wink:


Some Kapton tape should do a good job insulating the underside
1984 Autosleeper, pop-top, 1.9 1Y, 5-Speed

User avatar
maxstu
Registered user
Posts: 5209
Joined: 07 Feb 2008, 01:05
80-90 Mem No: 3946
Location: Margate

Re: PCB Damage Repair Advice

Post by maxstu »

I will be taking out dash later in summer.
Will insulate sink plate then
MaxStu
1987 2.1 Automatic Carb/LPG Autosleeper.
"Blissfully happy in your presence".

Post Reply