Custom Door Speaker Install....(11 x photos)

Alloys, lowered, tinted or custom painted, in fact any custom work. Discussion and Q&A last answered over 2 years ago.
You may also want to visit the Wiki(pedia) for a more structured index of T25 repair, maintenance, technical and ownership topics.

Moderators: User administrators, Moderators

Locked
User avatar
sonic23
Registered user
Posts: 236
Joined: 26 Oct 2005, 09:06
80-90 Mem No: 1158
Location: Zummer-zet, near Brizol

Custom Door Speaker Install....(11 x photos)

Post by sonic23 »

Right then.....I was fed up with the crap speakers mounted directly to the flimsy doorcards, and have finally found the time to install some juicy 5" component speakers directly to the doors, to match the new head unit i got at Crimbo

I also needed to fit some door whistlestops, new loom boots for the doors, sound deadening, and some grey doorcards, so decided to hit everything in one go.

I have had a set of 6" speakers on a previous van mounted down at the bottom, and to be honest, the sound stage was rubbish, and always fighting the road noise, so I decided from the beginning to mount the speakers high up on the door. I am very pleased with the results. Only a tiny portion of the speaker is hidden by the sides of the dash - but the 5" are much better in the bass department than 4" would be.

The HeadUnit is a Kenwood W5541U (front USB and aux in socket), the components are Hertz ESK130. Speaker cable is Gale (found at the dump). I have no amp - the Head Unit is driving them directly (So all the more reason to make sure they are mounted in an optimum fashion)

The starting point...One crappy set of Pioneer speakers that sounded like a squelchy fart box when turned up:
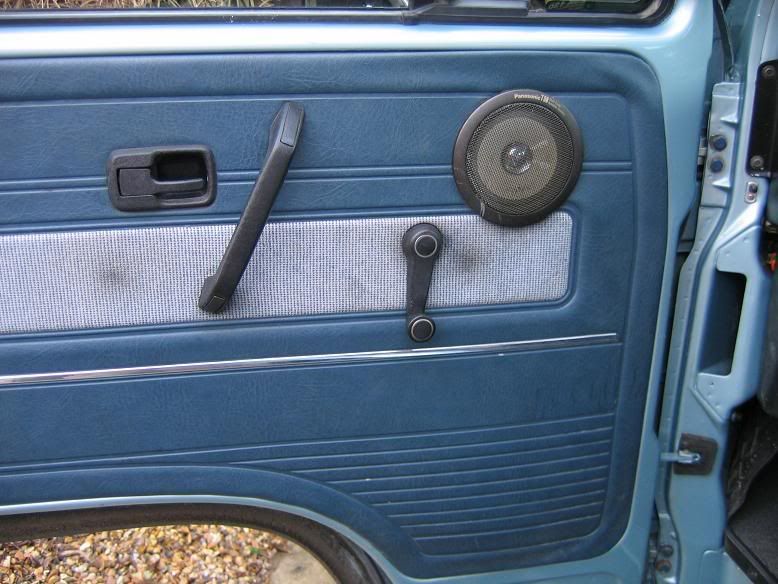
Image

Trimmed a bit of metal to make it easeier to fit/create template. That larger hole also makes it easier to fit a a good layer of sound deadening material onto the outer door skin.
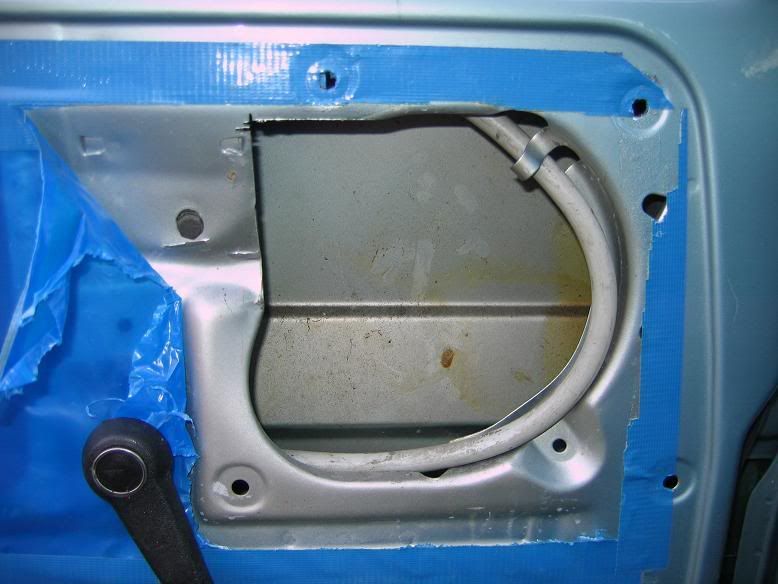
Image

Then I made a cardboard template to fit the hole:
Image

Next a 6mm ply template:
Image

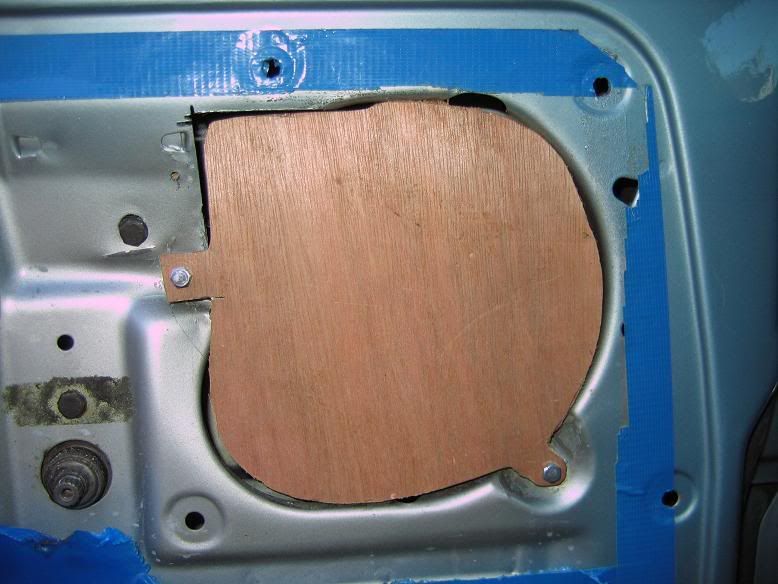
I then remade this template in 14mm ply, and bolted it into place at the 9pm and 5pm positions:
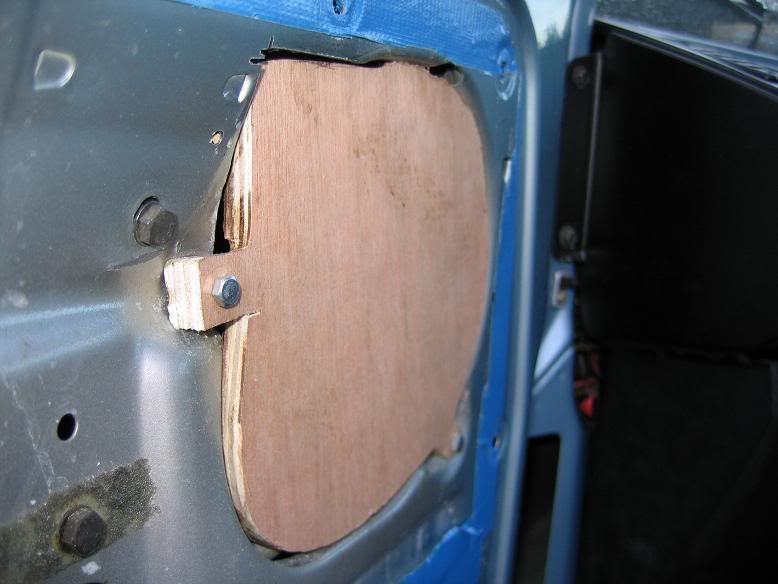
Image

Next I did a check to ensure that the speaker would sit nicely onto the wood. As you can see 5" fit just nicely.
At this point you can draw the hole that needs to be cut. Take the wood back off and then cut it out on a bench:
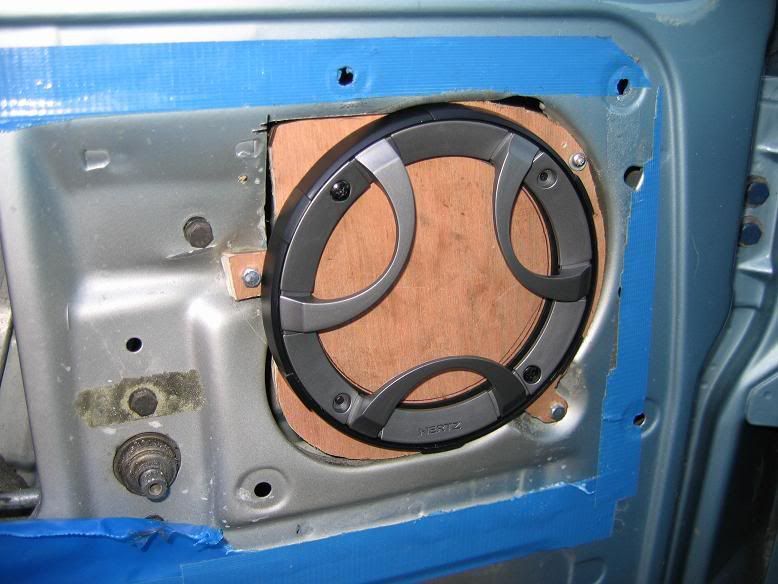
Image

Ok - time to get permanent and fibreglass over the wood and surrounding door frame area (you can see why you need to cut the hole at the previous stage....it would be a pain after fibreglassing) :
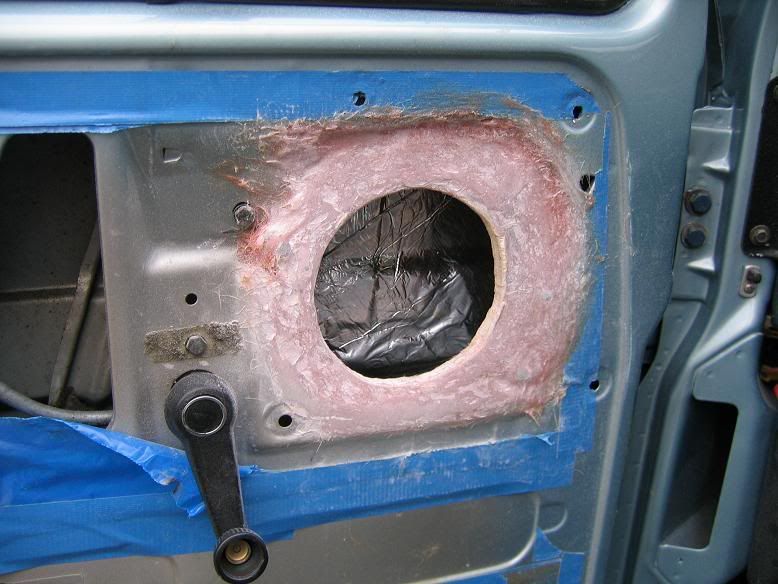
Image

Paint the fibreglass and then Sounddeaden over the top (actually - the door was taken off just prior to this stage after so that I could fit the whistle stops. I also fitted the rubber boots and threaded through the speaker cable too):
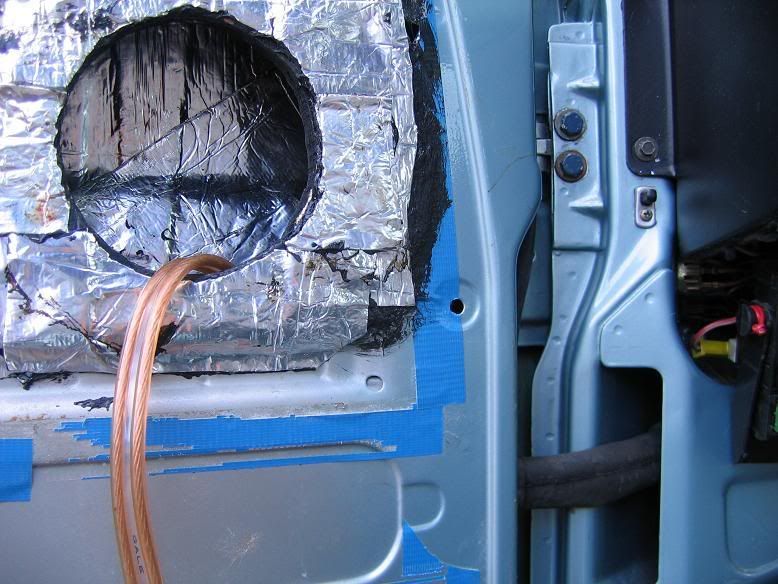
Image

Make sure the water barrier goes back in:
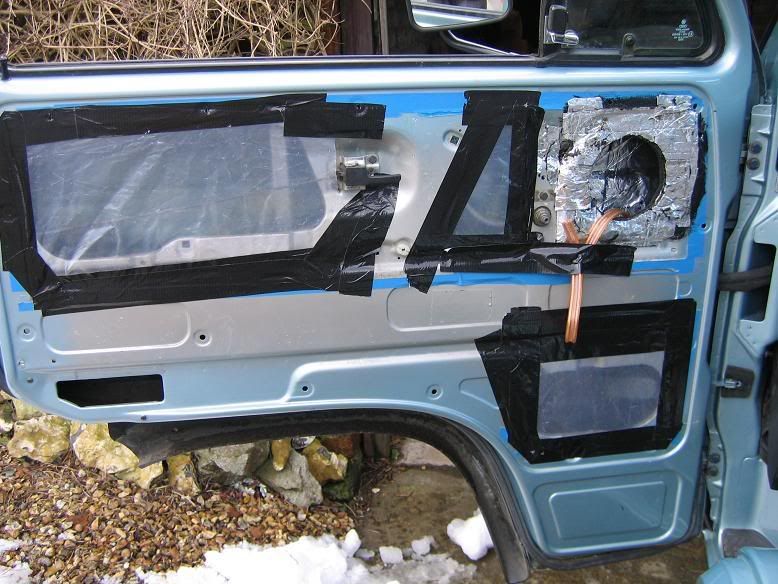
Image

Now sound deaden over the top of the inner skin:
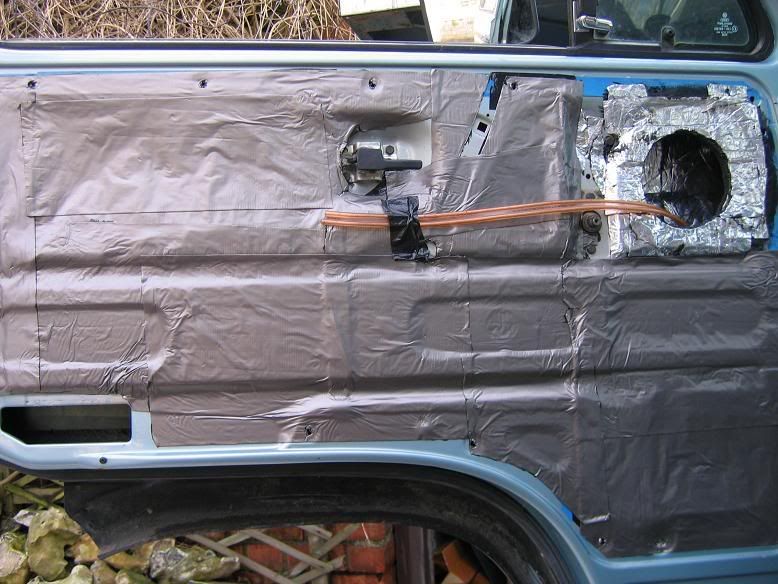
Image

Finally, refit the door card (after some carefull trimming for the speaker hole), and mount the speaker through the door card directly into your new wooden surround:
Image

I'm sure I've made a few mistakes (this is my first custom speaker install).....but I'm very happy with the results.
If you see me at a show or whatever, you're welcome to come have a listen to see what you think.
cheers,
Rich

User avatar
bigshape
Registered user
Posts: 31
Joined: 09 Oct 2006, 14:20
80-90 Mem No: 3121
Location: leicestershire

Re: Custom Door Speaker Install....(11 x photos)

Post by bigshape »

nice install!
hope nowt goes wrong with your windows - it's going to be a right "bar-steward" with all that deadening stuck everywhere!

i was under the imression that sound deadening sheets were more for stopping the resonance in large areas of sheet metal - i.e. the door skins, rather than all over everywhere.
does it make much difference to road noise when the stereo isn't on?
¿ɥɐǝʎ

User avatar
sonic23
Registered user
Posts: 236
Joined: 26 Oct 2005, 09:06
80-90 Mem No: 1158
Location: Zummer-zet, near Brizol

Re: Custom Door Speaker Install....(11 x photos)

Post by sonic23 »

Nah - not really. Ya just cut through it with a sharp knife into the voids behind. To tidy it up you can heat it gently with a hot air gun and it'll come off nicely - then repeat. But i'm hoping i don't have to do it too often. :D

Yes I thought that too about the sound deadening, and ideally you should try and fit some closed cell foam behind there - but there's not much room what with the window mechanisms. However, I thought i'd give it a go with the sound deadening and I think it's made a noticeable decrease in the Road noise. (I double layered it on the outer skin where possible). I also think by covering the voids with it (ontop of the water membrane) you have blocked some of the noise that would have otherwise been coming through. You can talk easily in the cab when driving on the motorway - and you don't have to crank the stereo either.

Rich

User avatar
bigshape
Registered user
Posts: 31
Joined: 09 Oct 2006, 14:20
80-90 Mem No: 3121
Location: leicestershire

Re: Custom Door Speaker Install....(11 x photos)

Post by bigshape »

cool.
i've put some sound deadening on my outer door skins and have noticed a drop in road 'thrum' through the panels.
re-covering the door panels at some point and need to think about speaker positions.
i've already got 2-way components installed in the door cards but the bass speakers are at the bottom and i agree with you about sound stage being crap...
need to move them up or angle them on mounts or something...
¿ɥɐǝʎ

User avatar
sonic23
Registered user
Posts: 236
Joined: 26 Oct 2005, 09:06
80-90 Mem No: 1158
Location: Zummer-zet, near Brizol

Re: Custom Door Speaker Install....(11 x photos)

Post by sonic23 »

Yeah - totally agree with you, you need to either create a pod that can angle speakers up, if located at the bottom of the door - or else locate them at the top of the door.

I can't empahise enough the difference in having then mounted solidly up on the door tops though

User avatar
eatcustard
Registered user
Posts: 1817
Joined: 27 Oct 2008, 07:26
80-90 Mem No: 6062
Contact:

Re: Custom Door Speaker Install....(11 x photos)

Post by eatcustard »

Looks like you have done a good job.

Out of interest when you close the door will the speaker miss the dash?

unlike mine
https://www.penguinjones.co.uk" onclick="window.open(this.href);return false; PM me for your 10% discount

User avatar
belle in progress
Registered user
Posts: 254
Joined: 07 Nov 2005, 14:08
80-90 Mem No: 2205
Location: Romford Essex
Contact:

Re: Custom Door Speaker Install....(11 x photos)

Post by belle in progress »

i thought you were supposed to have base speakers low and high range speakers/tweeters high. base speekers should be able to go any where, even the comp speekers, personally im too lazy for the comp speakers
"if it bends its funny" "if it breaks its even funnier" M&C 1994

User avatar
plurker
Registered user
Posts: 483
Joined: 11 Oct 2005, 09:52
80-90 Mem No: 2359
Location: Brixton, London
Contact:

Re: Custom Door Speaker Install....(11 x photos)

Post by plurker »

.
Last edited by plurker on 30 Jun 2009, 09:51, edited 1 time in total.
Recon 2.1 DJ, 5spd manual
A 16 year build in 300 pictures  8)

User avatar
sonic23
Registered user
Posts: 236
Joined: 26 Oct 2005, 09:06
80-90 Mem No: 1158
Location: Zummer-zet, near Brizol

Re: Custom Door Speaker Install....(11 x photos)

Post by sonic23 »

Ok a few questions to answer.
The speakers do just touch touch the edge of the dashboards - but it doesn't make the slightest bit of difference. I haven't had a good look for flush fit generic speaker grills - but I'm sure you could get them if you looked.

These are only 5" component speakers, so they're not true woofers/subwoofers which can be mounted out of sight. As a result - it does matter where they are mounted - especially since these are not being driven by an amp.

I pulled back the plastic and heated the window winder handles so that I could bend them enough to clear the grills. Took several trips as I didn't want to bend them too much. It works very well indeed. I know that Go Westy in the states can sell offset adapaters to do this job - but it costs too much. I've also read somehwere that you can fit late 90's SEAT winder handles too, which have longer splined fits.

cheers,
Rich

armyphil
Registered user
Posts: 1447
Joined: 03 Jan 2009, 19:57
80-90 Mem No: 6328
Location: Huddersfield

Re: Custom Door Speaker Install....(11 x photos)

Post by armyphil »

this is now a famous link for all vans alike great job
You can say alot of of things with "ar"

1984 syncro westfalia

07732299324

User avatar
slobbo
Registered user
Posts: 214
Joined: 12 Jul 2006, 23:48
80-90 Mem No: 3089
Location: Fife, Scotland
Contact:

Re: Custom Door Speaker Install....(11 x photos)

Post by slobbo »

I've got a nice speaker mount that goes across the roof on Fleabay at the moment. Item number 150356481097. Anybody seen these for sale new anywhere. I've only seen this one. Need the money now but plan on looking for another at some point.
Image
Cheers
Rob.

You only live once, but if you work it right, once is enough.
1987 2.9 litre VR6 powered Syncro - Westy wannabe.

My site - My obsession - http://www.aircooledcrazy.com
VW Xmas cards - http://www.ceinwen.co.uk

billy739
Trader
Posts: 2373
Joined: 20 Oct 2005, 10:00
80-90 Mem No: 1541
Location: gloucester

Re: Custom Door Speaker Install....(11 x photos)

Post by billy739 »

make sure the rear of the speaker is sealed. water gets into the door via the seals and will rot the speaker, also air coming in the door can effect the speaker use

Locked